Description
-
Model List:
- 180 E-Cut Hybrid Walk Greens Mower
- 220 E-Cut Hybrid Walk Greens Mower
- 1. Introduction
- 1.1. Thank You for Purchasing a John Deere Product
- 1.2. Using Your Operators Manual
- 1.3. Special Messages
- 2. Product Identification
- 2.1. Record Identification Numbers
- 3. Table of Contents
- 4. Safety Labels
- 4.1. Safety Label Location
- 4.2. Safety Label Location
- 4.3. Pictorial Safety Signs
- 4.4. Warning
- 4.5. Warning
- 4.6. Warning MT3367
- 4.6.1. Keep All Shields In Place
- 4.7. Label TCU25373 Caution Avoid Injury
- 4.7.1. Help Avoid Injury
- 4.8. Warning TCU27084
- 4.8.1. Help Avoid Injury
- 4.9. Danger MT6517
- 4.10. Danger MT6732
- 4.10.1. Avoid Injury From Rotating Blades
- 4.11. Emission Control System Certification Label
- 4.12. Emission Compliance Period
- 4.13. Certification
- 4.14. Operator Training Required
- 4.15. Preparation
- 4.16. Operating Safely
- 4.17. Using a Spark Arrestor
- 4.18. Checking Mowing Area
- 4.19. Parking Safely
- 4.20. Avoid Injury From Contacting Blades
- 4.21. Rotating Blades are Dangerous Protect Children and Prevent Accidents
- 4.21.1. Protect Children
- 4.22. Wear Appropriate Clothing
- 4.23. Maintenance and Storage
- 4.24. Prevent Fires
- 4.25. Handling Fuel Safely
- 4.25.1. To avoid personal injury or property damage, use extreme care in handling fuel. Fuel is extremely…
- 4.26. Handling Waste Product and Chemicals
- 5. Operating Controls
- 5.1. Operating Controls
- 6. Operating
- 6.1. Daily Operating Checklist
- 6.2. Avoid Damage to Plastic and Painted Surfaces
- 6.3. Adjusting Handlebar Height
- 6.4. Using Operator Controls
- 6.4.1. Using Run Switch
- 6.4.2. Using Operator Presence Bail
- 6.4.3. Using Travel Lever (Forward Travel)
- 6.4.4. Using Park Brake Lever
- 6.4.5. Using Throttle Lever
- 6.4.6. Using Choke Lever
- 6.4.7. Using Fuel ShutOff Valve
- 6.4.8. Using Mow/Backlap Switch
- 6.4.9. Using PTO Switch
- 6.5. Machine Hourmeter
- 6.6. Removing Transport Wheels
- 6.7. Starting the Engine
- 6.8. Stopping the Engine
- 6.9. Operating Turf Conditioner or Rotary Turf Brush (Optional)
- 6.10. ECut Hybrid System Operation
- 6.11. Frequency of Clip (FOC) Adjustment
- 6.12. Testing Safety Systems
- 6.13. Testing Park Brake
- 6.14. Testing Run Switch
- 6.15. Testing Operator Presence Bail
- 6.16. Emergency Stopping
- 6.17. Transporting Machine on Trailer
- 7. Operating Cutting Units
- 7.1. Engaging Cutting Unit
- 7.2. Emergency Stopping Cutting Unit
- 7.3. Adjusting Catcher Basket Height
- 7.4. Removing and Emptying Grasscatchers
- 7.4.1. Removing
- 7.4.2. Installing
- 7.5. Operating Rotary Brush (Optional)
- 7.6. Operating Greens Tender Conditioner (GTC) (Optional)
- 7.7. Cleaning Cutting Unit
- 8. Replacement Parts
- 8.1. Service Literature
- 8.1.1. Order Service Parts Online
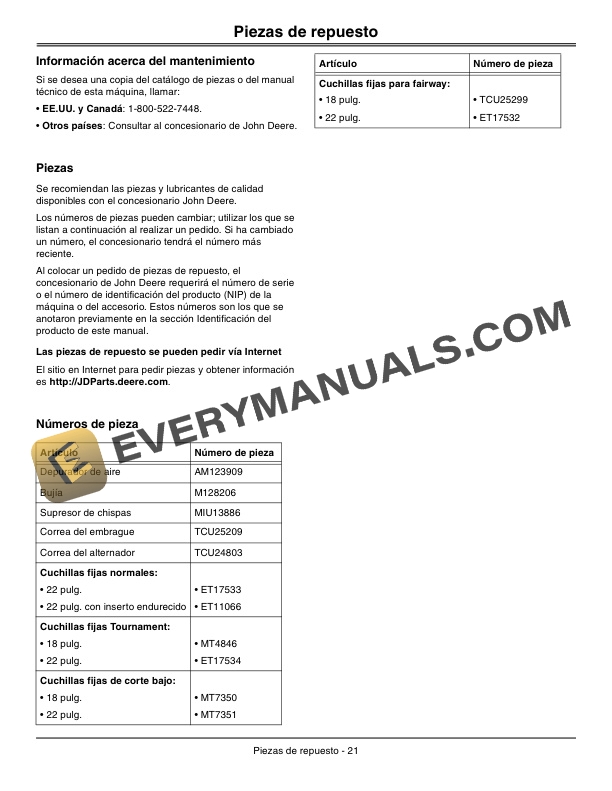
- 8.2. Part Numbers
- 8.2.1. Standard Bed Knives
- 8.2.2. Tournament Bed Knives
- 8.2.3. LowCut Bed Knives
- 8.2.4. Fairway Bed Knives
- 9. Service Intervals
- 9.1. Servicing Your Machine
- 9.2. Breakin After First 5 Hours
- 9.3. Breakin After First 20 Hours
- 9.4. Breakin After 50 Hours
- 9.5. Every 50 Hours
- 9.6. Every 100 Hours
- 9.7. Every 200 Hours
- 9.8. Every 300 Hours
- 9.9. Yearly or every 500 Hours
- 10. Service Lubrication
- 10.0.1. The following greases are preferred
- 10.1. Transmission and Hydraulic Oil
- 10.2. Biodegradable Oil
- 10.2.1. Application
- 10.2.2. Cold Weather Operation
- 10.3. Converting From HYGARD to BIO HYGARD
- 10.4. Lubricating Turf Conditioner or Rotary Turf Brush Drive
- 10.5. Lubricating Reel
- 10.6. Lubricating Input Drives
- 10.7. Lubricating Front Roller
- 10.8. Lubricating Drive Roller
- 10.9. Lubricating Rear Roller and Height of Cut Adjusters
- 10.10. Checking and Filling Gear Case
- 10.11. Lubricating Drive Control Linkage
- 11. Service Engine
- 11.1. Engine Warranty Maintenance Statement
- 11.2. Avoid Fumes
- 11.3. Engine Oil
- 11.3.1. The following oils are also recommended
- 11.3.2. Other oils may be used if they meet one or more of the following
- 11.4. Using Proper Fuel
- 11.5. Filling Fuel Tank
- 11.6. Adjusting Throttle Lever Location
- 11.7. Adjusting Throttle Lever Tension
- 11.8. Cleaning Air Cleaner
- 11.9. Cleaning Fuel Sediment Bowl and Fuel Filter
- 11.10. Checking Engine Oil Level
- 11.11. Changing Engine Oil
- 11.12. Cleaning Spark Plug And Adjusting Electrode Gap
- 11.13. Adjusting Carburetor
- 12. Service Cutting Units
- 12.1. Removing and Installing Cutting Units
- 12.1.1. Removing Cutting Unit
- 12.1.2. Installing Cutting Units
- 12.2. Adjusting Cutting Unit Shield
- 12.3. Adjusting Roller Drive Chains
- 12.4. Adjusting Bed Knife to Reel (QA5 Cutting Units)
- 12.5. Adjusting Front Roller Parallel with Bed Knife (QA5 Cutting Units)
- 12.5.1. Parallelism Adjustment with Bench Plate
- 12.5.2. Parallelism Adjustment with Height of Cut Gauge Bar
- 12.6. Adjusting Height Of Cut Range (QA5 Cutting Units)
- 12.7. Adjusting Height of Cut (QA5 Cutting Units)
- 12.8. Removing and Installing Bed Knife Shoe
- 12.8.1. Removing Bed Knife Shoe
- 12.8.2. Installing Bed Knife Shoe
- 12.9. Replacing Bed Knife (QA5 Cutting Units)
- 12.9.1. Removing Bed Knife
- 12.9.2. Installing Bed Knife
- 12.10. Adjusting Bed Knife and Bed Knife Shoe Position for Worn Reel (QA5 Cutting Units)
- 12.11. Removing and Installing Front Roller (QA5 Cutting Units)
- 12.11.1. Removing Front Roller
- 12.11.2. Installing Front Roller
- 12.12. Removing and Installing Rear Roller (QA5)
- 12.12.1. Removing Rear Roller
- 12.12.2. Installing Rear Roller
- 12.13. Adjusting Rotary Turf Brush
- 12.14. Adjusting Greens Tender Conditioner (GTC) (QA5)
- 12.15. Adjusting Cutting Unit Limit Chains
- 12.16. Adjusting Frequency of Clip (FOC)
- 12.17. Grinding Reel and Bed Knife
- 12.17.1. Reel and Bed Knife Relationship
- 12.17.2. Reasons for Grinding
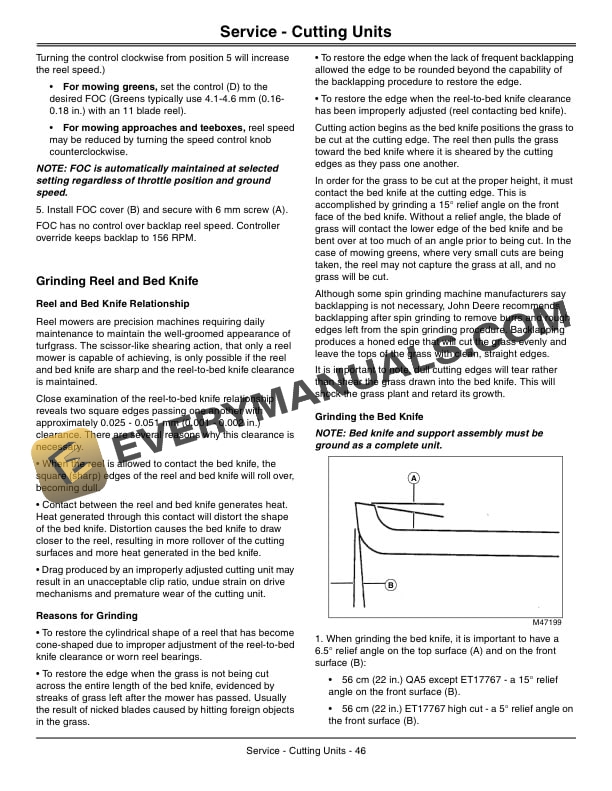
- 12.17.3. Grinding the Bed Knife
- 12.17.4. Grinding the Reel
- 12.18. Backlapping Cutting Unit
- 13. Service Electrical
- 13.1. ECut Hybrid System Service
- 14. Service Belts
- 14.1. Removing Belts
- 14.2. Installing Belts
- 14.3. Drive Belt Tension Check and Adjustment
- 14.3.1. Check Procedure
- 14.3.2. Adjustment Procedure
- 14.4. Adjusting Operator Presence Bail
- 15. Troubleshooting
- 15.1. Using Troubleshooting Chart
- 15.2. ECut Hybrid System Diagnostic Codes
- 16. Storage
- 16.1. Storing Safety
- 16.2. Preparing Machine for Storage
- 16.3. Preparing Fuel and Engine For Storage
- 16.3.1. Fuel Usage with Stabilizers or Conditioners.
- 16.3.2. Fuel Usage without Stabilizers or Conditioners.
- 16.3.3. Engine
- 16.4. Removing Machine From Storage
- 17. Specifications
- 17.0.1. Adjustment Specifications
- 17.1. Fuel System
- 17.1.1. Fuel Types (Recommended)
- 17.2. Capacities
- 17.3. Travel Speeds
- 17.3.1. Traveling Device (Maximum Forward Speed)
- 17.4. Tire Dimensions
- 17.5. Dimensions
- 17.6. Cutting Unit
- 17.6.1. Options
- 17.6.2. Frequency of Clip
- 17.6.3. Cutting Height (Minimum)
- 17.6.4. Cutting Width
- 17.6.5. Clutches
- 17.7. Miscellaneous
- 17.8. Recommended Lubricants
- 18. Warranty
- 18.1. Product Warranty
- 18.2. California and U.S. EPA Emissions Control System Warranty Statement (OffRoad Gas Engines)
- 18.3. Tire Warranty
- 18.4. Limited Battery Warranty
- 18.4.1. TO SECURE WARRANTY SERVICE
- 18.4.2. FREE REPLACEMENT
- 18.4.3. PRO RATA ADJUSTMENT
- 18.4.4. THIS WARRANTY DOES NOT COVER
- 18.4.5. LIMITATION OF IMPLIED WARRANTIES AND PURCHASERS REMEDIES
- 18.4.6. NO DEALER WARRANTY
- 18.4.7. PRO RATA MONTHS OF ADJUSTMENT
- 19. John Deere Quality Statement
- 19.1. John Deere Quality
- 20. Service Record
- 20.1. Record Service Dates