
Description
-
Model List:
- 616R Cutting Platform
- 618R Cutting Platform
- 620R Cutting Platform
- 622R Cutting Platform
- 625R Cutting Platform
- 630R Cutting Platform
- 635R Cutting Platform
- 1. Introduction
- 1.1. Foreword
- 1.2. Trademarks
- 1.3. A Message to Our Customers
- 1.4. John Deere Technical Information Bookstore
- 1.5. Recognize Safety Information
- 1.6. Follow Safety Instructions
- 1.7. Observe Road Traffic Regulations
- 1.8. Use Safety Lights and Devices
- 1.9. Prepare for Emergencies
- 1.10. Wear Protective Clothing
- 1.11. Store Attachments Safely
- 1.12. Guards and Shields
- 1.13. Stay Clear of Harvesting Units
- 1.14. Keep Hands Away From Knives
- 1.15. Stay Clear of Rotating Drivelines
- 1.16. Stay Clear of Cutterbar When Rotating Auger
- 1.17. Ballasting for Safe Ground Contact
- 1.18. Practice Safe Maintenance
- 1.19. Service Machines Safely
- 1.20. Service Drive Belts Safely
- 1.21. Support Machine Properly
- 1.22. Protect Against Noise
- 1.23. Avoid Heating Near Pressurized Fluid Lines
- 1.24. Avoid HighPressure Fluids
- 1.25. Decommissioning Proper Recycling and Disposal of Fluids and Components
- 1.26. Road Transport Disconnect Switch
- 1.27. Replace Safety Signs
- 1.28. Safety SignsTextFree Decals (If Equipped)
- 1.29. Safety SignsText Decals (If Equipped)
- 2. Field Operation
- 2.1. Cutting PlatformtoCombine Adaptation
- 2.2. Rework the WT or S Series Combine (If Necessary)
- 2.3. Attach Cutting Platform
- 2.4. Adjust Cutting Platform Tilt Angle
- 2.5. Header Height Control Skid Plates (If Equipped)
- 2.6. Detach Cutting Platform
- 2.7. Transport Cutting Platform on a Trailer
- 2.8. Calibrate Cutting Platform
- 2.9. Engage Cutting Platform Drive
- 2.10. Operate the Cutting PlatformGeneral
- 2.10.1. Cutting Platform Controls
- 2.10.2. Cutterbar Position
- 2.10.3. Cutting Height
- 2.10.4. Reel Settings
- 2.10.5. Auger Settings
- 2.11. Operate the Cutting PlatformCrop Condition Adaptation
- 2.12. Fine Knife (Option)
- 2.13. Heavy Duty Wear Plates (Option)
- 2.14. Composite Reel Tines (Option)
- 2.15. Skid Plates for Automatic Header Control (Option)
- 2.16. Top Beam Deflector Kit
- 2.17. Knife Protection Guard (If Equipped)
- 2.18. Crop Dividers (Option)
- 2.19. Crop Lifters (Option)
- 2.19.1. Arrangement of Crop Lifters
- 2.19.2. Adapt Crop Lifters to Ground Conditions
- 2.20. Troubleshooting
- 2.20.1. Cutterbar Difficulties
- 2.20.2. Down and Tangled Crops Difficulties
- 2.20.3. Feeder House Difficulties
- 2.20.4. Auger Difficulties
- 2.20.5. Cutting Difficulties
- 2.20.6. Reel Difficulties
- 2.21. Safety Stop for Feeder House Lift Cylinder
- 2.22. Set Safety Stop for Reel Lift Cylinder
- 2.23. Adjust Cutterbar Position
- 2.24. Adjust Reel Fore/Aft and Lift Cylinders Position
- 2.25. Adjust Reel Tine Pitch
- 2.26. Adjust Auger Height
- 2.27. Adjust Auger Fore/Aft
- 2.28. Adjust Auger Finger Timing
- 2.29. Adjust Rear Stripper
- 2.30. Adjust Floor Stripper
- 3. Lubrication and Maintenance
- 3.1. Required EmissionRelated Information
- 3.1.1. Service Provider
- 3.2. Safety Stop for Feeder House Lift Cylinder
- 3.3. Set Safety Stop for Reel Lift Cylinder
- 3.4. Side Shield
- 3.5. Tool Box (Option)
- 3.6. Alternative and Synthetic Lubricants
- 3.7. Mixing of Lubricants
- 3.8. Lubricant Storage
- 3.9. Maintenance Interval Chart
- 3.10. Lubrication Chart
- 3.11. Knife Drive Gear Case
- 3.12. Header Height Control SensorsOnce a Year
- 3.13. Auger Drive Ratchet Clutch
- 3.14. Basic Setting of Reel
- 3.15. Rephase Reel Fore/Aft Cylinders
- 3.16. Rephase Reel Lift Cylinders
- 3.17. Bleed Reel Lift Cylinders
- 3.18. Adjust Reel Speed Sensor
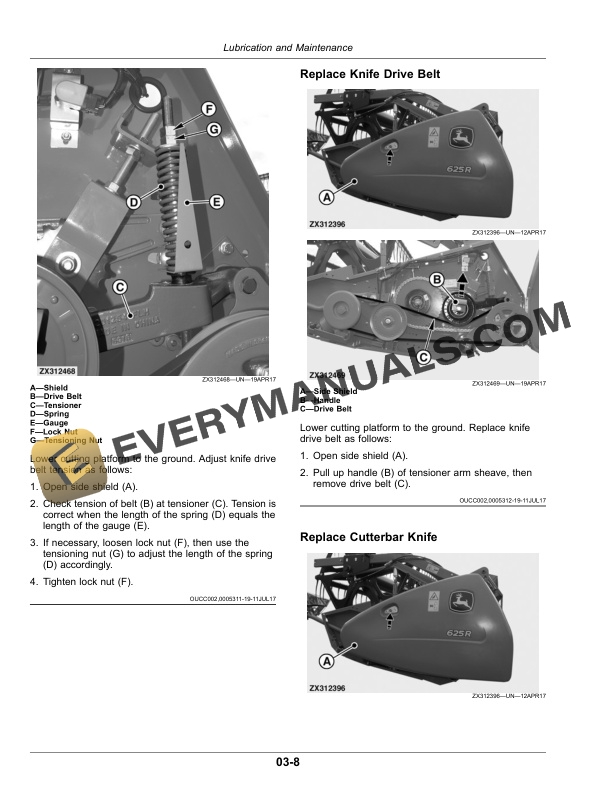
- 3.19. Adjust Knife Drive Belt Tension
- 3.20. Replace Knife Drive Belt
- 3.21. Replace Cutterbar Knife
- 3.22. Align Knife Head and Knife Drive
- 3.23. Adjust Cutterbar HoldDown Clips (Forged Guards Only)
- 3.24. Replace Cutterbar Wear Plates (Forged Guards Only)
- 3.25. Replace Cutterbar Wear Plates (Welded Guards Only)
- 3.26. Replace Knife Sections
- 3.27. Adjust Auger Drive Chain Tension
- 3.28. Replace Auger Drive Chain
- 3.29. Replace Auger Fingers and Retainers
- 3.30. Replace Stubble Light (Light Emitting Diode (LED) LightsIf Equipped)
- 3.31. End of Season
- 3.32. Beginning of Season Service
- 4. Specifications
- 4.1. 635R Cutting Platforms
- 4.1.1. Cutting Platform
- 4.1.2. Conveyor Auger
- 4.2. Type Plates
- 4.3. Cutting Platform (Product Identification) Type Plate
- 4.4. Product Identification Number
- 4.5. Machine Component Serial Numbers
- 4.6. Metric Bolt and Screw Torque Values
- 4.7. Unified Inch Bolt and Screw Torque Values
- 4.8. Keep Machines Secure
- 4.9. Keep Proof of Ownership
- 4.10. UKCA Declaration of Conformity (United Kingdom Only)
- 4.11. EU Declaration of Conformity
- 4.12. Eurasian Economic Union
- 4.13. Machine Design Life
- 5. John Deere Service Literature Available
- 5.1. Technical Information
- 6. John Deere Service Keeps You on the Job
- 6.1. John Deere Parts
- 6.2. The Right Tools
- 6.3. WellTrained Technicians
- 6.4. Prompt Service




