
Description
-
Model List:
- HD200 SelectSpray Attachment For ProGator
- HD300 SelectSpray Attachment For ProGator
- 1. Introduction
- 1.1. Using Your Operators Manual
- 2. Product Identification
- 2.1. Product Compatibility
- 2.2. Record Identification Numbers
- 3. Safety Labels
- 3.1. Understanding The Machine Safety Labels
- 3.2. WARNING MT6300
- 3.3. CAUTION MT6301
- 3.4. WARNING MT6302
- 3.5. DANGER MT6304
- 3.6. Warning
- 3.7. WARNING MT4163
- 3.8. CAUTION MX3605
- 3.9. Read Safety in Machine Operators Manual
- 3.10. Operate Safely
- 3.11. Parking Safely
- 3.12. Mix and Handle Chemicals Safely
- 3.13. Read Chemical Container Label
- 3.14. Handle Chemical Products Safely
- 3.15. Practice Safe Maintenance
- 3.16. Wear Appropriate Clothing
- 3.17. Avoid High Pressure Fluids
- 3.18. Dispose of Chemicals Properly
- 3.19. Handling Waste Product and Chemicals
- 4. Preparing Vehicle
- 4.1. Preparing the Machine
- 4.1.1. Machine Requirements
- 4.1.2. Prepare for Assembly
- 5. Assembly
- 5.1. Control Box Mounting Components
- 5.2. Tank Components
- 5.3. Electrical Components
- 5.4. Pump and Hydraulic Components
- 5.5. Personal Wash Tank Components
- 5.6. Install Control Box
- 5.6.1. Install Mounting Arm
- 5.6.2. Install Box
- 5.7. Install Cylinder Support Bracket (HD300)
- 5.8. Install Sprayer Tank
- 5.9. Install Power Harness
- 5.10. Install Console Wire Harness
- 5.11. Install Sprayer Tank Components
- 5.11.1. Tank Drain Hose
- 5.11.2. Personal Wash Tank Hose
- 5.12. Connect Sprayer Main Harness to Control Box
- 5.13. Connect Rear Wiring Harness
- 5.14. Install Frame Clamps
- 5.14.1. Installing Frame Clamps to Sprayer
- 5.14.2. Securing Sprayer to Frame
- 6. Removing and Storing
- 6.1. Prepare Machine for Removal
- 6.2. Disconnect Hydraulic Hoses
- 6.3. Disconnect Rear Wiring Harness
- 6.4. Removing Sprayer Without Support Stands
- 6.5. Removing Sprayer With Optional Support Stands
- 6.6. Storing Safety
- 6.7. Winterization and Storage
- 6.7.1. Sprayer
- 6.7.2. Foam Marker (If equipped)
- 6.7.3. Hose Reel (If equipped)
- 6.7.4. Personal Wash Tank
- 6.8. Removing From Storage
- 6.8.1. Sprayer
- 6.8.2. Foam Marker (If equipped)
- 6.8.3. Personal Wash Tank
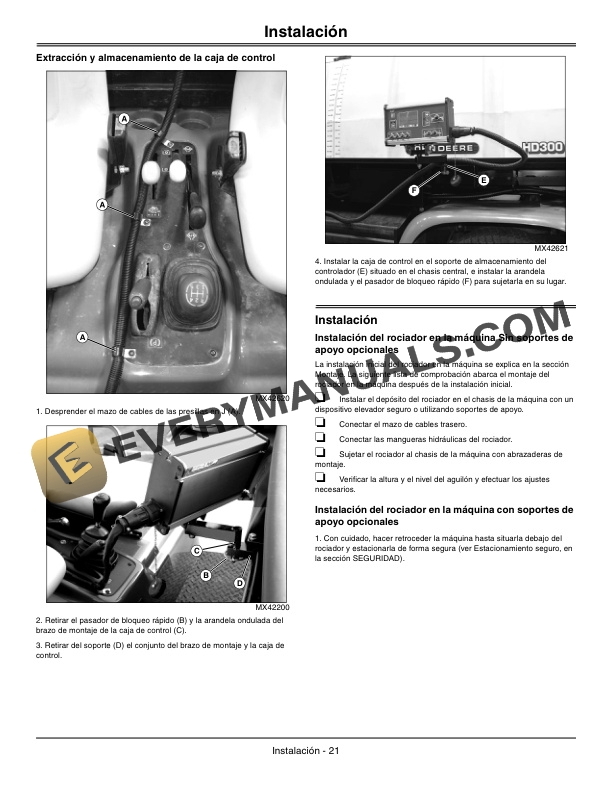
- 6.9. Remove and Store Control Box
- 7. Installing
- 7.1. Installing Sprayer on Machine
- 7.2. Installing Sprayer on Machine With Optional Support Stands
- 8. Operating Controls
- 8.1. Manual Control Box
- 8.2. Automatic Rate Control Box
- 9. Operating
- 9.1. Spray Tip Operation
- 9.2. Spray Tip Selection
- 9.3. Flood Style Spray Tip
- 9.3.1. Nozzle Dimensions
- 9.4. Ultra LowDrift Style Spray Tip
- 9.4.1. Nozzle Dimensions
- 9.5. Flat Fan Style Spray Tip
- 9.5.1. Nozzle Dimensions
- 9.6. Using Manual Control Box
- 9.7. Using Automatic Rate Control Box
- 9.7.1. Area / Volume Display Feature
- 9.7.2. Tank Volume Feature
- 9.7.3. Boost Mode
- 9.7.4. Sensor Alarms
- 9.7.5. User Programmable Tip
- 9.7.6. Power On Controller
- 9.7.7. Power Off Controller
- 9.8. Configuring Automatic Rate Control Box
- 9.9. Automatic Rate Controller Calibration
- 9.9.1. Speed Sensor
- 9.9.2. Pressure Sensor
- 9.9.3. Flow Meter
- 9.10. FLO and PRS Regulation
- 9.10.1. FLO Regulation Mode
- 9.10.2. PRS Regulating Mode
- 9.11. Programming Application Rate with Automatic Rate Control Box
- 9.11.1. Application Rate Adjustments
- 9.12. Operating the Sprayer
- 9.12.1. Stopping the Sprayer
- 9.12.2. Pump Use
- 9.13. Adjusting System Pressure
- 9.14. Using the Personal Wash Tank
- 9.15. Filling and Draining Sprayer Tank
- 9.15.1. Filling the Tank
- 9.15.2. Draining the Tank
- 9.16. Using ThreeWay Valve
- 9.17. Using the Agitator
- 9.18. Adjusting Throttling Valves
- 9.19. Setting System Relief Pressure (Diaphragm Pump Only)
- 9.20. Using Boom Wings
- 9.21. Using Boom Wing Extensions (4.6/6.4 m (15/21 ft) Boom Only)
- 9.22. Adjusting Boom Level and Height
- 9.23. Leveling the Boom Wings
- 9.23.1. Leveling Boom Wings with Ground Wheels (If equipped)
- 9.24. Raising and Lowering Sprayer
- 9.25. Transporting
- 10. Optional Attachments Kits
- 10.1. Using Eductor
- 10.1.1. Operating and Transport Positions
- 10.1.2. Startup
- 10.1.3. Loading Chemicals into Hopper
- 10.1.4. Loading Chemical with Optional Suction Lance
- 10.1.5. Shutdown
- 10.2. Using Foam Marker
- 10.2.1. Operating Foam Marker
- 10.2.2. Adjusting Foam Marker
- 10.2.3. Preparing Foam Marker Solution
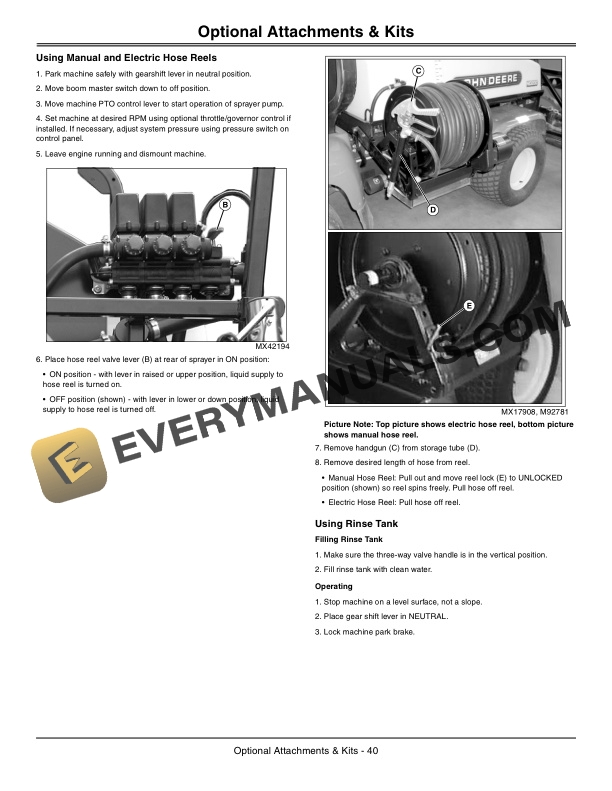
- 10.3. Using Manual and Electric Hose Reels
- 10.4. Using Rinse Tank
- 10.4.1. Filling Rinse Tank
- 10.4.2. Operating
- 11. Service
- 11.1. Service Intervals Standard Equipment
- 11.1.1. Before Each Use
- 11.1.2. After Each Use
- 11.1.3. As Needed
- 11.1.4. Annually
- 11.2. Service Intervals Optional Equipment
- 11.2.1. After Each Use
- 11.2.2. As Needed
- 11.2.3. Hours
- 11.2.4. Hours
- 11.2.5. Annually
- 11.3. Replacement Parts
- 11.4. Cleaning the Sprayer
- 11.5. Servicing the Inline Strainer
- 11.5.1. Backflushing the Inline Strainer
- 11.6. Verifying Sprayer Output
- 11.7. Checking Main Circuit Breaker
- 11.8. Checking Fuses and Boom Wing Actuator Circuit Breaker
- 11.9. Adjusting Boom Wing Spring Tension
- 11.10. Bleeding the Manual Control Box Isolator
- 11.11. Servicing the Diaphragm Pump
- 11.11.1. Valve Inspection and Replacement
- 11.11.2. Accumulator Diaphragm Replacement
- 11.11.3. Pump Diaphragm Replacement
- 11.11.4. Winterization
- 11.12. Lubricating Boom Wing Pivots
- 11.13. Inspecting and Cleaning Vented Fill Covers
- 11.13.1. Sprayer Tank Fill Cover
- 11.13.2. Personal Wash and Foam Marker Tanks
- 11.14. Servicing Foam Marker Kit
- 11.14.1. Foam Solution Pump
- 11.14.2. Foam Solution Strainer
- 11.14.3. Air Line Check Valve
- 11.14.4. Foamhead Check Valves
- 11.14.5. Foamhead Cleaning
- 11.14.6. Winterization
- 11.15. Lubricating Ground Wheels
- 11.16. Lubricating Jack Stands
- 11.17. Servicing Hose Reel
- 11.17.1. Lubricating Electric Hose Reel
- 11.17.2. Lubricating Manual Hose Reel
- 11.17.3. Adjusting Tension Brake
- 12. Troubleshooting
- 12.1. Using Troubleshooting Chart
- 12.2. SelectSpray HD200, HD300
- 13. Specifications
- 13.1. Standard Equipment
- 13.1.1. HD200 Specifications
- 13.1.2. HD300 Specifications
- 13.1.3. Boom Specifications (18 Foot Boom)
- 13.1.4. Boom Specifications (15/21 Foot Boom)
- 13.1.5. Personal Wash Tank Specifications
- 13.2. Optional Equipment
- 13.2.1. Foam Marker Specifications
- 13.2.2. Ground Plane Wheel Specifications
- 13.2.3. Hose Reel Specifications
- 14. Getting Quality Service
- 14.1. Service Literature
- 14.1.1. Order Service Parts Online
- 14.2. John Deere Quality Continues with Quality Service
- 15. Table of Contents