Description
-
Model List:
- S240 Riding Lawn Tractor
- 1. Introduction
- 1.1. Thank You for Purchasing a John Deere Product
- 1.2. Using Your Operators Manual
- 1.3. Special Messages
- 1.3.1. Order Service Parts Online
- 1.4. Service Literature
- 2. Contents
- 3. Product Identification
- 3.1. Record Identification Numbers
- 3.1.1. Lawn Tractors
- 3.1.2. Machine Product Identification Number Location
- 3.1.3. Engine Serial Number Location
- 3.2. Register Your Product and Warranty Online
- 4. Safety Labels Text
- 4.1. Safety Label Location
- 4.2. Understanding The Machine Safety Labels
- 4.2.1. French or Spanish Safety Labels and Operators Manual
- 4.3. WARNING
- 4.3.1. AVOID SERIOUS INJURY OR DEATH
- 4.4. CAUTION
- 4.5. WARNING
- 4.5.1. ROTATING BLADE
- 4.5.2. THROWN OBJECTS
- 5. Safety Labels NoText
- 5.1. Safety Label Location
- 5.2. Understanding The NoText Machine Safety Labels
- 5.3. Read Operators Manual
- 5.4. Keep Children Away from Mower
- 5.5. Avoid Serious Injury or Death From Tipping
- 5.6. Avoid Injury From Equipment Fires
- 5.7. Avoid Injury From Getting Caught in Belts
- 5.8. Avoid Injury From Rotating Blades
- 5.9. Avoid Injury From Hot Surfaces
- 5.10. Avoid Injury From Rotating Blades and Thrown Objects
- 5.11. Avoid Injury From Rotating Blades and Thrown Objects
- 5.12. Operating Safely
- 5.13. Using a Spark Arrestor
- 5.14. Checking Mowing Area
- 5.15. Parking Safely
- 5.16. Rotating Blades are Dangerous
- 5.16.1. HELP PREVENT SERIOUS OR FATAL ACCIDENTS
- 5.17. Protect Children
- 5.18. Operating on Slopes
- 5.18.1. Identify Slopes for Safe Operation
- 5.18.2. Measuring Slopes
- 5.18.3. Operate Safely on Slopes
- 5.18.4. Operating Near Hazards
- 5.19. Keep Riders Off
- 5.20. Towing Loads Safely
- 5.21. Wear Appropriate Clothing
- 5.22. Driving Safely on Public Roads
- 5.23. Practice Safe Maintenance
- 5.24. Avoid High Pressure Fluids
- 5.25. Prevent Fires
- 5.26. Handling Fuel Safely
- 5.27. Tire Safety
- 5.28. Handling Waste Product and Chemicals
- 6. Machine Cleanout
- 6.1. General Cleaning Guidelines
- 6.2. Cleanout Areas
- 7. Operating Controls
- 7.1. Operator Station Controls
- 8. Operating
- 8.1. Daily Operating Checklist
- 8.2. Adjusting Seat
- 8.3. Adjusting Cutting Height
- 8.3.1. Transporting or Getting On and Off Machine
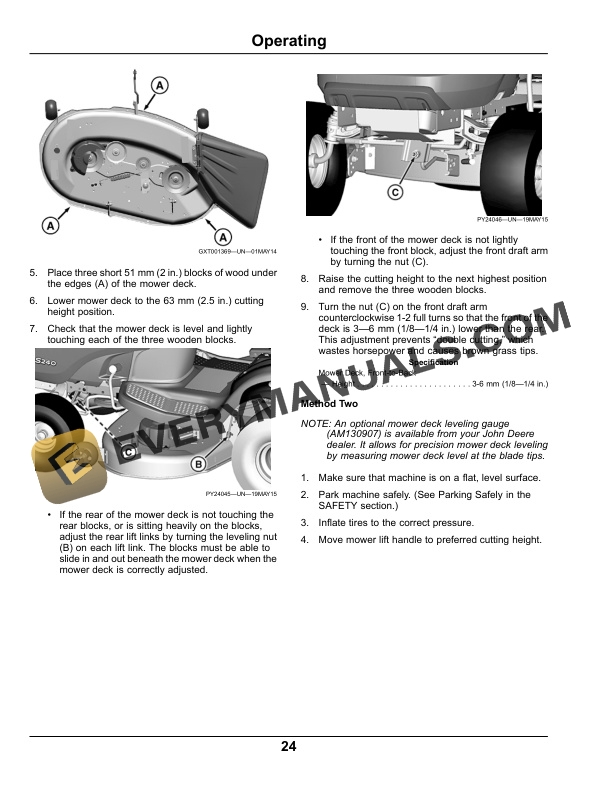
- 8.4. Checking and Adjusting Mower Deck Level
- 8.4.1. Method One
- 8.4.2. Method Two
- 8.5. Adjusting Mower Deck Wheels
- 8.6. Testing Safety Systems
- 8.7. Testing Park Brake Switch
- 8.8. Testing Park Brake
- 8.9. Testing Attachment Engagement Switch
- 8.10. Testing Seat Switch
- 8.11. Testing Reverse Implement Option (RIO)
- 8.12. Using the Park Brake
- 8.12.1. Locking park brake
- 8.12.2. Unlocking park brake
- 8.13. Using the Hourmeter and Service Reminder
- 8.14. Using Key Switch and Headlights
- 8.14.1. Engine Off
- 8.14.2. Engine On
- 8.15. Starting the Engine
- 8.16. Idling the Engine
- 8.17. Stopping the Engine
- 8.18. Using Travel Controls on Hydrostatic Transmission
- 8.18.1. Travel Forward
- 8.18.2. Travel in Reverse
- 8.18.3. Stopping
- 8.18.4. Emergency Stopping
- 8.19. Using The Reverse Implement Option (RIO)
- 8.20. Engaging and Disengaging Mower
- 8.21. Using Wash Port to Clean Mower Deck
- 8.22. Unplugging Mower, Bagger, or Material Collection System
- 8.22.1. Checking For Plugging While Driving
- 8.22.2. Removing Debris From Inspection Points
- 8.23. Moving Machine by Hand
- 8.24. Transporting Machine on Trailer
- 8.25. Transporting Material Collection System (If Equipped)
- 8.26. Using Weights
- 8.27. Using Tire Chains
- 8.28. Using Accessories
- 8.28.1. Using the Power Port (If Equipped)
- 8.28.2. Using CargO Mount System
- 8.29. Choosing Mower Blades
- 8.30. Mowing Tips
- 8.31. Towing Loads
- 9. Service Intervals
- 9.1. Servicing Your Machine
- 9.2. Service Intervals
- 9.2.1. Initial Service 8 Hours
- 9.2.2. Every 25 Hours
- 9.2.3. Yearly or Every 50 Hours (Whichever Comes First)
- 9.2.4. Yearly or Every 100 Hours (Whichever Comes First)
- 9.2.5. Every 200 Hours
- 10. Service Lubrication
- 10.1. Lubricating Front Axle
- 10.1.1. Wheel Spindles
- 10.1.2. Front Axle Pivot
- 10.2. Lubricating Pivot Points
- 10.2.1. Mower Deck
- 11. Service Engine
- 11.1. Emissions Service Information
- 11.1.1. Emission Control System Certification Label
- 11.1.2. Altitude Adjustment (Gasoline or Propane Converted Engines Only)
- 11.2. Avoid Fumes
- 11.3. Engine Oil
- 11.4. Checking Engine Oil Level
- 11.5. Changing Engine Oil and Filter
- 11.6. Cleaning Air Intake Screen and Engine Fins
- 11.7. Cleaning Engine Shroud
- 11.8. Checking and Cleaning Air Cleaner Elements
- 11.9. Checking Spark Plug
- 11.10. Replacing Fuel Filter
- 11.11. Spark Arrestor Maintenance (If Equipped)
- 12. Service Transmission
- 12.1. Checking Transmission
- 13. Service Mower
- 13.1. Removing Mower Deck
- 13.2. Installing Mower Deck
- 13.3. Replacing Mower Drive Belt
- 13.4. Checking for Bent Mower Blades
- 13.5. Servicing Mower Blades
- 13.5.1. Removing Mower Blades
- 13.5.2. Installing Mower Blades
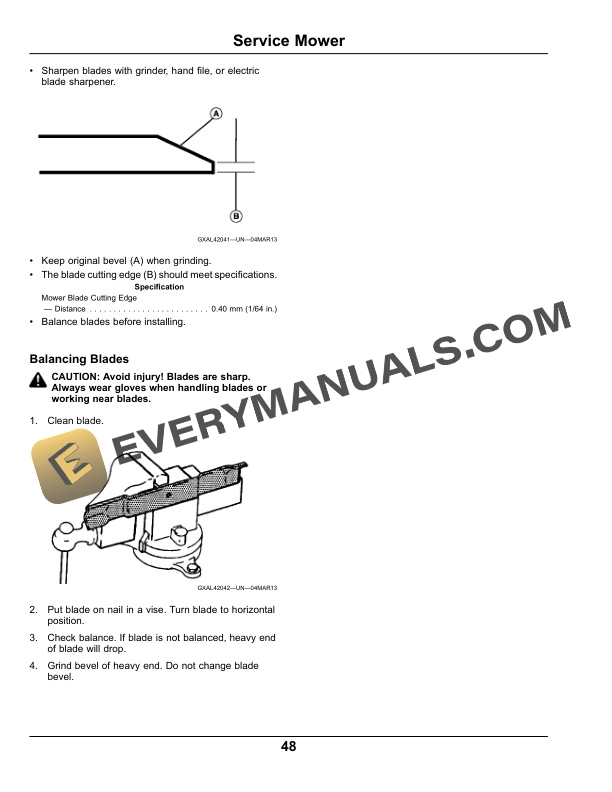
- 13.6. Sharpening Blades
- 13.7. Balancing Blades
- 14. Service Electrical
- 14.1. Electrical
- 14.2. Service the Battery Safely
- 14.3. Removing and Installing the Battery
- 14.3.1. Removing
- 14.3.2. Installing
- 14.4. Cleaning Battery and Terminals
- 14.5. Using Booster Battery
- 14.6. Replacing Headlight Bulb
- 14.7. Replacing Fuse
- 15. Service Miscellaneous
- 15.1. Using Proper Fuel and Stabilizer
- 15.2. Filling Fuel Tank
- 15.3. Lifting Machine
- 15.4. Checking Tire Pressure
- 15.5. Removing and Installing Hood
- 15.5.1. Removing
- 15.5.2. Installing
- 15.6. Cleaning Plastic Surfaces
- 15.7. Cleaning and Repairing Metal Surfaces
- 15.7.1. Cleaning
- 15.7.2. Repairing Minor Scratches (surface scratch)
- 15.7.3. Repairing Deep Scratches (bare metal or primer showing)
- 15.8. Avoid Damage to Plastic and Painted Surfaces
- 15.9. Removing and Installing Front Wheel Assembly
- 15.9.1. Removing
- 15.9.2. Installing
- 15.10. Removing and Installing Rear Wheel Assembly
- 15.10.1. Removing
- 15.10.2. Installing
- 16. Troubleshooting
- 16.1. Using Troubleshooting Chart
- 16.2. Electrical
- 16.3. Tractor
- 17. Storage
- 17.1. Storing Safety
- 17.2. Preparing Machine for Storage
- 17.3. Preparing Fuel and Engine For Storage
- 17.3.1. Engine
- 17.4. Removing Machine From Storage
- 18. Specifications
- 18.1. Model S240
- 18.2. Electrical System
- 18.3. Fuel System
- 18.4. Capacities
- 18.5. Dimensions
- 18.6. Recommended Lubricants
- 18.7. Mower Deck
- 19. Warranty
- 19.1. Product Warranty
- 19.1.1. United States
- 19.2. California and U.S. EPA Emissions Control System Warranty Statement (OffRoad Gas Engines)
- 19.2.1. Your Warranty Rights and Obligations
- 19.2.2. Manufacturers Warranty Coverage
- 19.2.3. Owners Warranty Responsibilities
- 19.2.4. General Emissions Warranty Coverage
- 19.2.5. Emissions Warranty Interpretation
- 19.2.6. Emission Warranty Parts List
- 19.2.7. Limited Liability
- 19.3. Tire Warranty
- 19.4. Limited Battery Warranty For Factory Installed Batteries
- 19.4.1. FREE REPLACEMENT PERIOD
- 19.4.2. PRO RATA ADJUSTMENT (batteries with letter code identification only)
- 19.4.3. THIS WARRANTY DOES NOT COVER
- 19.4.4. LIMITATION OF IMPLIED WARRANTIES AND PURCHASERS REMEDIES
- 19.4.5. NO DEALER WARRANTY
- 19.4.6. WARRANTY TERMS TABLE
- 20. John Deere Quality Statement
- 20.1. John Deere Quality
- 21. Service Record
- 21.1. Record Service Dates
- 22. Slope Gauge
- 22.1. Slope Gauge Template