

Description
-
Model List:
- DO6R XDR Deere-Orthman MaxEmerge 5 Row Unit Package
- DO8R XDR Deere-Orthman MaxEmerge 5 Row Unit Package
- 1. Introduction
- 1.1. Foreword
- 1.2. Product View
- 1.3. A Message to Our Customers
- 1.4. Preliminary Checks
- 1.5. Regions and Country Versions
- 1.6. Machine Overview
- 1.7. Additional Information Required
- 1.8. Recognize Safety Information
- 1.9. Understand Signal Words
- 1.10. Follow Safety Instructions
- 1.11. Park Machine Safely
- 1.12. Operate the Machine Safely
- 1.13. Prevent Machine Runaway
- 1.14. Prepare for Emergencies
- 1.15. Wear Protective Clothing
- 1.16. Keep Riders Off Machine
- 1.17. Use Safety Lights and Devices
- 1.18. Handle Agricultural Chemicals Safely
- 1.19. Use a Safety Chain
- 1.20. Practice Safe Maintenance
- 1.21. Remove Paint Before Welding or Heating
- 1.22. Avoid Heating Near Pressurized Fluid Lines
- 1.23. Avoid HighPressure Fluids
- 1.24. Dispose of Waste Properly
- 1.25. Store Attachments Safely
- 1.26. Releasing Fertilizer Augers Safely
- 2. Safety Signs
- 2.1. Pictorial Safety Signs
- 2.2. Replace Safety Signs
- 3. Preparing the Tractor
- 3.1. Prepare the Tractor
- 4. Preparing Machine
- 4.1. Protecting Hydraulic Motor Seals LowPressure (Case) Drain Connection
- 4.2. Tightening Hardware
- 4.3. Tire Inflation
- 4.4. Lubrication
- 4.5. Adjusting Seed and/or Fertilizer Transmission Wheel Engagement Point
- 5. Attaching and Detaching
- 5.1. Use the Tractor Operators Manual
- 5.2. Tractor Requirements
- 5.3. VacuMeter Motor (Case) Drain Requirements
- 5.4. VacuMeter Hydraulic Motor and Variable Rate Drive Return Coupler
- 5.5. Connect ComputerTrak Harness
- 5.6. Check Hydraulic System
- 5.7. Hydraulic Connections Recommendations
- 5.8. Attaching to Tractor
- 5.9. Attaching Warning Light Harness
- 6. Transporting
- 6.1. Transport Planter
- 7. Operating Machine
- 7.1. General
- 7.2. Leveling the Planter
- 7.3. Raising and Lowering Markers
- 7.4. Adjust Planting Depth of TruVee Planting Units
- 7.5. Closing Wheel Offset
- 7.6. Adjust Closing Wheels for Shallow Planting of Small Seeds
- 7.7. Adjust Closing Wheel Downforce
- 7.8. Center Closing Wheels
- 7.9. Installing and Removing Seed Tubes
- 7.10. Changing Input Sprocket Combinations Seed Transmission
- 7.11. Filling Seed Hoppers
- 7.12. Cleanout and Inspection of Seed Hoppers and Vacuum Meters
- 7.13. Set Vacuum Level
- 7.14. Changing Input Sprocket Combinations (Ground Drive)
- 7.15. Changing Planting Rate Sprocket Combinations (Ground Drive)
- 7.16. Change Input Sprocket Combinations (Contact Drive)
- 7.17. Changing Planting Rate Sprocket Combinations (Contact Drive)
- 7.18. Metering Units
- 8. Population Check
- 8.1. Check Seed Population
- 9. Preparing Vacuum Seed Metering Unit
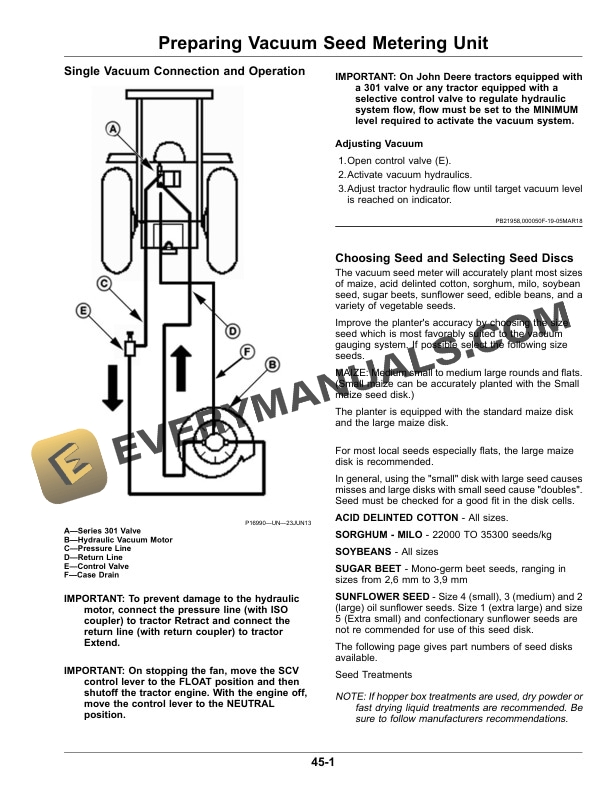
- 9.1. Single Vacuum Connection and Operation
- 9.2. Choosing Seed and Selecting Seed Discs
- 9.3. Vacuum Seed Metering Discs and Equipment
- 9.4. Installing Seed Disc
- 9.5. Adjust Vacuum Gauge Baffle
- 9.6. Selecting Correct Vacuum Gauge Brush
- 9.7. Change Vacuum Gauge Brush
- 9.8. Adjust Meter Hub
- 9.9. Seed Knockout Wheel Operation
- 9.10. Install Knockout Wheel Assembly
- 9.11. Operate Double Eliminator
- 9.12. Check Tractor Hydraulic System
- 9.13. Check Hydraulic Connections
- 10. How to Use Planting Rate Chart (Vacuum)
- 10.1. How to Use Planting Rate Charts
- 10.2. Vacuum Gauge Operating Characteristics
- 10.3. Metric Seed Population Tables for Vacuum Planter Plates
- 10.4. Corn ProMax 40 40 Cells
- 10.5. Corn ProMax 40 40 Cells
- 10.6. Vacuum Level, Baffle Position, and vacuum gauge Brush for Sweet Maize Seed
- 10.7. Maize and Sunflower 30 Cells
- 10.8. Maize and Sunflower 30 Cells
- 10.9. Vacuum Level, Baffle Position, and vacuum gauge Brush for or Maize Seed
- 10.10. Vacuum Level, Baffle Position, and vacuum gauge Brush for Oil Sunflower Seed
- 10.11. Vacuum Level for Oil Sunflower
- 10.12. Large Maize 25 Cells
- 10.13. Large Maize 25 Cells
- 10.14. Vacuum Level, Baffle Position, and vacuum gauge Brush for Large Maize Seed
- 10.15. Sugar Beets 45 Cells
- 10.16. Sugar Beets 45 Cells
- 10.17. Vacuum Level, Baffle Position, and vacuum gauge Brush for Sugar Beet Seed
- 10.18. Virginia Peanut Seed Disc, Part Number H138722 46 Cells
- 10.19. Virginia Peanut Seed Disc, Part Number H138722 46 Cells
- 10.20. Vacuum Level, Baffle Position, and vacuum gauge Brush for Peanuts
- 10.21. High Rate Sorghum 90 Cells
- 10.22. High Rate Sorghum 90 Cells
- 10.23. Vacuum Level, Baffle Position, and vacuum gauge Brush for Sorghum
- 10.24. Sorghum 45 Cells
- 10.25. Sorghum 45 Cells
- 10.26. Vacuum Level, Baffle Position, and vacuum gauge Brush for Sorghum
- 10.27. Soybeans 108 Cells
- 10.28. Soybeans 108 Cells
- 10.29. Vacuum Level, Baffle Position, and vacuum gauge Brush for Soybeans
- 10.30. Cotton 64 Cells
- 10.31. Cotton 64 Cells
- 10.32. Vacuum Level, Baffle Position, and vacuum gauge Brush for Cotton
- 10.33. Large Edible Beans Cell Type 50 Cells
- 10.34. Large Edible Beans Cell Type 50 Cells
- 10.35. Vacuum Level, Baffle Position, and vacuum gauge Brush for Larger Edible Beans
- 10.36. Medium Edible Beans Cell Type 56 Cells
- 10.37. Medium Edible Beans Cell Type 56 Cells
- 10.38. Vacuum Level, Baffle Position, and vacuum gauge Brush for Medium Edible Beans
- 10.39. Small Edible Beans, Cell Type 108 Cells
- 10.40. Small Edible Beans, Cell Type 108 Cells
- 10.41. Large Edible Beans
- 10.42. Large Edible Beans
- 10.43. Large Edible Beans
- 10.44. Vacuum Level, Baffle Position, and vacuum gauge Brush for Small Edible Beans
- 10.45. Lower Seed Populations
- 10.46. Blank Seed Plate
- 11. Dry Fertilizer Table Contact Drive
- 11.1. Dry Fertilizer Delivery Rates
- 11.2. To Change Sprockets
- 11.3. Dry Fertilizer Approximate Delivery Rates in Kilogram Per Hectare 27 Tooth Input for Planters with Contact Drive System
- 11.4. Dry Fertilizer Approximate Delivery Rates in Kilogram Per Hectare 27 Tooth Input for Planters with Contact Drive System
- 11.5. Dry Fertilizer Approximate Delivery Rates in Kilogram Per Hectare 18 Tooth Input for Planters with Contact Drive System
- 11.6. Dry Fertilizer Approximate Delivery Rates in Kilogram Per Hectare 18 Tooth Input for Planters with Contact Drive System
- 11.7. Dry Fertilizer Approximate Delivery Rates in Kilogram Per Hectare 36Tooth Input
- 11.8. Dry Fertilizer Approximate Delivery Rates in Kilogram Per Hectare 36 Tooth Input
- 11.9. Dry Fertilizer Approximate Delivery Rates in Kilogram Per Hectare 16 Tooth Input
- 11.10. Dry Fertilizer Approximate Delivery Rates in Kilogram Per Hectare 16 Tooth Input
- 12. Attachments
- 12.1. Dry Fertilizer
- 12.2. Storing Dry Fertilizer
- 12.3. SingleDisk Fertilizer Openers
- 12.4. Positioning the Fertilizer Opener
- 12.5. Adjust Downforce
- 12.6. Unit down Force Springs
- 13. Troubleshooting
- 13.1. Troubleshooting
- 13.2. Row Units
- 13.3. Troubleshooting Vacuum
- 14. Lubrications and Maintenance
- 14.1. Lubrication
- 14.2. Lubrication Symbols
- 14.3. Lubrication Intervals
- 15. Service and Adjustments
- 15.1. Metric Bolt and Cap Screw Torque Values
- 15.2. Install Service Stops
- 15.3. Mounting Tires
- 15.4. Replacing Drillshaft Cotter Pins
- 15.5. Ratchet Drive
- 15.6. SingleDisc Fertilizer Opener Maintenance
- 15.7. Adjust Gauge Wheels
- 15.8. Replace Seed Opener Blades and Seed Tube Guard
- 15.9. Replacing Cotter Pins in Dry Fertilizer Drive Shaft
- 15.10. Cleaning Dry Fertilizer Hoppers
- 15.11. Replacing Auger Sections
- 16. Service (Vacuum)
- 16.1. Cleaning Blower Motor Guard
- 16.2. Clean Vacuum System
- 16.3. Vacuum Motor Inspection
- 16.4. Inspect and Service Vacuum Meter
- 16.5. Low Rate Milo / Sugar beet Seed Tube
- 16.6. Cleaning Seed Sensor
- 17. Storage
- 17.1. Beginning of the Season Service
- 17.2. Service at the End of the Season
- 18. Storage (Vacuum)
- 18.1. Service at Beginning of Season
- 18.2. Service at the End of Season
- 19. Specifications
- 19.1. Planter Specification
- 19.2. Keep Proof of Ownership
- 19.3. Keep Machines Secure
- 19.4. Record Serial Number
- 20. John Deere Service Keeps You on the Job
- 20.1. John Deere Parts
- 20.2. The Right Tools
- 20.3. WellTrained Technicians
- 20.4. Prompt Service




