Description
-
Model List:
- 100 Series Flail Shredder
- 1. Introduction
- 1.1. Foreword
- 1.2. Identification View
- 1.3. A Message to Our Customers
- 1.4. Preliminary Checks
- 1.5. Regions and Country Versions
- 1.6. Machine Overview
- 1.7. Recognize Safety Information
- 1.8. Understand Signal Words
- 1.9. Follow Safety Instructions
- 1.10. Keep Riders Off Machine
- 1.11. Prepare for Emergencies
- 1.12. Wear Protective Clothing
- 1.13. Use Seat Belt Properly
- 1.14. Use Safety Lights and Devices
- 1.15. Practice Safe Maintenance
- 1.16. Avoid HighPressure Fluids
- 1.17. Store Attachments Safely
- 1.18. Protect Against Noise
- 1.19. Stay Clear of Rotating Drivelines
- 1.20. Remove Paint Before Welding or Heating
- 2. Safety Signs
- 2.1. Rotor Drive Shield Label
- 2.2. Flail Shredder Front Side Labels
- 2.3. Rotor Drive Label
- 2.4. Flail Shredder Rear Side Label
- 2.5. Gear Case Shield Label
- 2.6. Hitch Label
- 3. Preparing the Tractor
- 3.1. Tractor Size
- 3.2. Positioning Tractor Drawbar
- 3.3. Adjusting Tractor Drawbar and Hitch
- 3.4. Checking Ballast, Wheel Spacing, and Tire Inflation
- 3.5. Tractor Brakes
- 4. Preparing the Machine
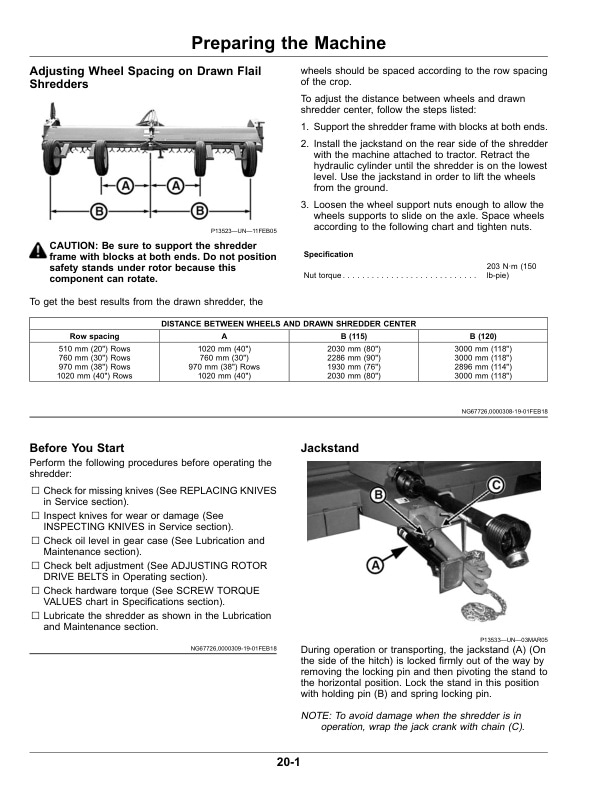
- 4.1. Adjusting Wheel Spacing on Drawn Flail Shredders
- 4.2. Before You Start
- 4.3. Jackstand
- 4.4. Place Jackstand in Vertical Position
- 5. Operating the Machine
- 5.1. BrakeIn the Shredder
- 5.2. Keep Riders off Machine
- 5.3. Follow Safe Operating Procedures
- 5.4. Operating Shredder for Best Performance
- 5.5. Maintaining Rotor Balance
- 5.6. Adjusting Rotor Drive Belts
- 5.7. Adjusting Cutting Height on Flail Shredders
- 5.8. Skid Plates
- 5.9. Support Stand
- 6. Attaching and Detaching
- 6.1. Attaching Shredder to Tractor
- 6.2. Detaching Shredder from Tractor
- 6.3. Use Correct Hose Tips
- 6.4. Attaching PTO Driveline
- 6.5. Checking Operation of the Depth Control Hydraulic Cylinder
- 7. Transporting
- 7.1. Use a Safety Chain
- 7.2. Use Safety Lights and Devices
- 7.3. Tow Loads Safely
- 7.4. Observe Maximum Transport Speed
- 7.5. Transporting Flail Shredder Using Regular Supports
- 7.6. Transporting Flail Shredder Using EasyEnd Transport
- 7.7. Installing Transport Lockup
- 7.8. Preparing the Shredder for Transport
- 7.9. Follow Safe Transport Procedures
- 7.10. Keep Riders off Machine
- 8. Attachments
- 8.1. Disk Hitch
- 8.2. Center Crop Divider
- 8.3. Safety Chain
- 8.4. Crop Deflectors
- 8.5. Rubber Deflectors
- 8.6. EasyEnd Transport
- 8.7. PTO Driveline Used on Flail Shredders
- 9. Assembly
- 9.1. SetUp Time
- 9.2. Assembling Shredder Safely
- 9.3. Assembling Flail Shredder
- 9.4. Disk Hitch
- 9.5. EasyEnd Transport
- 9.6. Center Crop Divider
- 9.7. Installing Warning Lights
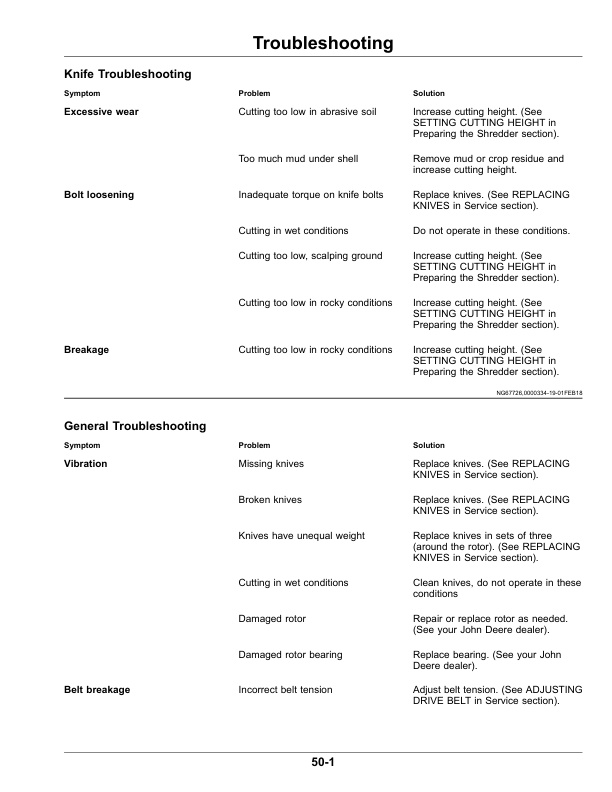
- 10. Troubleshooting
- 10.1. Knife Troubleshooting
- 10.2. General Troubleshooting
- 10.3. Operation Troubleshooting
- 11. Lubrication and Maintenance
- 11.1. Lubricating and Maintaining Machine Safely
- 11.2. Gear Case Lubricant
- 11.3. Grease for General Use
- 11.4. Perform Lubrication and Maintenance
- 11.5. Lubrication Intervals
- 11.6. PTO Driveline
- 11.7. Wheel Support
- 11.8. Drive Pulley
- 11.9. Wheel Support Bar
- 11.10. Adding Oil to the Gear Case
- 11.11. Wheel Bearing
- 12. Service
- 12.1. Practice Safe Service Procedures
- 12.2. Rotor Knives
- 12.3. Inspecting Knives
- 12.4. Inspecting Knife Fasteners(Standard, 68? and Hard Surfaced Knives)
- 12.5. Inspecting Knife Fasteners(Cupped Knives)
- 12.6. Replacing Knives(Standard, 68? and Hard Surfaced)
- 12.7. Replacing Knives(Cupped Knives)
- 12.8. Gear Case Service
- 12.9. Bearing Guards
- 12.10. Crop Deflectors
- 12.11. Rubber Deflectors (Optional)
- 12.12. Bearing Locking Collars
- 12.13. Rotor Drive Belts
- 12.14. Wheel Bearings
- 12.15. Adjusting the Pulleys
- 13. Storage
- 13.1. Store Attachments Safely
- 13.2. End of Season
- 13.3. Beginning of Season
- 13.4. Operators Manual Container
- 14. Specifications
- 14.1. Specifications
- 14.2. Unified Inch Bolt and Screw Torque Values
- 14.3. Metric Bolt and Screw Torque Values
- 14.4. Serial Number
- 15. John Deere Service Keeps You On Job
- 15.1. John Deere Is At Your Service
- 15.2. John Deere Parts
- 15.3. The Right Tools
- 15.4. WellTrained Technicians
- 15.5. Prompt Service