Description
-
Model List:
- 1010 MaxPlanter 2 Row
- 1010 MaxPlanter 3 Row
- 1010 MaxPlanter 4 Row
- 1. Contents
- 1.0.1. Recognize Safety Information
- 1.0.2. Understand Signal Words
- 1.0.3. Follow Safety Instructions
- 1.0.4. Prevent Machine Runaway
- 1.0.5. Operate Machine Safely
- 1.0.6. Keep Riders Off Machine
- 1.0.7. Avoid Rollover Accidents
- 1.0.8. Prepare for Emergencies
- 1.0.9. Wear Protective Clothing
- 1.0.10. Handle Chemicals Safely
- 1.0.11. Granular Chemical Lid Fill Closed Handling System
- 1.0.12. Use Safety Lights and Devices
- 1.0.13. Transport Safety
- 1.0.14. Tow Loads Safely
- 1.0.15. Comply with the Transport Speed Limit
- 1.0.16. Park Machine Safely
- 1.0.17. Practice Safe Maintenance
- 1.0.18. Remove Paint Before Welding or Heating
- 1.0.19. Avoid Heating Near Pressurized Fluid Lines
- 1.0.20. Avoid HighPressure Fluids
- 1.0.21. Store Attachments Safely
- 1.0.22. Decommissioning Proper Recycling and Disposal of Fluids and Components
- 1.1. Safety Signs
- 1.1.1. Implement Drop
- 1.1.2. Chemicals
- 1.1.3. Reflector
- 1.1.4. Safety Lights
- 1.2. Preparing the Tractor
- 1.2.1. Use Your Tractor Operators Manual
- 1.2.2. Check Tractor Hydraulic System
- 1.2.3. Front Counterweight
- 1.2.4. Rear Wheel Counterweight
- 1.2.5. Determining Front End Ballast Without Implement Codes
- 1.2.6. Sway Blocks (If installed)
- 1.2.7. Stabilizer Bar (If installed)
- 1.2.8. Center Link Adjustment
- 1.2.9. Lift Links
- 1.2.10. Vertical Float Adjustment
- 1.2.11. Rockshaft Draft Control
- 1.2.12. Preparing Tractor Drawbar
- 1.2.13. Check Tire Inflation Pressure
- 1.2.14. Setting Position Control Lever Stop
- 1.3. Preparing the Machine
- 1.3.1. Tightening Hardware
- 1.3.2. Wheel Bolt Torque
- 1.3.3. Check Tire Inflation Pressure
- 1.3.4. Rockshaft Control Lever
- 1.4. Attaching and Detaching
- 1.4.1. Use Your Tractor Operators Manual
- 1.4.2. Tractor ThreePoint Hitch
- 1.4.3. Install Rockshaft Hitch Pins
- 1.4.4. Attaching Planter to Tractor
- 1.4.5. Check Hydraulic System
- 1.4.6. Detaching from Tractor
- 1.5. Transporting
- 1.5.1. Transport Safely
- 1.5.2. Transporting
- 1.5.3. Sway Chains or Blocks
- 1.6. Operating the Machine
- 1.6.1. General
- 1.6.2. Adjust Planting Depth
- 1.6.3. Adjust Closing Wheel Down Force
- 1.6.4. Centering Closing Wheels
- 1.6.5. Adjust Closing Wheel Spacing
- 1.6.6. Closing Wheel Offset
- 1.6.7. Planting Depth
- 1.6.8. Penetration in Hard Ground, Conventional Till
- 1.6.9. Penetration in Hard Ground, ReducedTill Planting
- 1.6.10. Seed Disk Installation
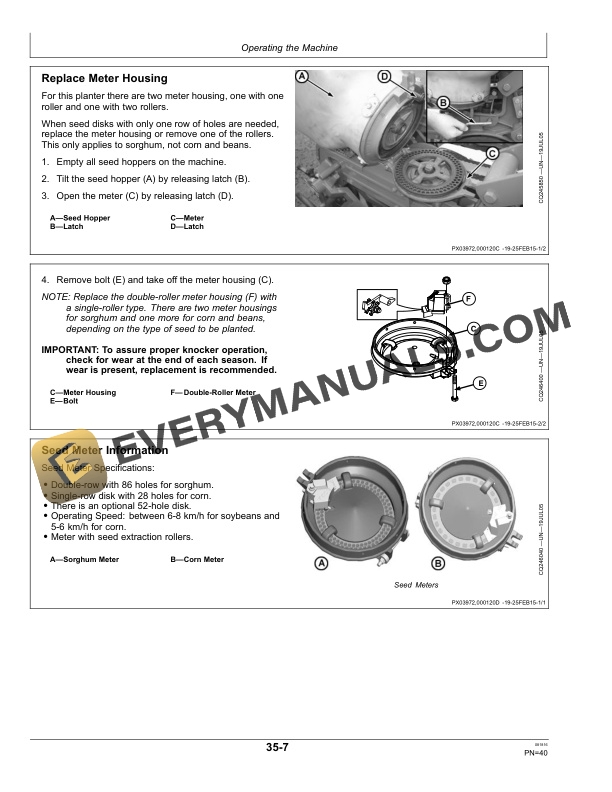
- 1.6.11. Replace Meter Housing
- 1.6.12. Seed Meter Information
- 1.6.13. Seed Meter Operation
- 1.6.14. Seed Disks
- 1.6.15. Row Crops
- 1.6.16. Use of Talc Lubricant
- 1.6.17. Unit Mounted Opener Disks
- 1.6.18. Dry Fertilizer
- 1.6.19. Amount of Fertilizer Applied
- 1.6.20. HoeType Opener
- 1.6.21. Dry Fertilizer Attachment Maintenance
- 1.6.22. Handling Fertilizer
- 1.6.23. TruVee DoubleDisk Seed Openers
- 1.6.24. Press Wheel
- 1.6.25. Filling Seed Hoppers
- 1.7. Checking Seed Population
- 1.7.1. Seed Population
- 1.7.2. Checking Seed Population
- 1.7.3. Check Planter Wheel Slip
- 1.8. Insecticide Attachment
- 1.8.1. Granular Product Attachment
- 1.8.2. Determine Application Rate and Initial Meter Setting
- 1.8.3. Insecticide Application Rates
- 1.9. General Attachments
- 1.9.1. General
- 1.9.2. Rigid Scrapers
- 1.9.3. HeavyDuty Scrapers
- 1.9.4. Weed Separator
- 1.9.5. HoeType Opener
- 1.9.6. Coulter Opener
- 1.9.7. VSections
- 1.9.8. Rigid Closing Shovels for Conventional Tillage
- 1.9.9. Double Down Force Springs
- 1.9.10. DoubleDisk Fertilizer Openers
- 1.9.11. Covering Disks
- 1.9.12. Closing Chain
- 1.9.13. Second Drive Wheel
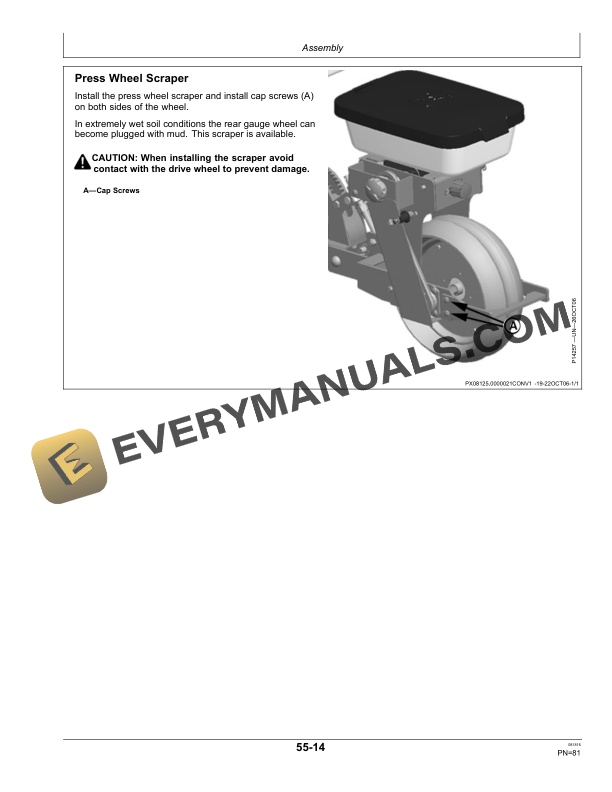
- 1.9.14. Press Wheel Scraper
- 1.10. Assembly
- 1.10.1. Planting Unit to Main Frame
- 1.10.2. Fertilizer Hopper
- 1.10.3. Drive Wheel
- 1.10.4. Hex Drive Shaft
- 1.10.5. Seed Hopper
- 1.10.6. Down Force Springs
- 1.10.7. Furrow Opener Disk
- 1.10.8. Insecticide
- 1.10.9. Opener Disks
- 1.10.10. DoubleDisk Fertilizer Openers
- 1.10.11. Covering Disks
- 1.10.12. Press Wheel Scraper
- 1.10.13. Seed Furrow Opener Assembly Instructions
- 1.10.14. Gauge Wheel Assembly Instructions
- 1.11. Troubleshooting
- 1.11.1. Seed Meter
- 1.11.2. Fertilizer Meter
- 1.11.3. Cutting Disk
- 1.11.4. Insecticide
- 1.12. Lubrication and Maintenance
- 1.12.1. Safe Lubrication and Maintenance of the Machine
- 1.12.2. Lubrication and Maintenance Procedures
- 1.12.3. Lubrication Symbols
- 1.12.4. Alternative Lubricants
- 1.12.5. Safe Maintenance Procedures
- 1.12.6. Practice Safe Maintenance
- 1.12.7. Service Tires Safely
- 1.12.8. Supporting Raised Machine
- 1.12.9. Lubrication and Maintenance Chart
- 1.12.10. Lubrication of Fertilizer, Seed and Insecticide Meter Roller Chain and Sprocket
- 1.12.11. Hour Lubrication
- 1.12.12. Hour Lubrication
- 1.13. Service and Adjustments
- 1.13.1. Using Safe Service Procedures
- 1.13.2. Practice Safe Maintenance
- 1.13.3. Service Tires Safely
- 1.13.4. Metric Bolt and Screw Torque Values
- 1.13.5. Unified Inch Bolt and Screw Torque Values
- 1.13.6. Tightening Wheel Bolts
- 1.13.7. Tighten Drive Chains
- 1.13.8. Check Tire Inflation Pressure
- 1.13.9. Changing Row Width
- 1.13.10. Row width Diagrams for 2Unit Planter without Fertilizer (1.5 m Main Frame)
- 1.13.11. Adjust Meter Chain Drive
- 1.13.12. Coulter Maintenance
- 1.13.13. Inspecting and Adjusting Opener Blades
- 1.13.14. Replacing Seed Opener Disks and Seed Tube Guard
- 1.13.15. Adjusting Gauge Wheels
- 1.13.16. Servicing Wheel Bearings
- 1.13.17. Closing Disk Attachment
- 1.13.18. Drive Wheels
- 1.14. Storage
- 1.14.1. Keep Your Planter Ready
- 1.14.2. Check Hardware and Worn Parts
- 1.14.3. Protect Closing Disks, Openers and Coulter with Grease or Oil
- 1.14.4. Press Wheel
- 1.14.5. Preparation for Storage
- 1.14.6. Removing from Storage
- 1.15. Specifications
- 1.15.1. Specifications
- 1.15.2. Serial Number
- 1.15.3. Keep Proof of Ownership
- 1.15.4. Keep Machines Secure
- 1.16. John Deere Service Keeps You On The Job
- 1.16.1. John Deere Parts
- 1.16.2. The Right Tools
- 1.16.3. WellTrained Technicians
- 1.16.4. Prompt Service
- 2. Page Number
- 2.1. Section 05
- 2.2. Section 10
- 2.3. Section 15
- 2.4. Section 20
- 2.5. Section 25
- 2.6. Section 30
- 2.7. Section 35
- 2.8. Section 40
- 2.9. Section 45
- 2.10. Section 50
- 2.11. Section 55
- 2.12. Section 60
- 2.13. Section 65
- 2.14. Section 70
- 2.15. Section 75
- 2.16. Section 80