
Description
-
Model List:
- 1505 – 1515 Basic Machines
- 1. Introduction
- 1.1. Thank You for Purchasing a John Deere Product
- 1.2. Using Your Operators Manual
- 1.3. Machine Use
- 1.4. Special Messages
- 2. Product Identification
- 2.1. Record Identification Numbers
- 3. Table of Contents
- 4. Safety Labels
- 4.1. Pictorial Safety Signs
- 4.2. Read Operators Manual
- 4.3. Avoid Injury from Tipping (Machine equipped with Cab) DM0143
- 4.4. Warning (Machine equipped with ROPS) TCU30379
- 4.5. Avoid Injury from Fan DM0968
- 4.6. Avoid Injury from Battery Gases and Acids
- 4.7. Avoid Injury from Radiator, Coolant Gases and Fluids
- 4.8. CE Certification, Specification and Sound Labels
- 4.9. Training
- 4.10. Preparation
- 4.11. Operation
- 4.12. Maintenance and Storage
- 4.13. Checking Mowing Area
- 4.14. Parking Safely
- 4.15. Rotating Blades are Dangerous
- 4.15.1. HELP PREVENT SERIOUS OR FATAL ACCIDENTS
- 4.16. Protect Children
- 4.17. Avoid Tipping
- 4.18. Use Seat Belt Properly
- 4.19. Keep ROPS Installed Properly
- 4.20. Keep Riders Off
- 4.21. Towing Loads Safely
- 4.22. Stay Clear of Rotating Drivelines
- 4.23. Avoid High Pressure Fluids
- 4.24. Checking Wheel Hardware
- 4.25. Wear Appropriate Clothing
- 4.26. Prevent Fires
- 4.27. Tire Safety
- 4.28. Handling Fuel Safely
- 4.28.1. To avoid personal injury or property damage, use extreme care in handling fuel. Fuel is extremely…
- 4.29. Handling Waste Product and Chemicals
- 5. Operating Controls
- 5.1. Operator Controls
- 5.1.1. Standard Seat
- 5.1.2. DeLuxe Seat
- 5.1.3. Adjusting Cab Mirrors
- 5.1.4. Changing Wiper Blade
- 5.1.5. Checking and Adjusting Cab Doors
- 5.1.6. Adjust Striker Bolt
- 5.1.7. Opening Cab Doors
- 5.1.8. Locking Cab Doors
- 5.1.9. Operating Cab Windows
- 5.1.10. Cab Controls (optional)
- 5.1.11. A/C Controls (optional)
- 6. Operating
- 6.1. Daily Checklist
- 6.2. Avoid Damage to Plastic and Painted Surfaces
- 6.3. Using Seat Belt
- 6.4. Adjusting Standard Seat
- 6.4.1. Adjusting Seat Position
- 6.4.2. Adjusting Seat Spring Tension
- 6.4.3. Adjusting Seat Height
- 6.4.4. Adjusting Seat Back
- 6.4.5. Adjusting Horizontal Absorber
- 6.5. Adjusting Deluxe Seat
- 6.5.1. Adjusting Seat Position
- 6.5.2. Adjusting Seat Spring Tension
- 6.5.3. Adjusting Seat Height
- 6.5.4. Adjusting Seat Back
- 6.5.5. Adjusting Horizontal Absorber
- 6.5.6. Adjusting Vertical Absorber
- 6.5.7. Adjusting Swivel
- 6.5.8. Adjusting Lumbar Support
- 6.5.9. Adjusting Armrests
- 6.6. Using Throttle Lever
- 6.7. Using Park Brake
- 6.7.1. Locking Hand Brake
- 6.7.2. Unlocking The Hand Brake
- 6.8. Using Parking Light
- 6.9. Adjusting Steering Wheel
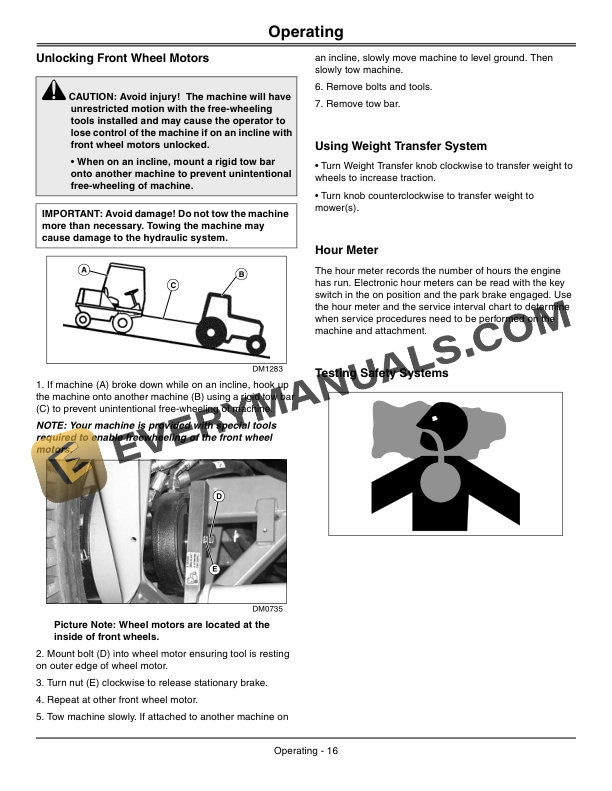
- 6.10. Unlocking Front Wheel Motors
- 6.11. Using Weight Transfer System
- 6.12. Hour Meter
- 6.13. Testing Safety Systems
- 6.14. Testing Lower Lock Switch
- 6.15. Testing Park Brake Switch
- 6.16. Testing Seat Switch
- 6.17. Testing Neutral Switch
- 6.18. Testing Park Brake
- 6.19. Starting the Engine
- 6.20. Using Travel Controls
- 6.21. Driving Machine
- 6.22. Stopping the Engine
- 6.22.1. Emergency Stop
- 6.23. Driving Mower To Work Site
- 6.24. Lifting and Lowering the Mower(s)
- 6.24.1. Using Mowers
- 6.24.2. To Lift Front Mower / 3 Meter Mower (Optional)
- 6.24.3. To Lift Wing Mower / Right Blade of 3 Meter Mower (Optional)
- 6.24.4. To Lift Left Blade of 3 Meter Mower (Optional
- 6.24.5. To Lower Front Mower / 3 Meter Mower (Optional)
- 6.24.6. To Lower Wing Mower (1515)
- 6.25. Using Cross Cut Switch
- 6.26. Transporting Machine on Trailer (1505 / 1515)
- 7. Replacement Parts
- 7.1. Service Literature
- 7.2. Part Numbers
- 8. Service Intervals
- 8.1. Servicing Your Machine
- 8.2. Every Two Days
- 8.3. After First 20 Hours
- 8.4. After First 50 Hours
- 8.5. Every 50 Hours
- 8.6. Every 150 Hours
- 8.7. Every 300 Hours
- 8.8. Every 600 Hours or Yearly
- 9. Service Lubrication
- 9.1. Lubricate Rear Axle
- 9.2. Lubricate Lift Cilinders
- 9.3. Lubricate Wing Arm
- 10. Service Engine
- 10.1. Avoid Fumes
- 10.2. Engine Oil
- 10.3. Checking Engine Oil Level
- 10.4. Changing Engine Oil and Filter
- 10.5. Cleaning Air Intake Screen and Engine Fins
- 10.6. Checking and Replacing Air Filter Elements
- 10.7. Checking Air Restriction Indicator
- 10.8. Cleaning Rubber Dust Unloading Valve
- 10.9. Service Cooling System Safely
- 10.10. Recommended Engine Coolant
- 10.10.1. The following Coolant is preferred
- 10.10.2. If the recommended coolant is not available, use a low silicate ethylene glycol base coolant conc…
- 10.11. Servicing Cooling System
- 10.11.1. Checking Coolant Level
- 10.11.2. Flushing Cooling System
- 10.12. Bleeding Cooling System
- 10.13. Belt, Checking
- 10.13.1. Checking belt
- 10.14. Adjustment procedure
- 10.14.1. Replacing Belt
- 10.15. Servicing Fuel Filter
- 10.15.1. Replacing Fuel Filter
- 10.16. Sediment Bowl, Checking
- 11. Service Transmission
- 11.1. Transmission and Hydraulic Oil
- 11.2. Checking Hydraulic Oil Level
- 11.3. Changing Hydraulic Filters
- 11.3.1. Changing Hydraulic Main Filter
- 11.3.2. Changing Pressure Filter
- 12. Service Electrical
- 12.1. Service the Battery Safely
- 12.2. Removing and Installing the Battery
- 12.2.1. Removing
- 12.2.2. Installing
- 12.3. Cleaning Battery and Terminals
- 12.4. Using Booster Battery
- 12.5. Replacing Relay and Fuses
- 12.6. Checking the White Box
- 12.6.1. Using the SitOnSeat (SOS) Interlock System
- 12.6.2. Diagnostic Patterns
- 13. Service Miscellaneous
- 13.1. Filling Fuel Tank
- 13.2. Checking Tire Pressure
- 13.3. Checking Wheel Bolts
- 13.4. Cleaning Plastic Surfaces
- 13.5. Cleaning and Repairing Metal Surfaces
- 13.5.1. Cleaning
- 13.5.2. Repairing Minor Scratches (surface scratch)
- 13.5.3. Repairing Deep Scratches (bare metal or primer showing)
- 13.6. Raising Hood
- 13.6.1. Lowering
- 14. Troubleshooting
- 14.1. Using Troubleshooting Chart
- 14.2. Electrical
- 14.3. Vehicle
- 14.4. Steering
- 14.5. Hydraulic Drive System
- 14.6. Driving
- 15. Storage
- 15.1. Storing Safety
- 15.2. Preparing Machine For Storage
- 15.3. Removing Machine From Storage
- 16. Assembly
- 16.1. Bag of Parts
- 16.2. Charge The Battery Safely
- 16.2.1. Before You Charge the Battery
- 16.3. Charge The Battery
- 16.4. Check Fluid Levels
- 16.5. Check Machine Safety System
- 16.6. Check Tire Pressure
- 17. Specifications
- 17.1. Series II
- 17.1.1. Engine Specifications
- 17.1.2. Travel Speeds at Full Engine RPM
- 17.1.3. Mowing Speeds at Full Engine RPM
- 17.1.4. Electrical System
- 17.1.5. Battery
- 17.1.6. Capacities
- 17.1.7. Dimensions
- 17.1.8. Recommended Lubricants
- 17.1.9. Tightening Torque
- 18. Declaration of Conformity
- 18.1. EC Declaration of Conformity
- 19. Service Statement
- 19.1. John Deere Parts
- 19.2. The Right Tools
- 19.3. WellTrained Technicians
- 19.4. Prompt Service
- 20. Service Record
- 20.1. Record Service Dates