Description
-
Model List:
- 2653A Diesel Professional Utility Mower
- 1. Introduction
- 1.1. Thank You for Purchasing a John Deere Product
- 1.2. Using Your Operators Manual
- 1.3. Machine Use
- 1.4. Special Messages
- 2. Product Identification
- 2.1. Record Identification Numbers
- 3. Table of Contents
- 4. Safety Labels
- 4.1. Pictorial Safety Signs
- 4.2. Avoid Injury from Tipping
- 4.2.1. Park Brake
- 4.2.2. Weight Transfer Valve
- 4.2.3. Throttle Lever
- 4.3. Warning Hot Surface
- 4.4. Avoid Bodily Injury
- 4.5. Avoid Injury from Battery Gases and Acids
- 4.6. Tow Valve Label
- 4.7. Warning Rotating Blades
- 4.8. CE Certification, Specification and Sound Label
- 4.9. CE Specifications Label
- 4.10. Training
- 4.11. Preparation
- 4.12. Operation
- 4.13. Maintenance and Storage
- 4.14. Checking Mowing Area
- 4.15. Parking Safely
- 4.16. Avoid Injury From Contacting Blades
- 4.17. Protect Children
- 4.18. Avoid Tipping
- 4.19. Keep Riders Off
- 4.20. Checking Wheel Hardware
- 4.21. Wear Appropriate Clothing
- 4.22. Avoid High Pressure Fluids
- 4.23. Prevent Fires
- 4.24. Tire Safety
- 4.25. Handling Fuel Safely
- 4.25.1. To avoid personal injury or property damage, use extreme care in handling fuel. Fuel is extremely…
- 4.26. Handling Waste Product and Chemicals
- 5. Operating Machine
- 5.1. Daily Operating Checklist
- 5.2. Avoid Damage to Plastic and Painted Surfaces
- 5.3. Dash Platform Controls
- 5.4. Foot Controls
- 5.5. Miscellaneous Controls
- 5.6. Adjusting Standard Seat
- 5.7. Adjusting Deluxe Seat
- 5.7.1. Select Seat Position
- 5.7.2. Adjust Ride Comfort
- 5.8. Testing Safety Systems
- 5.9. Checking Ignition Interlock Switches
- 5.10. Using Fuel ShutOff Valve
- 5.11. Using Park Brake
- 5.12. Using Mow Lift Lever
- 5.13. Using Hydrostatic Ground Drive
- 5.14. Using the PTO Switch
- 5.15. Using Throttle Lever
- 5.16. Using Glow Plug
- 5.17. Using FreeWheeling Lever
- 5.18. Using The Weight Transfer Control
- 5.19. Using Ignition Interlock System
- 5.20. Starting The Engine
- 5.21. Checking Indicator Lights
- 5.21.1. After engine starts
- 5.22. Warming and Idling Engine
- 5.22.1. Warming Engine
- 5.22.2. Idling Engine
- 5.23. Stopping Engine
- 5.24. Using Hydrostatic Transmission
- 5.25. Emergency Stopping
- 6. Operating Cutting Units
- 6.1. Cutting Taller Grass (Front Rollers Are Optional)
- 6.2. Cutting Shorter Grass
- 6.3. Grass Deflector
- 6.4. Engaging Reel Drive
- 7. Replacement Parts
- 7.1. Service Literature
- 7.1.1. Order Service Parts Online
- 7.2. Part Numbers
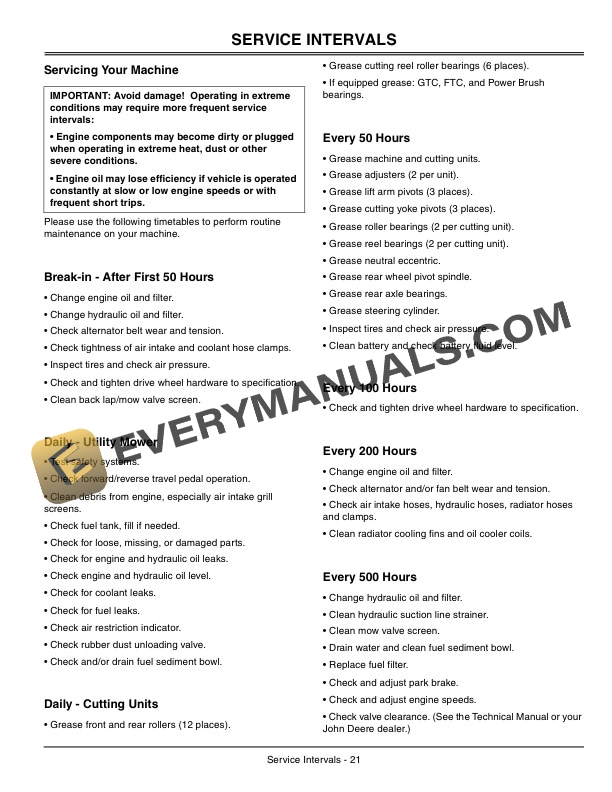
- 8. Service Intervals
- 8.1. Servicing Your Machine
- 8.2. Breakin After First 50 Hours
- 8.3. Daily Utility Mower
- 8.4. Daily Cutting Units
- 8.5. Every 50 Hours
- 8.6. Every 100 Hours
- 8.7. Every 200 Hours
- 8.8. Every 500 Hours
- 8.9. Every 1500 Hours or Two Years
- 8.10. Every 2000 Hours or Two Years
- 8.11. Every 3000 Hours or Three Years
- 8.12. As Needed
- 9. Service Lubrication
- 9.0.1. Chassis and Rollers
- 9.0.2. Cutting Units
- 9.0.3. Other greases that can be used
- 9.1. Grease All Locations Every 50 Hours
- 10. Service Engine
- 10.1. Avoid Fumes
- 10.2. Engine Oil Diesel Model
- 10.2.1. The following John Deere oils are preferred
- 10.2.2. Other oils may be used if above John Deere oils are not available, provided they meet one of the …
- 10.3. Checking Engine Oil Level
- 10.4. Changing Engine Oil and Filter
- 10.5. Cleaning Plenum Air Intake Screens
- 10.6. Checking Air Restriction Indicator
- 10.7. Replacing Air Cleaner Element
- 10.8. Clean Rubber Dust Unloading Valve
- 10.9. Service Cooling System Safely
- 10.10. Recommended Engine Coolant
- 10.10.1. The following John Deere coolants are preferred
- 10.10.2. If neither of the recommended coolants is available, use a glycol base coolant that meets the fol…
- 10.11. Checking Coolant Level
- 10.12. Draining Cooling System
- 10.13. Flushing Cooling System
- 10.14. Filling Cooling System
- 10.15. Checking Sediment Bowl
- 10.16. Cleaning Fuel Filter Sediment Bowl
- 10.17. Bleeding Fuel System
- 11. Service Transmission
- 11.1. Transmission and Hydraulic Oil
- 11.2. Checking Hydrostatic Drive Oil Level
- 11.3. Changing Hydrostatic Drive Oil
- 11.4. Replacing Hydrostatic Drive Oil Filter
- 11.5. Adjusting Transmission Neutral Creep
- 11.6. Adjusting the Neutral Start Switch
- 11.6.1. Testing Neutral Start Switch
- 11.6.2. Adjusting the Neutral Switch
- 12. Service Cutting Units
- 12.1. Avoid Injury from Contacting Blades
- 12.2. Adjusting Cutting Units
- 12.3. Adjusting HeightofCut
- 12.4. Adjusting ReelToBed Knife Clearance
- 12.5. Adjust Lift Arm Bumper Stops
- 12.6. Backlapping Cutting Units
- 12.7. Readjust ReelToBed Knife Clearance
- 12.8. Grinding Bed Knife
- 12.9. Replacing Bed Knife
- 13. Service Electrical
- 13.1. Service the Battery Safely
- 13.2. Checking Battery Electrolyte Level
- 13.3. Cleaning Or Replacing Battery
- 13.4. Using Booster Battery
- 13.5. Replacing Fuses
- 13.6. Replacing Indicator Light Bulb
- 14. Service Miscellaneous
- 14.1. Using Proper Fuel (Diesel)
- 14.1.1. Sulfur content
- 14.1.2. Using BioDiesel Fuel
- 14.1.3. Handling and Storing Diesel Fuel
- 14.2. Filling Fuel Tank
- 14.3. Checking Tire Pressure
- 14.4. Tighten Wheel Bolts
- 14.5. Adjusting Park Brake
- 14.6. Cleaning Equipment Properly After Use
- 14.7. Cleaning Plastic Surfaces
- 14.8. Raising Hood
- 15. Troubleshooting
- 15.1. Using Troubleshooting Chart
- 15.2. Electrical
- 15.3. Hydraulic Drive System
- 15.4. Hydrostatic Drive
- 15.5. Cutting Units
- 15.6. Steering
- 16. Storage
- 16.1. Storing Safety
- 16.2. Preparing Fuel and Engine For Storage
- 16.2.1. Engine
- 16.3. Removing Machine From Storage
- 17. Assembly
- 17.1. Service the Battery Safely
- 17.2. Charge Battery
- 17.3. Install Steering Wheel
- 17.4. Install Tires
- 17.5. Install Seat (Standard or Deluxe)
- 17.6. Remove Machine From Crating
- 17.7. Install Front Roller and Lift Arm Assembly
- 17.8. Adjust Lift Arm Bumper Stops
- 17.9. Checking Tire Pressure
- 17.10. Checking Fluid Levels
- 17.11. Checking Machine Safety System
- 18. Specifications
- 18.1. Engine Specifications
- 18.2. Fuel System
- 18.3. Electrical System
- 18.4. Fluid Capacities
- 18.5. Wheel Motor and Reel Drive
- 18.6. Travel Speeds
- 18.7. Cutting Units
- 18.8. Steering and Brakes
- 18.9. Dimensions
- 18.10. Recommended Lubricants
- 18.11. Sound Measurement
- 18.11.1. Average Sound Level
- 18.12. Vibration Measurements
- 18.12.1. Hand/Arm Measured Per ISO 5349
- 18.12.2. Whole Body
- 19. Declaration of Conformity
- 19.1. Utility Mower 2653A
- 20. Service Statement
- 20.1. John Deere Parts
- 20.2. The Right Tools
- 20.3. WellTrained Technicians
- 20.4. Prompt Service
- 21. Service Record
- 21.1. Record Service Dates