Description
-
Model List:
- 600D Series Draper Platform
- 1. Contents
- 1.1. Safety Features
- 1.1.1. Platform Safety Features
- 1.1.2. Recognize Safety Information
- 1.1.3. Understand Signal Words
- 1.1.4. Use Safety Lights and Devices
- 1.1.5. Follow Safety Instructions
- 1.1.6. Spanish Safety Signs and Operators Manual
- 1.1.7. Wear Protective Clothing
- 1.1.8. Prepare for Emergencies
- 1.1.9. Store Attachments Safely
- 1.1.10. Road Transport Disconnect Switch
- 1.1.11. Guards and Shields
- 1.1.12. Stay Clear of Platform
- 1.1.13. Keep Hands Away From Knives
- 1.1.14. Stay Clear of Rotating Drivelines
- 1.1.15. Ballasting for Safe Ground Contact
- 1.1.16. Practice Safe Maintenance
- 1.1.17. Service Machines Safely
- 1.1.18. Support Machine Properly
- 1.1.19. Park Machine Safely
- 1.1.20. Avoid Contact With Moving Parts
- 1.1.21. Avoid Contact With Cutterbar
- 1.1.22. Service Belts Safely
- 1.1.23. Transport Safely
- 1.1.24. Observe Maximum Transport Speed
- 1.1.25. Service Tires Safely
- 1.1.26. Avoid HighPressure Fluids
- 1.1.27. Remove Paint Before Welding or Heating
- 1.1.28. Protect Against High Pressure Spray
- 1.1.29. Avoid Heating Near Pressurized Fluid Lines
- 1.1.30. Dispose of Waste Properly
- 1.1.31. Replace Safety Signs
- 1.2. Safety Sign Location
- 1.2.1. Safety Sign Location
- 1.3. Transporting
- 1.3.1. Transporting on Trailer
- 1.3.2. Transporting on Combine
- 1.3.3. Transporting on SelfPropelled Windrower
- 1.3.4. Converting Transport System for Transport (If Equipped with Slow
- 1.3.5. Converting Transport System for Field Operation (If Equipped wit
- 1.4. Attaching and DetachingCombine
- 1.4.1. Attaching Platform to Combine
- 1.4.2. Detaching Platform from Combine
- 1.4.3. Feeder House Manual Unlatching
- 1.4.4. Replacement Shear Screw Location
- 1.4.5. Dual Machine Platform
- 1.5. Attaching and DetachingWindrower
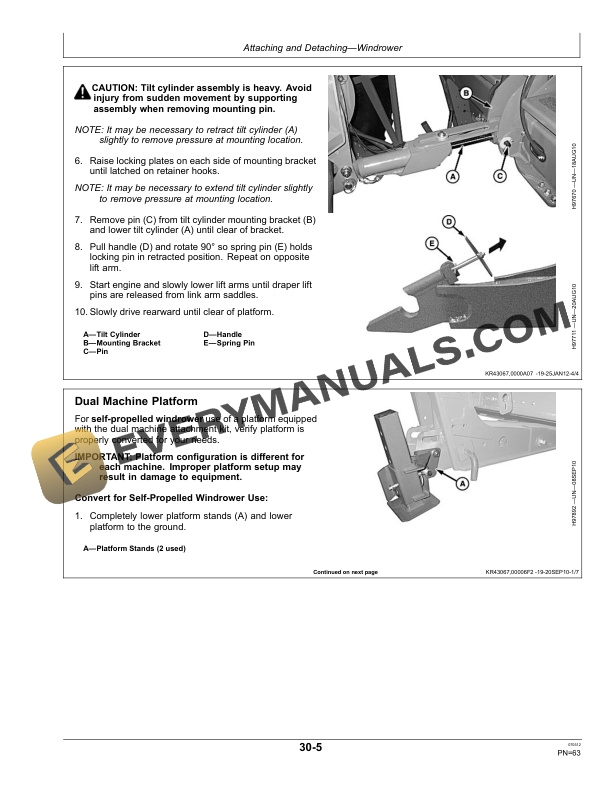
- 1.5.1. Attaching Platform to Windrower
- 1.5.2. Detaching Platform from Windrower
- 1.5.3. Dual Machine Platform
- 1.6. Calibration
- 1.6.1. When to Calibrate
- 1.6.2. Calibration Error Codes
- 1.6.3. Calibration with Slope Float Kit Installed Combine
- 1.6.4. User Calibration Procedures for S Series Combines
- 1.6.5. User Calibration Procedures for 70 Series Combines
- 1.6.6. User Calibration Procedures for 50/60 Series Combines
- 1.7. Operating the PlatformCombine
- 1.7.1. General Information
- 1.7.2. Armrest Functions
- 1.7.3. Draper Belt Speed
- 1.7.4. Draper Belt Speed Adjust Switch (If Equipped)
- 1.7.5. Cutterbar Tilt Adjust Switch (If Equipped)
- 1.7.6. Reel Settings
- 1.7.7. Feed Drum Settings
- 1.7.8. Active Header Control Display
- 1.7.9. Description of Automatic Header Height Control Systems
- 1.7.10. Active Header Height Control
- 1.7.11. Dual Zone Float
- 1.7.12. Feeder House Drop Rate and Sensitivity S and 70 Series Combine
- 1.7.13. Feeder House Drop Rate and Sensitivity 60 Series and Older Com
- 1.7.14. Recommended Combine Settings
- 1.7.15. Recommended Initial Crop Settings
- 1.7.16. Harvesting in Dry Crop Conditions
- 1.7.17. Harvesting in Tough Feeding Crop Conditions
- 1.7.18. Harvesting in Short, Thin Crops
- 1.7.19. Harvesting in Down Crops
- 1.7.20. Bushy or High Volume Crops
- 1.7.21. Sorghum
- 1.8. Operating the PlatformWindrower
- 1.8.1. General Information
- 1.8.2. Armrest Functions
- 1.8.3. Active Header Control Display
- 1.8.4. Draper Belt Speed
- 1.8.5. Cutterbar Tilt Adjust Switch
- 1.8.6. Reel Settings
- 1.8.7. Active Header Height Control
- 1.8.8. Automatic Header Height Control System
- 1.8.9. Dual Zone Float
- 1.8.10. Windrowing in Bushy or Heavy Crops
- 1.9. Attachments and Options
- 1.9.1. Slow Speed Integral Transport System
- 1.9.2. Top Crop Conveying Auger
- 1.9.3. Long Divider Points
- 1.9.4. Plastic Skid Shoes
- 1.9.5. Crop Lifters
- 1.9.6. Crop Lifter Adjustments
- 1.9.7. Reel FlipOver Assembly
- 1.9.8. Reel End Fingers
- 1.9.9. Dual Zone Float Hydraulics
- 1.9.10. Feed Drum AntiWrap Brackets Combine
- 1.9.11. Dual Machine Quick Attachment Mount
- 1.9.12. Spare Knife Storage
- 1.9.13. Stubble Lights
- 1.10. Adjustments Combine Use
- 1.10.1. Suspension and Leveling
- 1.10.2. Feeding Related
- 1.10.3. Windrow Conversion
- 1.11. Adjustments Windrower Use
- 1.11.1. Suspension and Leveling
- 1.11.2. Feeding Related
- 1.11.3. Windrow Conversion
- 1.12. Adjustments Reel
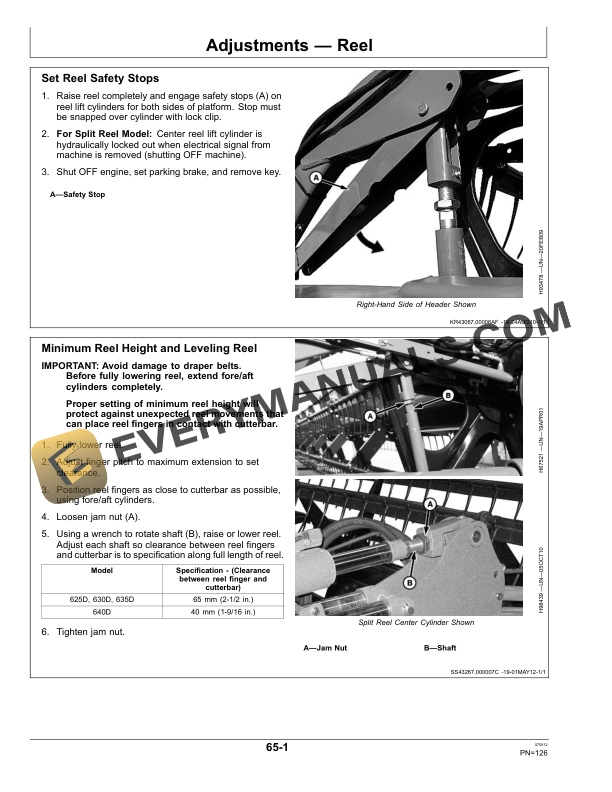
- 1.12.1. Set Reel Safety Stops
- 1.12.2. Minimum Reel Height and Leveling Reel
- 1.12.3. Fore/Aft Cylinder Mount Adjustment
- 1.12.4. Rephasing Reel Fore/Aft Cylinders
- 1.12.5. Rephasing Reel Lift Cylinders
- 1.12.6. Bleeding Reel Lift Cylinder System
- 1.12.7. Adjusting Reel Fingers
- 1.12.8. DialASpeed Reel
- 1.12.9. Reel Speed Ratio Sensor Adjustment
- 1.12.10. Reel Drive Gear Adjustment
- 1.13. Lubrication
- 1.13.1. Lubricant Storage
- 1.13.2. Alternative and Synthetic Lubricants
- 1.13.3. Mixing of Lubricants
- 1.14. Lubrication and Maintenance
- 1.14.1. Lubrication Interval Chart
- 1.14.2. Care and Maintenance of Belts
- 1.14.3. Every 50 Hours of Operation
- 1.14.4. Every 200 400 Hours of Operation
- 1.15. Troubleshooting
- 1.15.1. Cutting Platform
- 1.15.2. Active Header Height Control
- 1.16. Service
- 1.16.1. Tire Pressure and Wheel Bolt Torque
- 1.16.2. Feeder House Safety Stop Combine
- 1.16.3. Platform Lift Lockout Lever SelfPropelled Windrower
- 1.16.4. Set Reel Safety Stops
- 1.16.5. Open Side Shields
- 1.16.6. Remove and Install Side Shields
- 1.16.7. Remove and Install Backshaft Drive Belts
- 1.16.8. Remove and Install Telescoping Knife Drive Shaft
- 1.16.9. Cutterbar Maintenance
- 1.16.10. Knife Section Service Kit
- 1.16.11. Remove and Install Cutterbar Knife
- 1.16.12. Remove and Install Knife Sections
- 1.16.13. Align Knife Head and Knife Drive
- 1.16.14. Spare Knife Storage
- 1.16.15. Remove and Install Knife Guards
- 1.16.16. Center Draper Cleanout Combine
- 1.16.17. Cleaning Material Build Up at Side Shields
- 1.16.18. Remove and Install Side Draper Belts
- 1.16.19. Remove and Install Center Draper Belt Combine
- 1.16.20. Remove and Install Feed Drum Finger Guides Combine
- 1.16.21. Remove and Install Feed Drum Fingers Combine
- 1.16.22. Header Warning Light Bulb Replacement
- 1.16.23. Remove and Install Sump Cover Combine
- 1.17. Storage
- 1.17.1. End of Season Service
- 1.17.2. Beginning of Season Service
- 1.18. Specifications
- 1.18.1. Overall Dimensions
- 1.18.2. Gauge Wheel Tire Pressure and Wheel Bolt Torque
- 1.18.3. Specifications
- 1.18.4. Platform Weights
- 1.18.5. Header Identification Number
- 1.18.6. Keep Machines Secure
- 1.18.7. Keep Proof of Ownership
- 1.18.8. Unified Inch Bolt and Screw Torque Values
- 1.18.9. Metric Bolt and Screw Torque Values
- 1.19. John Deere Service Literature Available
- 1.19.1. Technical Information
- 1.20. John Deere Service Keeps You On The Job
- 1.20.1. John Deere Is At Your Service
- 2. Page Number
- 2.1. Section 05
- 2.2. Section 10
- 2.3. Section 15
- 2.4. Section 20
- 2.5. Section 25
- 2.6. Section 30
- 2.7. Section 35
- 2.8. Section 40
- 2.9. Section 45
- 2.10. Section 50
- 2.11. Section 55
- 2.12. Section 60
- 2.13. Section 65
- 2.14. Section 70
- 2.15. Section 75
- 2.16. Section 80
- 2.17. Section 85
- 2.18. Section 90
- 2.19. Section 95