Description
-
Model List:
- 946 Mower-Conditioner
- 956 Mower-Conditioner
- 1. Introduction
- 1.1. Foreword
- 1.2. Recognize Safety Information
- 1.3. Understand Signal Words
- 1.4. Follow Safety Instructions
- 1.5. Spanish Safety Signs and Operators Manual
- 1.6. Operate MowerConditioner
- 1.7. Keep Riders Off Machine
- 1.8. Prepare for Emergencies
- 1.9. Fire Prevention
- 1.10. In Case of Fire
- 1.11. Wear Protective Clothing
- 1.12. Handle Chemical Products Safely
- 1.13. Stay Clear of Rotating Drivelines
- 1.14. Avoid Injury From Thrown Objects
- 1.15. Use Safety Lights and Devices
- 1.16. Use a Safety Chain
- 1.17. Tow Loads Safely
- 1.18. Practice Safe Maintenance
- 1.19. Remove Paint Before Welding or Heating
- 1.20. Avoid Heating Near Pressurized Fluid Lines
- 1.21. Avoid HighPressure Fluids
- 1.22. Decommissioning Proper Recycling and Disposal of Fluids and Components
- 1.23. Safety Features
- 2. Safety Signs
- 2.1. Replace Safety Signs
- 2.2. Tongue Decals (LeftHand Side)
- 2.3. Tongue Decals (LeftHand Side)Continued
- 2.4. Platform Decals (RightHand Side)
- 2.5. Platform Decals (LeftHand Side)
- 2.6. Platform Decals (LeftHand Side)Continued
- 2.7. Tongue Pivot Decals
- 2.8. Rear Shield Decals
- 2.9. PTO Speed Decals
- 3. Preparing the Tractor
- 3.1. Selecting Tractor PTO Speed
- 3.2. Positioning DrawbarTwoPoint Hitch
- 3.3. Positioning DrawbarDrawbar Hitch
- 3.4. Installing Hitch Adapter (Drawbar Hitch)
- 3.5. Adjusting Sway Blocks (TwoPoint Hitch)
- 3.6. Setting Hydraulic Outlets
- 3.7. Checking Ballast, Wheel Spacing, and Tire Inflation
- 3.8. Using Drawbar Shield (Drawbar Hitch)
- 3.9. Making Drawbar Shield (Drawbar Hitch)
- 4. Preparing the MowerConditioner
- 4.1. Prestarting Checklist
- 4.2. Checking Tire Inflation Pressure
- 4.3. Checking Wheel Hardware Torque
- 4.4. Positioning Hitch Pad (TwoPoint Hitch)
- 4.5. Assembling Hitch Pins (TwoPoint Hitch)
- 5. Attaching and Detaching
- 5.1. Attaching MowerConditioner TwoPoint Hitch to Tractor QuickCoupler Hitch
- 5.2. Attaching MowerConditioner TwoPoint Hitch to Tractor Draft Link Hitch
- 5.3. Attaching MowerConditioner Drawbar Hitch to Tractor
- 5.4. Assembling Main PTO Driveline Splined Telescoping Members (If Necessary)
- 5.5. Attaching PTO Driveline
- 5.6. Connecting Tail/Warning Light Wiring Harness to Tractor
- 5.7. Checking Transport Light Function
- 5.8. Attaching to Tractor Hydraulic System
- 5.9. Detaching MowerConditioner From Tractor
- 6. TransportingStandard Machine
- 6.1. Preparing MowerConditioner for Transport
- 6.2. Transporting MowerConditioner
- 6.3. Keep Riders Off Machine
- 7. Operating the MowerConditioner
- 7.1. Preparing MowerConditioner for Field Operation
- 7.2. Breaking In MowerConditioner
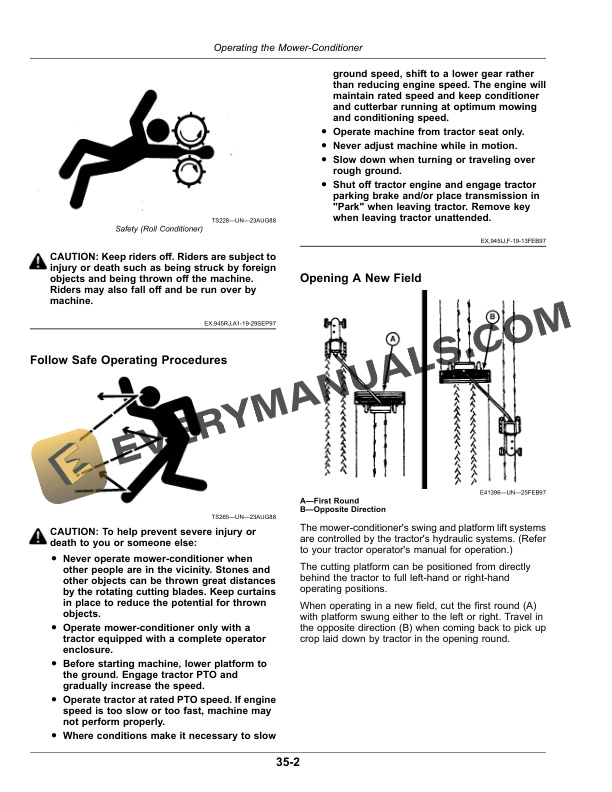
- 7.3. Keep Riders Off Machine
- 7.4. Follow Safe Operating Procedures
- 7.5. Opening A New Field
- 7.6. Turning In Field
- 7.7. Settings for Various Crop Conditions
- 7.8. Raising and Lowering Front Doors and Curtains
- 7.9. Adjusting Windrow Width
- 7.10. Adjusting Gauge Shoes
- 7.11. Adjusting Carrier Frame Height
- 7.12. Adjusting Cut HeightTurnbuckle Top Link
- 7.13. Adjusting Cut HeightHydraulic Tilt Control
- 7.14. Adjusting Platform Float
- 7.15. Adjusting Roll Spacing (Roll Conditioner)
- 7.16. Adjusting Conditioner Roll Pressure (Roll Conditioner)
- 7.17. Unplugging Conditioner Rolls (Roll Conditioner)
- 7.18. Checking Conditioning Effect (Impeller Conditioner)
- 7.19. Adjusting Conditioning Intensity (Impeller Conditioner)
- 7.20. Changing Impeller Rotor Speed (Impeller Conditioner)
- 7.20.1. Practice Safe Service Procedures
- 7.21. Shearing Disk Driver When Operating In the Field
- 7.22. Fire Prevention
- 7.23. Extinguishing a Fire
- 8. Attachments
- 8.1. Turnbuckle Top Link for Cutting Angle Adjustment
- 8.2. Hydraulic Top Link for Cutting Angle Adjustment
- 8.3. Drawbar Hitch
- 8.4. TwoPoint Hitch
- 8.5. Hose Support for Tractors With QuickCoupler Hitch
- 8.6. Fire Extinguisher and Mounting Bracket
- 8.7. Drawbar Shield
- 9. Lubrication and Maintenance
- 9.1. Lubricating and Maintaining Machine Safely
- 9.2. Multipurpose Extreme Pressure (EP) Grease
- 9.3. Cutterbar Oil
- 9.4. Gear Case Oil
- 9.5. Alternative and Synthetic Lubricants
- 9.6. Mixing of Lubricants
- 9.7. Lubricant Storage
- 9.8. Observe Lubrication Symbols
- 9.9. Perform Lubrication and Maintenance
- 9.10. Fire Prevention
- 9.11. Every 10 Hours
- 9.11.1. Front Driveline
- 9.11.2. Drawbar Pivot (If Equipped)
- 9.11.3. Jackstand (If Equipped)
- 9.11.4. Swivel Hitch Pivot
- 9.11.5. Overrunning Coupler
- 9.11.6. Tongue Pivot (Top and Bottom)Rear Main Driveline (3 lubrication fittings)
- 9.11.7. Platform Driveline
- 9.11.8. Wheel Support (left and righthand side)
- 9.11.9. Lift Arm Pivot (left and righthand side)
- 9.11.10. Float Springs Crank (left and righthand side)
- 9.11.11. Main Drive Belt Idler Pivot
- 9.11.12. Conditioner Drive Belt Idler Pivot
- 9.11.13. Top and Bottom Roll Drivelines (Roll Conditioner)
- 9.11.14. Roll Tension Bell Crank and Roll Arm Pivot Pin (left and righthand side) (Roll Conditioner)
- 9.11.15. Turnbuckle Top Link (if equipped)
- 9.11.16. Cutterbar and BreathersCleaning
- 9.11.17. Cutterbar Driveline
- 9.12. Every 50 Hours
- 9.12.1. Endwise Transport Latch Linkage (If Equipped)
- 9.12.2. CutterbarChecking Oil Level
- 9.13. Every 100 Hours
- 9.13.1. Swivel Hitch Driveline
- 9.13.2. Main Drive Gear CasesCheck Oil Level (Iberica Gear Case)
- 9.13.3. Main Drive Gear CasesCheck Oil Level (Comer Gear Case)
- 9.13.4. Practice Safe Service Procedures
- 9.13.5. Cutterbar Input Drive Gear CaseChecking Oil Level
- 9.13.6. Roll Drive Gear CaseChanging Oil (Roll Conditioner)
- 9.14. Every 200 Hours
- 9.14.1. CutterbarChanging Oil
- 9.15. Each Season
- 9.15.1. Phasing Cylinders
- 10. Troubleshooting
- 10.1. Troubleshooting
- 11. Service
- 11.1. Detailed Service InformationUse TM1824
- 11.2. Fire Prevention
- 11.3. Practice Safe Service Procedures
- 11.4. Keep Service Area Clean
- 11.5. Service Tires Safely
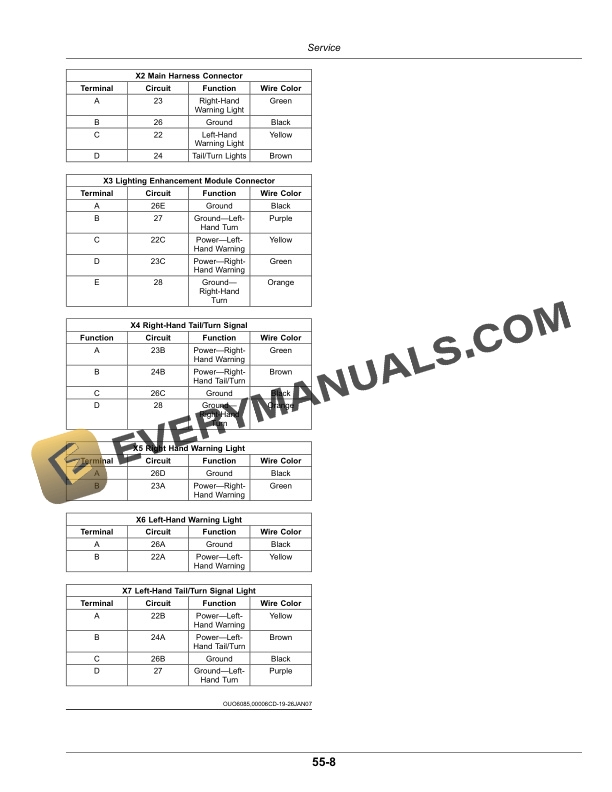
- 11.6. Tail/Warning Light Wiring Harness DiagramPower Supply
- 11.7. Tail/Warning Light Wiring Harness Diagram Main
- 11.8. Tail/Warning Light Wiring Harness Diagram Main
- 11.9. Bleeding Platform Lift Circuit
- 11.10. Adjusting Main Drive Belt Tension
- 11.10.1. Initial Tension Adjustment
- 11.10.2. Final Tension Adjustment
- 11.11. Replacing Main Drive Belt
- 11.12. Adjusting Conditioner Drive Belt TensionRoll Conditioner
- 11.13. Replacing Conditioner Drive BeltRoll Conditioner
- 11.13.1. Practice Safe Service Procedures
- 11.14. Replacing Conditioner Drive SheaveRoll Conditioner
- 11.15. Adjusting Roll Timing (Roll Conditioner)
- 11.16. Adjusting Conditioner Drive Belt TensionImpeller Conditioner
- 11.17. Replacing Conditioner Drive BeltImpeller Conditioner
- 11.17.1. Practice Safe Service Procedures
- 11.18. Replacing Rotor Tines (Impeller Conditioner)
- 11.18.1. Practice Safe Service Procedures
- 11.19. Removing Disks
- 11.20. Installing and Synchronizing Disks
- 11.21. Checking Knives
- 11.22. Removing Knives
- 11.23. Checking Knife Wear
- 11.24. Installing Knives
- 11.25. Replacing Wear Shield On Knife Bolt
- 11.26. Replacing Crop Accelerator
- 11.26.1. Practice Safe Service Procedures
- 11.27. Replacing LeftHand End Disk Driver
- 11.28. Replacing Intermediate Disk Drivers
- 11.29. Replacing RightHand End Disk Driver
- 11.30. Adjusting Lower Crop Shields
- 11.31. Changing TireMowerConditioner
- 11.32. Fire Prevention
- 12. Storage
- 12.1. Storing MowerConditioner (End of Season)
- 12.2. Removing MowerConditioner From Storage (Beginning of Season)
- 13. Specifications
- 13.1. Center Pivot Rotary MowerConditioner Specifications
- 13.2. Center Pivot Rotary MowerConditioner Specifications
- 13.3. Machine Weights
- 13.4. Tractor Compatibility
- 13.5. Record Product Identification Numbers
- 13.6. Record MowerConditioner Serial Number
- 13.7. Metric Bolt and Screw Torque Values
- 13.8. Unified Inch Bolt and Screw Torque Values
- 14. John Deere Service Keeps You On The Job
- 14.1. John Deere Parts
- 14.2. The Right Tools
- 14.3. WellTrained Technicians
- 14.4. Prompt Service