Description
-
Model List:
- CS Gator Compact Series Utility Vehicles
- CX Gator Compact Series Utility Vehicles
- 1. Introduction
- 1.1. Thank You for Purchasing a John Deere Product
- 1.2. Using Your Operators Manual
- 1.3. Special Messages
- 1.4. Attachments for Your Machine
- 2. Product Identification
- 2.1. Record Identification Numbers
- 2.1.1. GATOR Compact Series Utility Vehicle
- 3. Table of Contents
- 4. Safety Labels
- 4.1. Understanding The Machine Safety Labels
- 4.2. Safety Labels
- 4.2.1. WARNING RIDERS CAN FALL OFF AND BE KILLED (A)
- 4.2.2. WARNING AVOID INJURY FROM EXPLOSION (B)
- 4.2.3. CAUTION HELP PREVENT INJURY WHEN DUMPING LOADS (C)
- 4.2.4. CAUTION BEFORE LEAVING VEHICLE (D)
- 4.2.5. WARNING YOUNG DRIVERS INCREASE CHANCE OF DEATH (E)
- 4.2.6. WARNING ROLLOVER OR FALLING OFF MAY CAUSE DEATH (F)
- 4.2.7. DANGER CAUTION (G)
- 4.2.7.1. DANGER SHIELD EYES
- 4.2.7.2. DANGER NO
- 4.2.7.3. DANGER SULFURIC ACID
- 4.2.7.4. CAUTION
- 4.3. Emission Control System Certification Label
- 4.4. Emission Compliance Period
- 4.5. SAE J2258 and ASME B56.8 Compliance
- 4.6. Canadian Electromagnetic Compatibility (EMC) Compliance
- 4.7. Warning M159705
- 4.8. Supervisor Safety Responsibilities
- 4.9. Operator Training Required
- 4.10. Operating Safely
- 4.11. Using a Spark Arrestor
- 4.12. Parking Safely
- 4.13. Protect Children and Prevent Accidents
- 4.14. Avoid Excessive Speeds
- 4.15. Avoid Tipping
- 4.16. Keep Riders Off Vehicle
- 4.17. Transport Loads Safely
- 4.18. Towing Loads Safely With Utility Vehicle
- 4.19. Before Driving
- 4.20. Driving On Rough Terrain
- 4.21. Climbing Or Descending A Hill
- 4.22. Driving Across Slopes
- 4.23. Riding Through Water
- 4.24. Checking Wheel Hardware
- 4.25. Wear Appropriate Clothing
- 4.26. Practice Safe Maintenance
- 4.27. Prevent Fires
- 4.28. Do Not Modify Machine
- 4.29. Tire Safety
- 4.30. Handling Fuel Safely
- 4.30.1. To avoid personal injury or property damage, use extreme care in handling fuel. Fuel is extremely…
- 4.31. Handling Waste Product and Chemicals
- 5. Operating
- 5.1. Daily Operating Checklist
- 5.2. Avoid Damage to Plastic and Painted Surfaces
- 5.3. Operator Station Controls
- 5.4. Miscellaneous Controls
- 5.5. Adjusting Seat
- 5.5.1. Adjusting Seat Position
- 5.6. Using Hand Holds
- 5.7. Testing Safety Systems
- 5.8. Testing the Safety Start System
- 5.9. Using Park Brake
- 5.9.1. Locking Park Brake
- 5.9.2. Unlocking Park Brake
- 5.10. Using Key Switch
- 5.11. Using Headlights
- 5.12. Using 3Way Light Switch (If Equipped)
- 5.13. Using Hazard Lights (If Equipped)
- 5.14. Using Hour Meter
- 5.15. Using Turn Signal Switch (If equipped)
- 5.16. Using Accessory Outlet (If equipped)
- 5.17. Starting the Engine
- 5.18. Stopping Engine
- 5.19. Using Travel Controls
- 5.19.1. Traveling Forward
- 5.19.2. Traveling in Reverse
- 5.19.3. Stopping
- 5.20. Using Traction Assist (CX Model)
- 5.20.1. Engaging the traction assist
- 5.20.2. Disengaging the Traction Assist
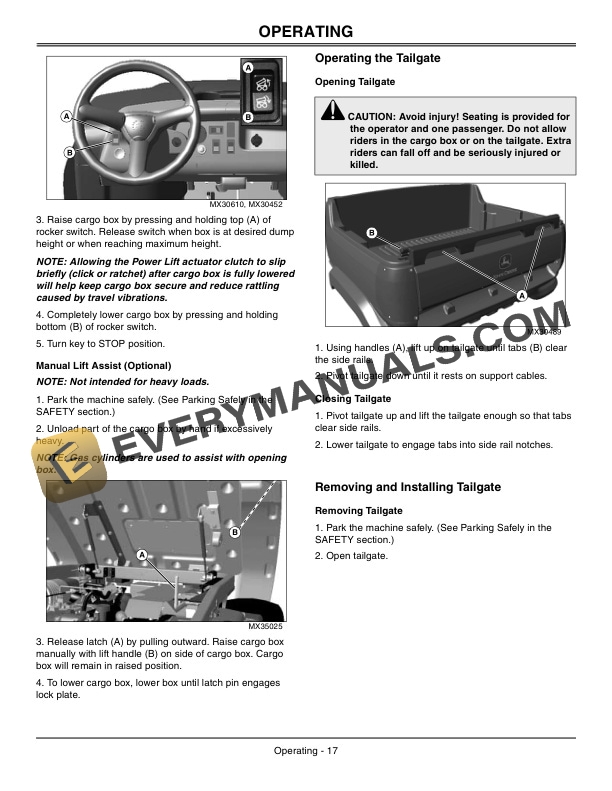
- 5.21. Raising and Lowering Cargo Box
- 5.21.1. Manual Lift
- 5.21.2. Power Lift (Optional)
- 5.21.3. Manual Lift Assist (Optional)
- 5.22. Operating the Tailgate
- 5.22.1. Opening Tailgate
- 5.22.2. Closing Tailgate
- 5.23. Removing and Installing Tailgate
- 5.23.1. Removing Tailgate
- 5.23.2. Installing Tailgate
- 5.24. Loading the Cargo Box
- 5.25. Emptying Cargo Box
- 5.26. Towing Loads
- 5.27. Transporting Vehicle
- 6. Replacement Parts
- 6.1. Service Literature
- 6.1.1. Order Service Parts Online
- 6.2. Part Numbers
- 7. Service Intervals
- 7.1. Servicing Your Machine
- 7.2. Break In
- 7.2.1. After 8 Hours of Use
- 7.3. Every 50 Hours or Annually
- 7.4. Every 100 Hours or Annually
- 7.5. Every 200 Hours
- 7.6. Every 250 Hours or Every 2 Years
- 8. Service Lubrication
- 8.0.1. The following greases are preferred
- 8.1. Lubricating King Pins on Front Wheel Suspension
- 9. Service Engine
- 9.1. Engine Warranty Maintenance Statement
- 9.2. Avoid Fumes
- 9.3. Engine Oil
- 9.3.1. The following John Deere oils are preferred
- 9.3.2. Other oils may be used if above John Deere oils are not available, provided they meet the followi…
- 9.4. Checking Engine Oil Level
- 9.5. Changing Engine Oil and Filter
- 9.6. Cleaning Rubber Dust Unloading Valve
- 9.7. Servicing Air Cleaner Element
- 9.8. Checking Air Intake Hoses and Clamps
- 9.9. Checking Spark Plug
- 9.10. Replacing Fuel Filter
- 9.11. Adjusting Carburetor
- 9.12. Cleaning Engine Compartment and Fins
- 10. Service Transmission
- 10.1. Transaxle Oil
- 10.2. Checking Transaxle Oil Level
- 10.3. Changing Transaxle Oil
- 10.4. Checking Drive Belt
- 10.5. Replacing Drive Belt
- 10.6. Checking Secondary Clutch Buttons
- 11. Service Electrical
- 11.1. Service the Battery Safely
- 11.2. Removing and Installing Battery
- 11.2.1. Removing
- 11.2.2. Installing
- 11.3. Cleaning Battery and Terminals
- 11.4. Supplemental Battery Maintenance
- 11.5. Using Booster Battery
- 11.6. Replacing Headlight Bulb
- 11.7. Replacing Fuse
- 12. Service Miscellaneous
- 12.1. Using Proper Fuel
- 12.2. Filling Fuel Tank
- 12.3. Checking Tire Pressure
- 12.4. Cleaning Plastic Surfaces
- 12.5. Cleaning and Repairing Metal Surfaces
- 12.5.1. Cleaning
- 12.5.2. Repairing Minor Scratches (surface scratch)
- 12.5.3. Repairing Deep Scratches (bare metal or primer showing)
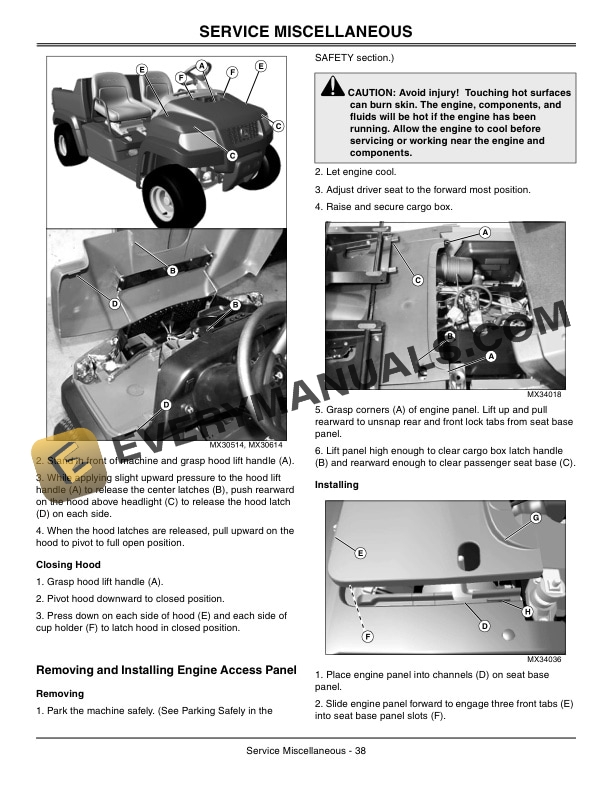
- 12.6. Opening and Closing Hood
- 12.6.1. Opening Hood
- 12.6.2. Closing Hood
- 12.7. Removing and Installing Engine Access Panel
- 12.7.1. Removing
- 12.7.2. Installing
- 12.8. Shock Adjustment
- 12.8.1. Preload Adjustment
- 12.9. Removing and Installing Front Wheel Assembly
- 12.9.1. Removing
- 12.9.2. Installing
- 12.10. Removing and Installing Rear Wheel Assembly
- 12.10.1. Removing
- 12.10.2. Installing
- 12.11. Checking Brakes and Brake Cables
- 12.12. Checking Traction Assist Cable Operation (CX Model)
- 13. Troubleshooting
- 13.1. Using Troubleshooting Chart
- 13.2. Electrical
- 14. Storage
- 14.1. Storing Safety
- 14.2. Preparing Machine for Storage
- 14.3. Preparing Fuel and Engine For Storage
- 14.3.1. Engine
- 14.4. Removing Machine From Storage
- 15. Assembly
- 15.1. Checking Tire Pressure
- 15.2. Charge and Connect Battery
- 15.3. Prepare Brakes
- 15.3.1. Seat Brakes
- 15.3.2. Burnish Brakes
- 15.4. Check Fluid Levels
- 15.5. Test Safety Start System
- 16. Specifications
- 16.1. Engine Specifications
- 16.2. Electrical System
- 16.3. Fuel System
- 16.4. Drive Train
- 16.5. Steering and Brakes
- 16.6. Capacities
- 16.6.1. Crankcase
- 16.7. Dimensions
- 16.7.0.1. Inflation Pressure
- 16.7.0.2. Inflation Pressure
- 16.8. Recommended Lubricants
- 17. Warranty
- 17.1. Product Warranty
- 17.2. California and U.S. EPA Emissions Control System Warranty Statement (Small OffRoad Gas Engines)
- 17.3. Tire Warranty
- 17.4. Limited Battery Warranty
- 17.4.1. TO SECURE WARRANTY SERVICE
- 17.4.2. FREE REPLACEMENT
- 17.4.3. PRO RATA ADJUSTMENT
- 17.4.4. THIS WARRANTY DOES NOT COVER
- 17.4.5. LIMITATION OF IMPLIED WARRANTIES AND PURCHASERS REMEDIES
- 17.4.6. NO DEALER WARRANTY
- 17.4.7. PRO RATA MONTHS OF ADJUSTMENT
- 18. John Deere Quality Statement
- 18.1. John Deere Quality
- 19. Service Record
- 19.1. Record Service Dates