Description
-
Model List:
- F310R Mower-Conditioner
- F350R Mower-Conditioner
- 1. Contents
- 1.1. Identification Views
- 1.1.1. F310R and F350R MowerConditioners
- 1.1.2. Recognize Safety Information
- 1.1.3. Follow Safety Instructions
- 1.1.4. Understand Signal Words
- 1.1.5. Maintain a Safety Area Around the Machine
- 1.1.6. Keep Riders Off Machine
- 1.1.7. Observe Road Traffic Regulations
- 1.1.8. Store Attachments Safely
- 1.1.9. Prepare for Emergencies
- 1.1.10. Wear Protective Clothing
- 1.1.11. Check Machine Safety
- 1.1.12. Stay Clear of Rotating Drivelines
- 1.1.13. Check Ballast, Wheel Spacing and Tire Inflation
- 1.1.14. Operate Safely
- 1.1.15. Avoid Injury from Thrown Objects
- 1.1.16. Use Safety Lights and Devices
- 1.1.17. Practice Safe Maintenance
- 1.1.18. Handling of Knives
- 1.1.19. Avoid HighPressure Fluids
- 1.1.20. Service Machines Safely
- 1.1.21. Support Machine Properly
- 1.1.22. Electrical Circuit and Control Power Supply Requirement
- 1.1.23. Avoid Heating Near Pressurized Fluid Lines
- 1.1.24. Service Accumulator Systems Safely
- 1.1.25. Remove Paint Before Welding or Heating
- 1.1.26. Decommissioning Proper Recycling and Disposal of Fluids and Components
- 1.1.27. Use Genuine John Deere Parts
- 1.1.28. Avoid HighPressure Jet on Cylinders
- 1.1.29. Avoid HighPressure Jet on Safety Signs
- 1.2. Safety Signs
- 1.2.1. Replace Safety Signs
- 1.2.2. Danger Rotating Driveline
- 1.2.3. Danger Avoid Crushing
- 1.2.4. Caution Operators Manual
- 1.2.5. Caution Keep Away From Power Driven Parts
- 1.2.6. Caution 1000 RPM PTO
- 1.2.7. Caution Hydraulic Accumulators
- 1.2.8. Warning Thrown Objects
- 1.2.9. Warning Avoid Rotating Knives
- 1.2.10. Warning Avoid Fall
- 1.2.11. Warning Hydraulic Pressure
- 1.3. Preparing the Tractor
- 1.3.1. Tractor Compatibility for F310R and F350R MowerConditioners
- 1.3.2. Prepare Tractor for Hitching the MowerConditioner
- 1.3.3. Tractor PTO Speed
- 1.3.4. Tractor Front PTO Rotation Direction
- 1.3.5. Operate Tractor Front Hitch with DoubleActing Selective Control Valve
- 1.3.6. Road Transport Preparation
- 1.4. Preparing the MowerConditioner
- 1.4.1. Check and Lubricate MowerConditioner
- 1.4.2. Check Cutterbar Rotation Direction
- 1.4.3. Attach Rear Curtain
- 1.5. Attaching
- 1.5.1. PTO Speed
- 1.5.2. Attach Machine
- 1.5.3. Raise Support Stand
- 1.5.4. Set Machine Frame Operating Height
- 1.5.5. Connect Hydraulic Hose to Tractor Selective Control Valve
- 1.5.6. Connect Wiring Harness
- 1.5.7. Adjust Telescoping Driveline
- 1.5.8. Connect Telescoping Driveline
- 1.6. Detaching
- 1.6.1. Detach MowerConditioner
- 1.6.2. Lower Support Stand
- 1.6.3. Disconnect Telescoping Driveline
- 1.6.4. Disconnect Hydraulic Hoses
- 1.6.5. Disconnect Electrical Plug
- 1.6.6. Disconnect from ThreePoint Hitch
- 1.7. Transporting MowerConditioner
- 1.7.1. Observe Local Transport Regulation
- 1.7.2. Prepare MowerConditioner for Transport
- 1.8. Breakingin
- 1.8.1. BreakIn MowerConditioner
- 1.8.2. After the First 30 Hours Main Gear Case
- 1.8.3. After the First 30 Hours Drain and Refill Cutterbar Intermediate Gear Case (Impeller Conditioner)
- 1.8.4. After the First 30 Hours Drain and Refill Cutterbar Intermediate Gear Case (Roll Conditioner)
- 1.8.5. After the First 30 Hours Drain and Refill Conditioner Gear Case (Roll Conditioner)
- 1.9. Operating MowerConditioner
- 1.9.1. PreOperation Checklist
- 1.9.2. Start and Operate MowerConditioner
- 1.9.3. Move Lateral Curtain with SCV (If Equipped)
- 1.9.4. Place MowerConditioner Unit in Working Position
- 1.9.5. Move MowerConditioner to Headland Turn Position
- 1.9.6. Set Machine Ground Pressure
- 1.9.7. Adjust Cutting Height
- 1.9.8. Adjust Conditioning Intensity (Impeller Conditioner)
- 1.9.9. Adjust Conditioning Hood
- 1.9.10. Adjust Rotor Speed
- 1.9.11. Adjust Conditioning Intensity (Roll Conditioner)
- 1.9.12. Adjust Roll Clearance (Roll Conditioner)
- 1.9.13. Check Conditioning Effect
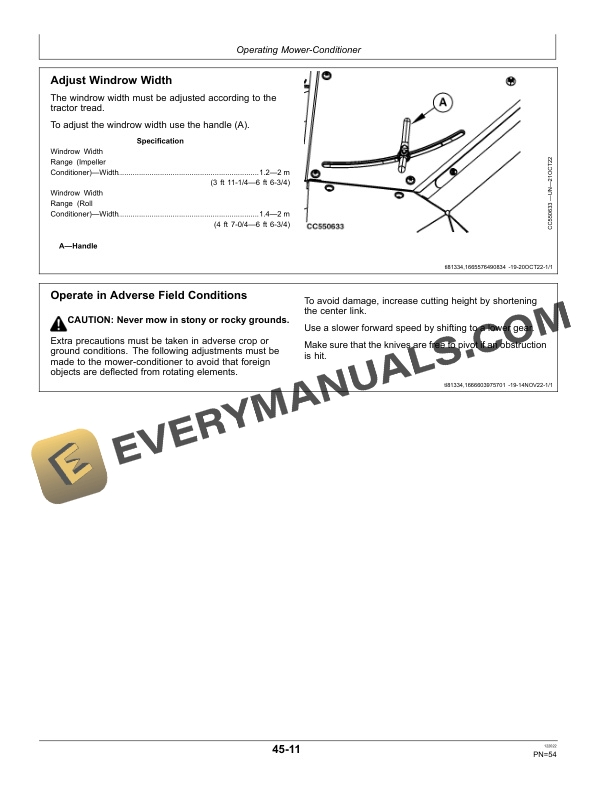
- 1.9.14. Adjust Windrow Width
- 1.9.15. Operate in Adverse Field Conditions
- 1.10. Attachments
- 1.10.1. Find Attachments
- 1.10.2. Wear Plates
- 1.10.3. Raised Skid Shoes
- 1.10.4. Grass Flow Accelerators
- 1.10.5. Protection Sheets
- 1.11. Lubrication and Maintenance
- 1.11.1. Observe Service Intervals
- 1.11.2. Multipurpose Extreme Pressure (EP) Grease
- 1.11.3. Gear Case Oil
- 1.11.4. Transmission and Hydraulic Oil
- 1.11.5. Alternative and Synthetic Lubricants
- 1.11.6. Lubricant Storage
- 1.11.7. Mixing of Lubricants
- 1.11.8. As Required Clean the Machine
- 1.11.9. Before The First Use Lubricate Drivelines
- 1.11.10. Every 50 Hours Grease Pivot Pins
- 1.11.11. Every 50 Hours Grease Stop Rings
- 1.11.12. Every 50 Hours Check Cutterbar Leaks
- 1.11.13. Every 100 Hours Grease Pivot Pins
- 1.11.14. Every 100 Hours Telescoping Driveline
- 1.11.15. Every 100 Hours Lubricate Intermediate Power Shaft (Roll Conditioner)
- 1.11.16. Every 200 Hours or yearly Hydraulic Hoses
- 1.11.17. Check Oil Level of Main Gear Case
- 1.11.18. Check Oil Level of Cutterbar Intermediate Gear Case (Impeller Conditioner)
- 1.11.19. Check Oil Level of Cutterbar Intermediate Gear Case (Roll Conditioner)
- 1.11.20. Check Oil Level of Conditioner Gear Case (Roll Conditioner)
- 1.11.21. Every 500 Hours or at Least Once a Year Drain and Refill Main Gear Case
- 1.11.22. Every 500 Hours or at Least Once a Year Drain and Refill Cutterbar Intermediate Gear Case (Impeller Conditioner)
- 1.11.23. Every 500 Hours or at Least Once a Year Drain and Refill Cutterbar Intermediate Gear Case (Roll Conditioner)
- 1.11.24. Every 500 Hours or at Least Once a Year Drain and Refill Conditioner Gear Case (Roll Conditioner)
- 1.11.25. Every Years Check Accumulators
- 1.11.26. Every 5 Years Replace Hydraulic Hoses
- 1.11.27. Every 10 Years Replace Accumulators
- 1.11.28. Drain and Refill Cutterbar
- 1.12. Troubleshooting
- 1.12.1. MowerConditioner Operation
- 1.12.2. End Yokes
- 1.12.3. Inboard Yokes
- 1.12.4. Telescoping Driveline
- 1.12.5. Telescoping Driveline Guards
- 1.13. Service
- 1.13.1. Metric Bolt and Screw Torque Values
- 1.13.2. Replace Safety Tube
- 1.13.3. Check Slip Clutch
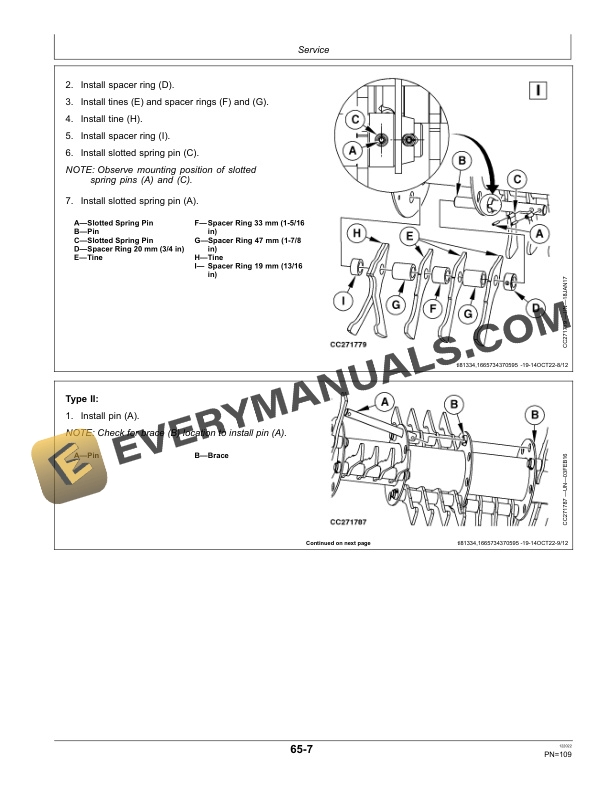
- 1.13.4. Replace Rotor Tines (F310R)
- 1.13.5. Replace Rotor Tines (F350R)
- 1.13.6. Replace Rotor Shear Bolt
- 1.13.7. Replace Rotor Safety System Nuts
- 1.13.8. Check HydroPneumatic Accumulators
- 1.13.9. Bleed Ground Pressure Hydraulic Circuit
- 1.13.10. Adjust Machine Horizontality
- 1.13.11. Check and Replace Disks
- 1.13.12. Remove Disks
- 1.13.13. Install and Synchronize Disks
- 1.13.14. Check the Knives
- 1.13.15. Understand Direction of Knife Rotation
- 1.13.16. Direction of Disk Rotation
- 1.13.17. Reverse Main Gear Case
- 1.13.18. Remove Knives
- 1.13.19. Install Knives
- 1.13.20. Check Quick Change Knife Retainer
- 1.13.21. Check Knife Wear
- 1.13.22. Check Knife Fitting Hole
- 1.13.23. Check Hardware Torques
- 1.13.24. Check Knife Hardware
- 1.13.25. Check Knife Screw Wear
- 1.13.26. Install Knife Screw
- 1.13.27. Check Knife Lock Nut Wear
- 1.14. Storage
- 1.14.1. After the Season
- 1.14.2. Before the Season
- 1.15. Specifications
- 1.15.1. F310R Specifications with Impeller
- 1.15.2. F310R Specifications with Roll Conditioner
- 1.15.3. F350R Specifications with Impeller
- 1.15.4. F350R Specifications with Roll Conditioner
- 1.16. Serial Numbers
- 1.16.1. Serial Number Plate
- 1.16.2. Serial Number Plate Description
- 1.16.3. Record MowerConditioner Serial Number
- 1.16.4. Keep Proof of Ownership
- 1.16.5. Keep Machines Secure
- 1.17. John Deere Service Literature Available
- 1.17.1. Technical Information
- 1.18. John Deere Service Keeps You On The Job
- 1.18.1. John Deere Is At Your Service
- 2. Page Number
- 2.1. Section 00
- 2.2. Section 05
- 2.3. Section 10
- 2.4. Section 15
- 2.5. Section 20
- 2.6. Section 25
- 2.7. Section 26
- 2.8. Section 30
- 2.9. Section 35
- 2.10. Section 45
- 2.11. Section 50
- 2.12. Section 55
- 2.13. Section 60
- 2.14. Section 65
- 2.15. Section 70
- 2.16. Section 75
- 2.17. Section 80
- 2.18. Section SLIT