Description
-
Model List:
- HD200 Sprayer Attachment For ProGator
- 1. Introduction
- 1.1. Using Your Operators Manual
- 1.2. Machine Use
- 2. Product Identification
- 2.1. Product Compatibility
- 2.2. Record Identification Numbers
- 3. Safety Labels
- 3.1. Pictorial Safety Signs
- 3.2. Avoid Injury Read Operators Manual
- 3.3. Danger Avoid Injury from Contaminated Water
- 3.4. Warning Avoid Injury from Chemical Hazards
- 3.5. Read Operators Manual
- 3.6. Warning Avoid Injury from Pinch Point
- 3.7. Caution Avoid Injury from Being Crushed or Cut
- 3.8. CE Certification and Specification Label
- 3.9. Operate Safely
- 3.10. Parking Safely
- 3.11. Mix and Handle Chemicals Safely
- 3.12. Read Chemical Container Label
- 3.13. Handle Chemical Products Safely
- 3.14. Practice Safe Maintenance
- 3.15. Wear Appropriate Clothing
- 3.16. Avoid High Pressure Fluids
- 3.17. Dispose of Chemicals Properly
- 3.18. Handling Waste Product and Chemicals
- 4. Preparing Vehicle
- 4.1. Preparing the Machine
- 4.2. Prepare for Assembly
- 4.3. Install Control Panel and Front Harness
- 5. Assembly
- 5.1. Tank Components
- 5.2. Electrical Components
- 5.3. Sprayer Pump and Hydraulic Components
- 5.4. Boom Components
- 5.5. Boom Hardware
- 5.6. Sprayer Assembly and Installation
- 5.7. Install Sprayer Tank
- 5.8. Install Sprayer Tank Components
- 5.9. Install Sprayer Pump and Hoses
- 5.10. Install and Connect Rear Wiring Harness
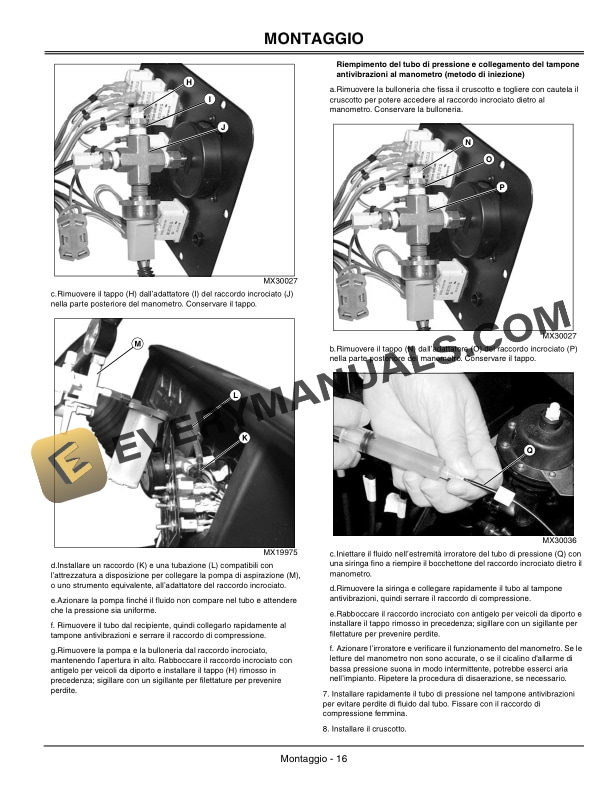
- 5.11. Fill and Connect Pressure Tube
- 5.12. Connect Hydraulic Hoses
- 5.13. Install the Boom
- 5.14. Install Down Stops
- 5.15. Install Frame Clamps
- 6. Removing and Storing
- 6.1. Prepare Machine for Removal
- 6.2. Disconnect Hydraulic Hoses
- 6.3. Disconnect Pressure Gauge Tube
- 6.4. Disconnect Rear Wiring Harness
- 6.5. Removing Sprayer
- 6.6. Storing Safety
- 6.7. Winterization and Storage
- 6.8. Removing From Storage
- 7. Installing
- 7.1. Installing Sprayer on Machine
- 8. Operating
- 8.1. Spray Tip Selection
- 8.2. Flood Style Spray Tip
- 8.3. Ultra LowDrift Style Spray Tip
- 8.4. Flat Fan Style Spray Tip
- 8.5. Understanding Dash Controls
- 8.6. Operating the Sprayer
- 8.7. Adjusting System Pressure
- 8.8. Low Pressure (Low Fluid Indicator) Warning System
- 8.9. Using the Personal Wash Tank
- 8.10. Filling and Draining Sprayer Tank
- 8.11. Using the Agitator
- 8.12. Backflushing the Inline Strainer
- 8.13. Using Boom Wings
- 8.14. Using Boom Wing Extensions (1521 Foot Boom Only)
- 8.15. Adjusting Boom Level and Height
- 8.16. Leveling the Boom Wings
- 8.17. Using Foam Marker
- 8.18. Using Rinse Tank (If equipped)
- 8.19. Using Manual and Electric Hose Reels (If equipped)
- 8.20. Transporting
- 9. Service
- 9.1. Remove and Install Inline Strainer
- 9.2. Checking Main Circuit Breaker
- 9.3. Checking Fuses and Boom Wing Actuator Circuit Breaker
- 9.4. Adjusting Boom Wing Spring Tension
- 9.5. Bleeding the Isolator
- 9.6. Bleeding the Pressure Gauge Tube
- 9.7. Lubricating Boom Wing Pivots
- 9.8. Inspecting and Cleaning Vented Fill Covers
- 9.9. Servicing Foam Marker Kit (If equipped)
- 9.10. Ground Wheels (If equipped)
- 9.11. Adjusting Manual Hose Reel Tension Brake
- 9.12. Lubricating Hose Reel
- 10. Service Intervals
- 10.1. Service Intervals Standard Equipment
- 10.2. Service Intervals Optional Equipment
- 11. Troubleshooting
- 11.1. Using Troubleshooting Chart
- 12. Specifications
- 12.1. Standard Equipment
- 12.2. Optional Equipment
- 13. Getting Quality Service
- 13.1. Service Literature
- 13.2. John Deere Quality Continues with Quality Service
- 14. Declaration of Conformity
- 14.1. HD200 Sprayer
- 15. omtcu19538_g7_28_01jul07_original.pdf
- 15.1. Introduction
- 15.2. Num?ros didentification du produit
- 15.3. Autocollants de s?curit?
- 15.4. S?curit?
- 15.5. Pr?raration de la machine
- 15.6. Montage
- 15.7. Installation
- 15.8. Fonctionnement
- 15.9. Entretien
- 15.10. Entretien Intervalles
- 15.11. D?pannage
- 15.12. Caract?ristiques
- 15.13. Obtention dun entretien de qualit?
- 15.14. D?claration de Conformit?
- 16. omtcu19538_g7_29_01jul07_original.pdf
- 16.1. Einleitung
- 16.2. Produktkennzeichnung
- 16.3. Sicherheitsaufkleber
- 16.4. Sicherheit
- 16.5. Vorbereitung der Maschine
- 16.6. Zusammenbau
- 16.7. Bedienung
- 16.8. Wartung
- 16.9. Wartungszeitr?ume
- 16.10. St?rungssuche
- 16.11. Technische Daten
- 16.12. Qualit?tsservice erhalten
- 16.13. ?bereinstimmungserkl?rung
- 17. omtcu19538_g7_39_01jul07_original.pdf
- 17.1. Introduzione
- 17.2. Identificazione del prodotto
- 17.3. Etichette di sicurezza
- 17.4. Misure di sicurezza
- 17.5. Preparazione della macchina
- 17.6. Montaggio
- 17.7. Rimozione
- 17.8. Installazione
- 17.9. Funzionamento
- 17.10. Manutenzione
- 17.11. Manutenzione Intervalli di manutenzione
- 17.12. Individuazione dei guasti
- 17.13. Caratteristche tecniche
- 17.14. Per un servizio di qualita
- 17.15. Dichiarazione di conformit?
- 18. omtcu19538_g7_63_01jul07_original.pdf
- 18.1. Introducci?n
- 18.2. Identificati?n del producto
- 18.3. Etiquetas de seguridad
- 18.4. Seguridad
- 18.5. Preparaci?n del veh?culo
- 18.6. Montaje
- 18.7. Extracci?n
- 18.8. Instalaci?n
- 18.9. Funcionamiento
- 18.10. Mantenimiento
- 18.11. Intervalos de mantenimiento
- 18.12. Resoluci?n de problemas
- 18.13. Especificaciones
- 18.14. Obtenci?n de servicio de primera calidad
- 18.15. Declaraci?n de conformidad