Description
-
Model List:
- PH1102T Pull Type Harvester
- 1. Contents
- 1.0.1. Recognize Safety Information
- 1.0.2. Understand Signal Words
- 1.0.3. Follow Safety Instructions
- 1.0.4. Prevent Machine Runaway
- 1.0.5. In Case of Fire
- 1.0.6. Operate Machine Safely
- 1.0.7. Keep Riders Off Machine
- 1.0.8. Avoid Rollover Accidents
- 1.0.9. Prepare for Emergencies
- 1.0.10. Wear Protective Clothing
- 1.0.11. Protect Against Noise
- 1.0.12. Insecticide and/or Herbicide Hoppers Lid Fill Closed Handling System
- 1.0.13. Use Safety Lights and Devices
- 1.0.14. Avoid HighPressure Fluids
- 1.0.15. Transport Safely
- 1.0.16. Comply with the Transport Speed Limit
- 1.0.17. Service Machine Safely
- 1.0.18. Practice Safe Maintenance
- 1.0.19. Remove Paint Before Welding or Heating
- 1.0.20. Store Attachments Safely
- 1.0.21. Decommissioning Proper Recycling and Disposal of Fluids and Components
- 1.0.22. Observe Environmental Protection Regulations
- 1.0.23. Store Harvester Safely
- 1.0.24. Use Service Stops
- 1.1. Safety Signs
- 1.1.1. Safety Sign Locations
- 1.1.2. Safety Sign Locations on Harvester Drum
- 1.1.3. Safety Sign Locations on Exhaust Pipe
- 1.1.4. Warning Decal Slow Moving Vehicle
- 1.1.5. Safety Sign Locations on Bulk Unit Tank
- 1.1.6. Safety Signs Locations on Cereal Platform
- 1.1.7. Safety Signs Locations on Corn Platform
- 1.2. Preparing the Tractor
- 1.2.1. Use Your Tractor Operators Manual
- 1.2.2. PushPull Level Mounting on the Tractor (If Equipped)
- 1.3. Preparing The Machine
- 1.3.1. Preoperational / Preseason Service
- 1.3.2. Install Wheel Support
- 1.3.3. Install Stabilizer Arm and Pulley Guide
- 1.3.4. Install Bumper
- 1.3.5. Front Counterweight
- 1.3.6. Install Pulley and Pulley Support Assembly
- 1.3.7. Install Residue Disposal Pan
- 1.3.8. Install Sight Glass
- 1.3.9. Height Adjustment
- 1.4. Attaching and Detaching
- 1.4.1. Tractor Requirements
- 1.4.2. Attaching the Machine to Tractor
- 1.4.3. Detaching the Machine From Tractor
- 1.4.4. Universal Drive Shaft
- 1.5. Preparing Harvester For Use
- 1.5.1. Support Rollers
- 1.5.2. Rotation of Tractor PTO
- 1.5.3. Hydraulic Cylinders
- 1.5.4. Leveling the Harvester
- 1.5.5. Beginning Operation and Ground Speed
- 1.5.6. Preventive Test
- 1.5.7. Harvester Conditions
- 1.5.8. Humidity Conditions
- 1.5.9. Harvester Ground Speed
- 1.5.10. Adjustments of Drive System Belts
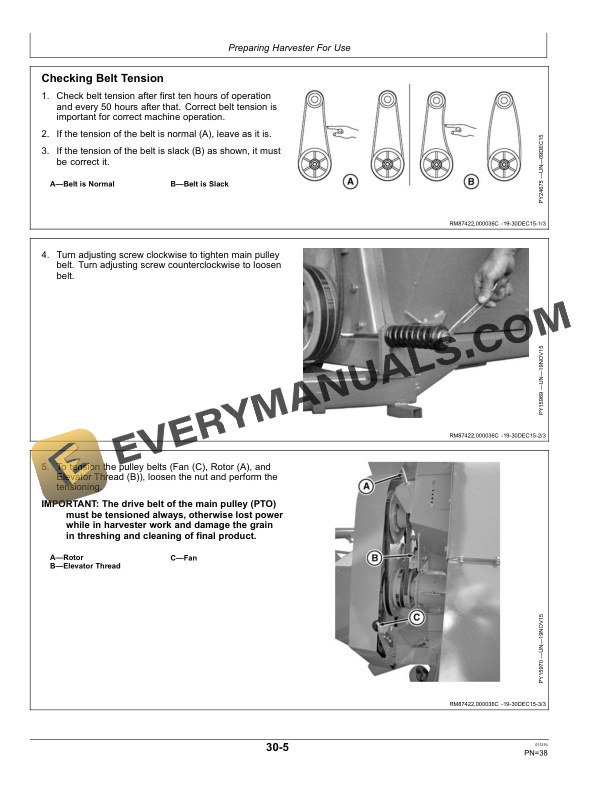
- 1.5.11. Checking Belt Tension
- 1.6. Threshing Unit
- 1.6.1. Rotary Type Threshing System
- 1.6.2. Rotary Cylinder Tines Adjustment
- 1.6.3. Adjust Rotor Speed
- 1.7. Separator and Cleaning Unit
- 1.7.1. Vibratory sieve
- 1.7.2. Replace Sieve
- 1.7.3. Adjust Sieve Angle
- 1.7.4. Adjust Grain Deflector Plate
- 1.7.5. Cover Plate and Sieve for Conveyor Grain Auger
- 1.7.6. Grain Tank Unloading Auger Cover Plate
- 1.7.7. Cleaning Fan and Ventilation System
- 1.8. Elevators, Grain Tank and Unloading System
- 1.8.1. Grain Elevator
- 1.8.2. Grain Tank
- 1.8.3. Unloading Auger
- 1.8.4. Engage and Disengage Grain Tank Unloading Auger
- 1.8.5. Grain Tank Auger Cover Kit (Optional)
- 1.9. Corn Header Platform and Adjustments
- 1.9.1. Corn Platform
- 1.9.2. Attach Corn Header Platform
- 1.9.3. Platform Auger Drive
- 1.9.4. Check Row Unit Transmission Oil Level
- 1.9.5. Auger Drive Alignment and Chain Tension
- 1.9.6. Adjust Deck Plate
- 1.9.7. Adjust Trash Knives
- 1.9.8. Adjusting Gatherer Chain Tension
- 1.9.9. Adjust Gathering Chain Flight
- 1.9.10. Chain Guide Pickers Adjustment
- 1.9.11. Adjusting Auger
- 1.9.12. Adjust Platform Position
- 1.9.13. Ear Savers
- 1.9.14. Row Spacing
- 1.9.15. Adjust Row Spacing of Corn Head Platform
- 1.9.16. Install Row Unit
- 1.9.17. Install Row Unit Cover Assembly
- 1.9.18. Change Spacing of Central Deck Cover
- 1.9.19. Change Spacing of Central Pointer
- 1.9.20. Assembly Central Row Platform
- 1.9.21. Harvesting Corn With Weakened or Broken Stalks
- 1.10. Rigid Platform and Adjustments
- 1.10.1. Rigid Platform
- 1.10.2. Attach Rigid Platform
- 1.10.3. Reel Speed Adjustment
- 1.10.4. Reel Height Adjustment
- 1.10.5. Reel Fore/Aft Adjustment
- 1.10.6. Reel Finger Adjustment
- 1.10.7. Hydraulic Lift Cylinder
- 1.10.8. Platform Lock
- 1.10.9. Drive belt adjustment
- 1.10.10. Auger Drive Chain Tension adjustment
- 1.10.11. Auger Slip Clutch
- 1.10.12. Cutter bar Position Adjustment for Harvesting
- 1.10.13. Sidewall Crop Divider Kit
- 1.11. Windrower Platform and Adjustments
- 1.11.1. Windrower Platform
- 1.11.2. Attach Windrower Platform
- 1.11.3. Attach Windrower Drive
- 1.11.4. Drive Belt Adjustment
- 1.12. Wheels and Tires
- 1.12.1. Service Tires Safely
- 1.12.2. Tire Inflation Pressure Chart
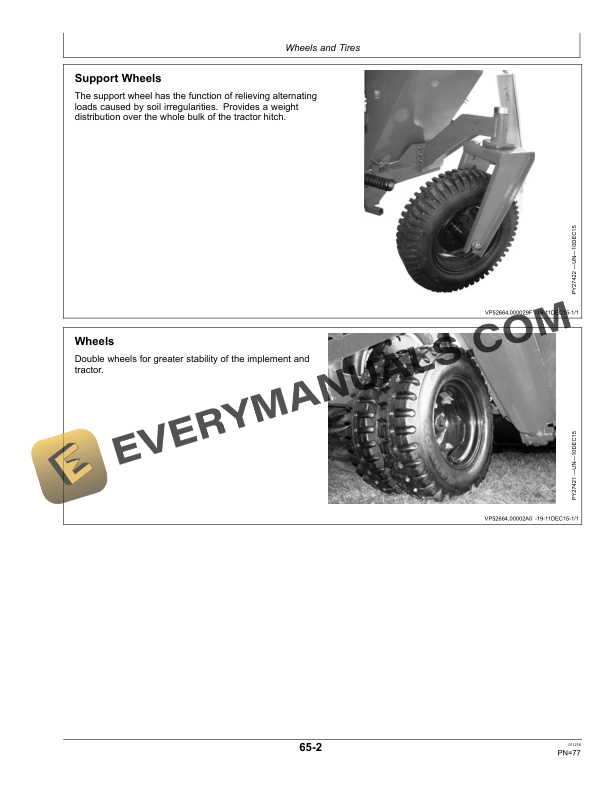
- 1.12.3. Support Wheels
- 1.13. Lubricants
- 1.13.1. Use Correct Lubricant
- 1.13.2. Mixing of Lubricants
- 1.13.3. Alternative and Synthetic Lubricants
- 1.14. Lubrication and Maintenance
- 1.14.1. Lubricant Storage
- 1.14.2. Lubrication Symbols
- 1.14.3. Rigid Platform Lubrication (If Equipped)
- 1.14.4. Corn Platform Lubrication (If Equipped)
- 1.14.5. Frame and Grain Tank Assembly Lubrication
- 1.14.6. Structure Assembly Lubrication
- 1.14.7. Support Wheels Lubrication
- 1.14.8. Corrective Maintenance
- 1.14.9. Predictive Maintenance
- 1.14.10. Sieve Inspection Panel
- 1.14.11. Header Inspection Cover
- 1.14.12. Grain Elevator Auger Inspection Cover
- 1.14.13. Grain Tank Clean Out Cover
- 1.14.14. Replacing Knife Section
- 1.14.15. Maintenance of Hydraulic Cylinders
- 1.14.16. General Chain Maintenance
- 1.14.17. Maintenance of Chain
- 1.14.18. Storing Belts
- 1.14.19. Inspect Belts
- 1.14.20. Remove and Install Belts
- 1.14.21. Cleaning the Machine After harvest
- 1.15. Troubleshooting
- 1.15.1. Implement Troubleshooting
- 1.15.2. Corn Platform Troubleshooting
- 1.15.3. Belt Troubleshooting
- 1.15.4. Chains Troubleshooting
- 1.15.5. Hydraulics Troubleshooting
- 1.15.6. Bearings Troubleshooting
- 1.15.7. Rigid Platform Troubleshooting
- 1.16. Storage
- 1.16.1. Preparing Machine for Storage
- 1.16.2. Removing Machine from Storage
- 1.17. Torque Charts
- 1.17.1. Metric Bolt and Screw Torque Values
- 1.17.2. Unified Inch Bolt and Screw Torque Values
- 1.17.3. Face Seal Fittings Assembly and InstallationAll Pressure Applications
- 1.17.4. Metric Face Seal and ORing Stud End Fitting Torque ChartStandard Pressures
- 1.17.5. Metric Face Seal and ORing Stud End Fitting Torque ChartHigh Pressure Applications
- 1.18. Specifications
- 1.18.1. Specification and Application Rates
- 1.18.2. Keep Machines Secure
- 1.18.3. Keep Proof of Ownership
- 1.19. Machine Identification Numbers
- 1.19.1. Identification Number
- 1.19.2. Machine Identification Plate
- 1.20. John Deere Service Keeps You on the Job
- 1.20.1. John Deere Parts
- 1.20.2. The Right Tools
- 1.20.3. WellTrained Technicians
- 1.20.4. Prompt Service
- 2. Page Number
- 2.1. Section 5
- 2.2. Section 10
- 2.3. Section 15
- 2.4. Section 20
- 2.5. Section 25
- 2.6. Section 30
- 2.7. Section 35
- 2.8. Section 40
- 2.9. Section 45
- 2.10. Section 50
- 2.11. Section 55
- 2.12. Section 60
- 2.13. Section 65
- 2.14. Section 70
- 2.15. Section 75
- 2.16. Section 80
- 2.17. Section 85
- 2.18. Section 90
- 2.19. Section 95
- 2.20. Section 100
- 2.21. Section IBC