Description
-
Model List:
- R500 Rotary Platform
- 1. Introduction
- 1.1. Foreword
- 1.2. Recognize Safety Information
- 1.3. Understand Signal Words
- 1.4. Follow Safety Instructions
- 1.5. Spanish Safety Signs and Operators Manual
- 1.6. Replace Safety Signs
- 1.7. Keep Riders and Children Off Machine
- 1.8. Ballast for Safe Ground Contact
- 1.9. Prepare for Emergencies
- 1.10. In Case of Fire
- 1.11. Wear Protective Clothing
- 1.12. Stay Clear of Platform
- 1.13. Use Safety Lights and Devices
- 1.14. Transport Machine with Platform or Weight Box Attached
- 1.15. Avoid Injury From Thrown Objects
- 1.16. Practice Safe Maintenance
- 1.17. Remove Paint Before Welding or Heating
- 1.18. Avoid Heating Near Pressurized Fluid Lines
- 1.19. Install All Shields and Guards
- 1.20. Avoid HighPressure Fluids
- 1.21. Decommissioning Proper Recycling and Disposal of Fluids and Components
- 1.22. Remove Accumulated Crop Debris
- 1.23. Support Machine Properly
- 1.24. Service Drive Belts Safely
- 1.25. Use Proper Lifting Equipment
- 1.26. Avoid Backover Accidents
- 1.27. Before Operating
- 1.28. Use Proper Tools
- 1.29. Practice Safe Service Procedures
- 1.29.1. W200M, W235 and W260 Windrower
- 2. Safety Sign Location
- 2.1. Replace Safety Signs
- 2.2. LeftHand Side Decals
- 2.3. RightHand Side Decal
- 2.4. LeftHand Door Decals
- 2.5. RightHand Door Decal
- 2.6. Platform Decal Right Hand Side (Rear)
- 3. Attaching and Detaching Platform
- 3.1. Attach R400/R500 Header
- 3.2. Balance R400/R500 Header
- 3.3. Detach R400/R500 Header
- 3.4. Detach Platform (W235, W260, W200M, and W235M)
- 3.5. Convert R500 Platform to W200M and W235M
- 4. Operating Platform
- 4.1. Prestart Checks
- 4.2. Breakin Rotary Platform
- 4.3. Keep Riders and Children Off Machine
- 4.4. Follow Safe Operating Procedures
- 4.5. Raise and Lower Platform
- 4.6. Adjust Platform Cutterbar Angle
- 4.7. Adjust Platform Float
- 4.8. Adjust Platform Cutterbar Speed
- 4.9. Raise and Lower Front Doors and Curtains
- 4.10. Adjust Gauge Shoes
- 4.11. Platform Settings for Various Crop Conditions
- 4.11.1. Troubleshooting Guide
- 4.12. Adjust Windrow Width and Shape (TouchSet Equipped)
- 4.12.1. Adjustment Using Display
- 4.12.2. Adjustment Using Armrest
- 4.13. Adjust Windrow Width and Shape (NonTouchSet)
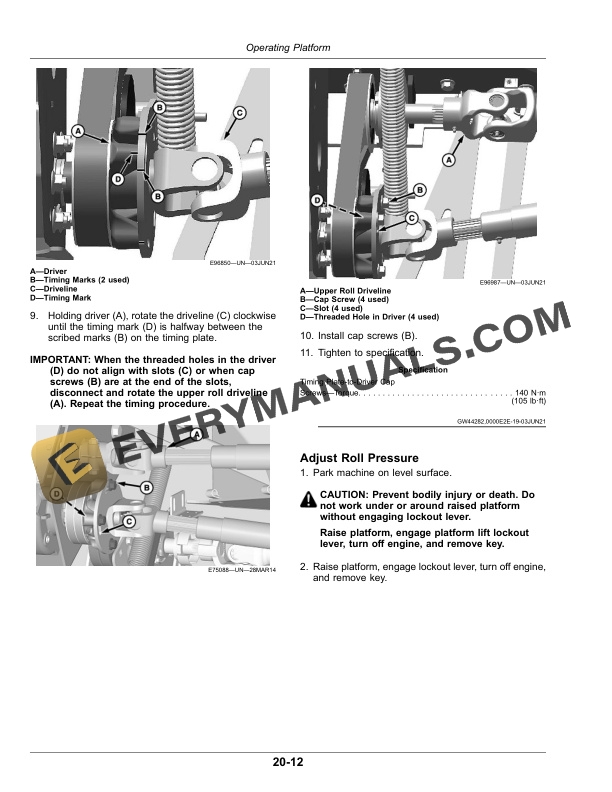
- 4.14. Adjust Roll Timing
- 4.15. Adjust Roll Pressure
- 4.16. Adjust Roll Gap (TouchSet Equipped)
- 4.16.1. Adjustment Using Display
- 4.16.2. Adjustment Using Armrest
- 4.17. Roll Gap Actuator Calibration
- 4.17.1. Roll Gap Offset Adjustment
- 4.18. Adjust Roll Gap (NonTouchSet)
- 4.18.1. Adjust Roll Spacing for Various Crop Conditions
- 4.19. Unplug Rolls
- 4.20. Change Conditioner Speed
- 4.20.1. Change Conditioner Speeds, Factory Supplied Sheaves
- 4.20.2. Change Conditioner Speeds, Optional Sheaves
- 4.21. Adjust Conditioner Drive Belt Tension
- 4.22. Adjust Auger Drive Belt Tension
- 4.23. Shear Disk Driver When Operating In the Field
- 5. Fire Prevention
- 5.1. Recommended Fire Prevention
- 5.2. Fire Extinguisher Operation
- 5.2.1. Fire Extinguisher Recommendations
- 5.2.2. Use of a Fire Extinguisher
- 5.2.3. Inspection Checklist
- 5.3. Prepare for Emergencies
- 5.4. Remove Accumulated Crop Debris
- 5.5. Fire Extinguisher (If Equipped)
- 5.6. Fire Extinguisher Location
- 5.7. In Case of Fire
- 6. Lubrication and Maintenance
- 6.1. Multipurpose Extreme Pressure (EP) Grease
- 6.2. Cutterbar Oil
- 6.3. Cutterbar Drive and Conditioner Drive Gear Case Oil
- 6.4. Alternative and Synthetic Lubricants
- 6.5. Mixing of Lubricants
- 6.6. Lubricant Storage
- 6.7. Observe Lubrication Symbols
- 6.8. Service Intervals
- 6.9. Daily Service
- 6.9.1. Clean Cutterbar
- 6.10. As Required
- 6.10.1. Check Knife Retainer Wear (Machine with QuickChange Knives)
- 6.10.2. Adjust StrippertoAuger
- 6.11. Every 10 Hours Service
- 6.11.1. Lubricate Top And Bottom Roll Drivelines (Roll Conditioner)
- 6.11.2. Lubricate Cutterbar Driveline
- 6.11.3. Lubricate Auger Driveline
- 6.11.4. Lubricate Drum Driveline on Number 10 Disk
- 6.12. First 50 Hours Service
- 6.12.1. Change Cutterbar Oil
- 6.12.2. Change Cutterbar Input Drive Gear Case Oil
- 6.12.3. Change Conditioner Drive Gear Case Oil
- 6.13. Every 50 Hours Service
- 6.13.1. LeftHand Side
- 6.13.2. RightHand Side
- 6.14. Every 100 Hours Service
- 6.14.1. Check Cutterbar Input Drive Gear Case Oil Level
- 6.14.2. Check Conditioner Drive Gear Case Oil
- 6.14.3. Check Cutterbar Oil Level
- 6.14.4. Check Roll Gap Actuator Calibration
- 6.15. Every 200 Hours Service
- 6.15.1. Change Cutterbar Oil
- 6.15.2. Clean Cutterbar
- 6.15.3. Check Quill Bearings
- 6.16. Every 300 Hours Service or Yearly
- 6.16.1. Check Knife Retainer Wear (Machine with QuickChange Knives)
- 6.16.2. Check Rockshaft Hardware Torque
- 6.17. Every 800 Hours Service
- 6.17.1. Change Conditioner Drive Gear Case Oil
- 6.17.2. Change Cutterbar Input Drive Gear Case Oil
- 7. Troubleshooting
- 7.1. Troubleshooting
- 8. Service
- 8.1. Practice Safe Service Procedures
- 8.1.1. W235 and W260 Windrower
- 8.2. Keep Service Area Clean
- 8.3. Care of VBelts
- 8.4. Tighten Bearing Locking Collars
- 8.5. Wire HarnessImpeller Conditioner
- 8.6. Wire HarnessTouchSet
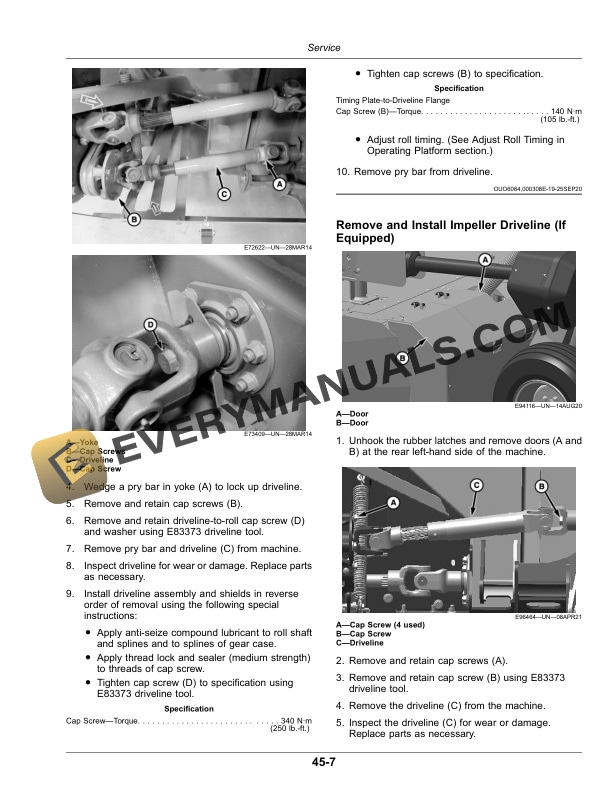
- 8.7. Remove and Install Upper Roll Driveline
- 8.8. Remove and Install Lower Roll Driveline
- 8.9. Remove and Install Impeller Driveline (If Equipped)
- 8.10. Check Converging Drum Wear
- 8.11. Check Converging Drum Wear, Impeller (If Equipped)
- 8.12. Remove and Install Converging Drums
- 8.13. Remove and Install Converging Drums, Impeller (If Equipped)
- 8.14. Remove and Install Converging Drum Drive Belts
- 8.14.1. RightHand Side
- 8.14.2. LeftHand Side
- 8.15. Replace Conditioner Drive Gear Case Belt
- 8.16. Replace Auger Drive Belt
- 8.17. Check Disk Wear
- 8.18. Remove Disks
- 8.19. Install and Synchronize Disks
- 8.20. Replace LeftHand End Disk Driver
- 8.21. Replace Intermediate Disk Drivers
- 8.22. Replace RightHand End Disk Driver
- 8.23. Check Knives
- 8.24. Replace Knives (Machine without QuickChange Knives)
- 8.24.1. Remove Knives
- 8.24.2. Install Knives
- 8.25. Replace Knives (Machine with QuickChange Knives)
- 8.26. Understand Direction of Knife Rotation
- 8.27. Check Knife Wear
- 8.28. Check Knife Fitting Hole
- 8.29. Check Knife Hardware
- 8.30. Check Knife Bolt Wear
- 8.31. Check Knife Lock Nut Wear
- 8.32. Check Knife Retainer Wear (Machine with QuickChange Knives)
- 8.33. Replace Wear Shield on Knife Bolt
- 8.34. Replace Knife Bolt (Machine with QuickChange Knives)
- 8.35. Replace Disk Scraper (Machine with QuickChange Knives)
- 8.35.1. Disk Scraper Configuration
- 8.35.2. Replace Disk Scraper
- 8.36. Replace Crop Accelerator
- 8.37. Remove and Install Gauge Shoes
- 9. Storage
- 9.1. Prepare Platform for Storage
- 9.2. Remove Platform from Storage
- 10. Specifications
- 10.1. Platform Specifications
- 10.2. Metric Bolt and Screw Torque Values
- 10.3. Unified Inch Bolt and Screw Torque Values
- 11. Machine Identification Numbers
- 11.1. Serial Number Plate
- 11.2. Serial Number Plate Description
- 11.3. Record Platform Serial Number
- 11.4. Keep Proof of Ownership
- 11.5. Keep Machines Secure
- 12. John Deere Service Literature Available
- 12.1. Technical Information
- 13. John Deere Service Keeps You on the Job
- 13.1. John Deere Is At Your Service