Description
-
Model List:
- ST12 Strip Till Solutions
- ST16 Strip Till Solutions
- ST18 Strip Till Solutions
- 1. Contents
- 1.0.1. Recognize Safety Information
- 1.0.2. Understand Signal Words
- 1.0.3. Follow Safety Instructions
- 1.0.4. Prepare for Emergencies
- 1.0.5. Operate Safely
- 1.0.6. Handle Agricultural Chemicals Safely
- 1.0.7. Working with Anhydrous Ammonia
- 1.0.8. Anhydrous Ammonia Safety
- 1.0.9. Emergency Procedure for Anhydrous Ammonia
- 1.0.10. Supplying Anhydrous Ammonia Information
- 1.0.11. Handle Chemical Products Safely
- 1.0.12. Use a Signal Person
- 1.0.13. Park Machine Safely
- 1.0.14. Use Safety Lights and Devices
- 1.0.15. Use a Safety Chain
- 1.0.16. Keep Riders Off Machine
- 1.0.17. Transport Safely
- 1.0.18. Tow Loads Safely
- 1.0.19. Observe Maximum Transport Speed
- 1.0.20. Practice Safe Maintenance
- 1.0.21. Handle Electronic Components and Brackets Safely
- 1.0.22. Support Raised Equipment
- 1.0.23. Remove Paint Before Welding or Heating
- 1.0.24. Avoid Heating Near Pressurized Fluid Lines
- 1.0.25. Avoid HighPressure Fluids
- 1.0.26. Check Hydraulic Hoses
- 1.0.27. Store Attachments Safely
- 1.0.28. Dispose of Waste Properly
- 1.1. Safety Signs
- 1.1.1. Replace Damaged or Missing Safety Signs
- 1.1.2. Sign Locations
- 1.2. Safety Features
- 1.2.1. Safety Features
- 1.3. Preparing Tractor
- 1.3.1. Use Tractor Operators Manual
- 1.3.2. Determine Tractor Requirements
- 1.3.3. Secure ThreePoint Hitch
- 1.3.4. Power TakeOff (PTO)
- 1.3.5. Position Tractor Drawbar
- 1.3.6. Prepare Hydraulic SystemJohn Deere R/RT Series Tractors
- 1.3.7. Use a Safety Chain
- 1.4. Preparing Machine
- 1.4.1. Check and Lubricate Machine
- 1.4.2. Check Tire Pressure
- 1.4.3. Check Wheel Nuts
- 1.4.4. Tightening Hardware
- 1.4.5. Row Unit Settings
- 1.5. Attaching And Detaching
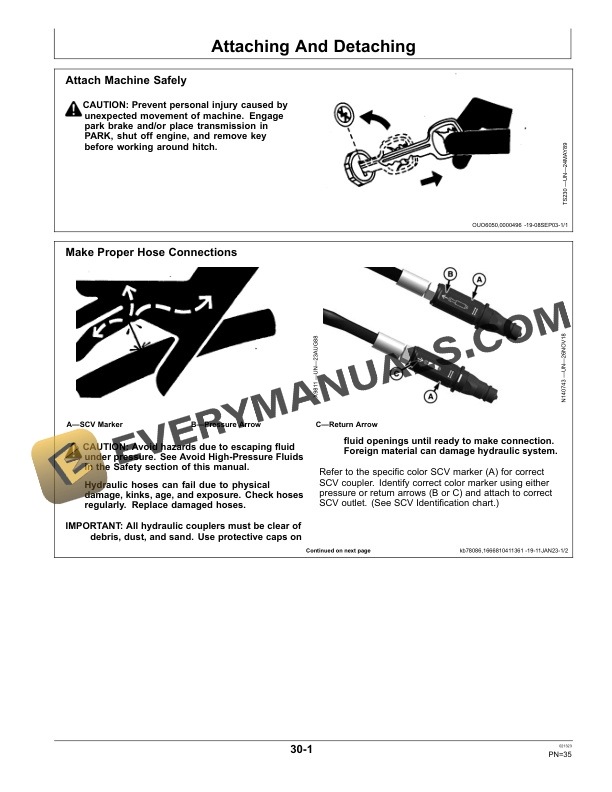
- 1.5.1. Attach Machine Safely
- 1.5.2. Make Proper Hose Connections
- 1.5.3. Attach Drawn Machine to Tractor
- 1.5.4. Attach Safety Chain to Tractor
- 1.5.5. Attach Warning Light Connector
- 1.5.6. Install Air Regulators and Monitor
- 1.5.7. Detach Drawn Machine from Tractor
- 1.6. Transporting
- 1.6.1. Use a Safety Chain
- 1.6.2. Use Safety Lights and Devices
- 1.6.3. Keep Riders Off Machine
- 1.6.4. Tow Loads Safely
- 1.6.5. Observe Maximum Transport Speed
- 1.6.6. Position Jack for Transport
- 1.6.7. Attach Safety Chain to Tractor
- 1.6.8. Attach Warning Light Connector
- 1.6.9. Transport Machine to Field
- 1.7. Operating Machine
- 1.7.1. Keep Riders Off Machine
- 1.7.2. Avoid HighPressure Fluids
- 1.7.3. Understand Air Systems
- 1.7.4. Understand Switch Box Functions
- 1.7.5. Unfold and Fold Wings
- 1.7.6. Adjust the Hitch
- 1.7.7. Prepare the Nutrient Delivery System
- 1.7.8. Inspect and Service Meter Rolls
- 1.7.9. Calibrate Mounted Scale Head
- 1.7.10. Calibration PreFill Recommendations
- 1.7.11. Load FertilizerDry System
- 1.7.12. Prepare to CalibrateDry System
- 1.7.13. PWM BlockDry System
- 1.7.14. PWM Manual OverrideDry System
- 1.7.15. PWM Pressure Reduction Valve AdjustmentDry System
- 1.7.16. Shaft Speed SensorDry System
- 1.7.17. Hydraulic FlowDry System
- 1.7.18. Calibration Settings and Meter Roll SelectionDry System
- 1.7.19. Fan Speed and Water Column SettingsDry System
- 1.7.20. Fertilizer Tube Placement for Dry or Liquid FertilizerDry System
- 1.7.21. PDC Run Block System
- 1.7.22. Configure Active Implement Guidance (if equipped)
- 1.7.23. Adjust JDRC2000 Settings
- 1.7.24. Tighten Hardware
- 1.7.25. Prepare to Operate Drawn Machine in Field
- 1.7.26. Prepare Drawn Machine for InField Application
- 1.8. Lubrication And Maintenance
- 1.8.1. Lubricating and Maintaining Machine Safely
- 1.8.2. Alternative and Synthetic Lubricants
- 1.8.3. Lubricant Storage
- 1.8.4. Beginning and End of Season
- 1.8.5. Lubrication Symbols
- 1.8.6. Daily Machine Maintenance
- 1.8.7. Cart Steering Maintenance
- 1.8.8. Fertilizer Fan Drive Motor Seal Inspection
- 1.8.9. Service RemoteControlled Regulator
- 1.8.10. Lubrication Intervals
- 1.8.11. Air Compressor Maintenance
- 1.8.12. Lubricate Hubs
- 1.8.13. Lubricate Cart Steering Slide Plates
- 1.9. Troubleshooting
- 1.9.1. Troubleshoot Fertilizer FlowDry System
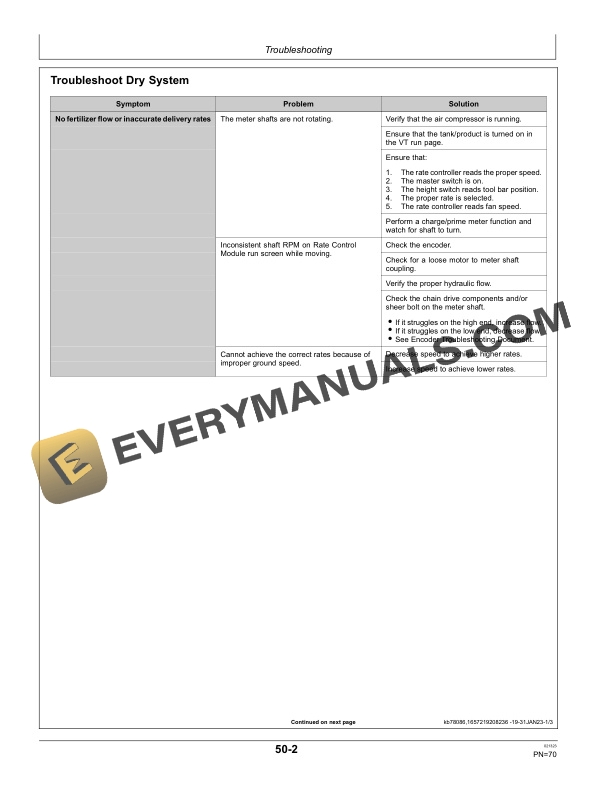
- 1.9.2. Troubleshoot Dry System
- 1.9.3. Troubleshoot Hydraulic Systems
- 1.9.4. Troubleshoot Weigh Tronix Scales
- 1.10. Service
- 1.10.1. Practice Safe Maintenance
- 1.10.2. Using Safe Service Procedures
- 1.10.3. Work in Clean Area
- 1.10.4. Service Machines Safely
- 1.10.5. Illuminate Work Area Safely
- 1.10.6. Support Machine Properly
- 1.10.7. Tighten Hardware
- 1.10.8. Using Safe Service Procedures
- 1.10.9. Metric Bolt and Screw Torque Values
- 1.10.10. Unified Inch Bolt and Screw Torque Values
- 1.10.11. Face Seal Fittings Assembly and InstallationAll Pressure Applications
- 1.10.12. Metric Face Seal and ORing Stud End Fitting Torque ChartStandard Pressures
- 1.10.13. SAE Face Seal and ORing Stud End Fitting Torque ChartStandard Pressures
- 1.10.14. Discarded Tires
- 1.10.15. Service Tires Safely
- 1.10.16. Check Tire Pressure
- 1.10.17. Prevent Hydraulic System Contamination
- 1.10.18. Cleanliness
- 1.10.19. Hydraulic Hose Replacement
- 1.10.20. Inspect and Service Meter Rolls
- 1.10.21. Replace Containment Coulter and Tillage Coulter Hub Bearing and Seal
- 1.10.22. Replace Wheel Hub Bearing and Seal
- 1.10.23. Replace Lead Coulter Hub Bearing
- 1.10.24. Set Avery Weigh Tronix Scale
- 1.10.25. Replace Battery
- 1.11. Storage
- 1.11.1. Prepare for Storage
- 1.12. Specifications
- 1.12.1. Tractor Power Recommendation
- 1.12.2. Hydraulic System Requirements
- 1.12.3. Machine Specifications
- 1.12.4. Downward Force On Tractor Drawbar
- 1.12.5. Keep Proof of Ownership
- 1.12.6. Record Product Identification Number (PIN)
- 1.12.7. Keep Machines Secure
- 1.13. John Deere Service Literature Available
- 1.13.1. Technical Information
- 1.14. John Deere Service Keeps You On The Job
- 1.14.1. John Deere Is At Your Service
- 2. Page Number
- 2.1. Section 05
- 2.2. Section 10
- 2.3. Section 15
- 2.4. Section 20
- 2.5. Section 25
- 2.6. Section 30
- 2.7. Section 35
- 2.8. Section 40
- 2.9. Section 45
- 2.10. Section 50
- 2.11. Section 55
- 2.12. Section 60
- 2.13. Section 65