Description
-
Model List:
- 630C Windrow Pickup
- 640C Windrow Pickup
- 645C Windrow Pickup
- 1. Contents
- 1.1. Identification View
- 1.1.1. Identification View
- 1.1.2. Recognize Safety Information
- 1.1.3. Follow Safety Instructions
- 1.1.4. Understand Signal Words
- 1.1.5. Observe Road Traffic Regulations
- 1.1.6. Store Attachments Safely
- 1.1.7. Prepare for Emergencies
- 1.1.8. Wear Protective Clothing
- 1.1.9. Check Machine Safety
- 1.1.10. Guards and Shields
- 1.1.11. Use Safety Lights and Devices
- 1.1.12. Operate Pickup Safely
- 1.1.13. Stay Clear of Rotating Drivelines
- 1.1.14. Practice Safe Maintenance
- 1.1.15. Avoid HighPressure Fluids
- 1.1.16. Service Tires Safely
- 1.1.17. Use Proper Tools
- 1.1.18. Service Machines Safely
- 1.1.19. Support Machine Properly
- 1.1.20. Stay Clear of Pickup
- 1.1.21. Driving on Public Road with Harvesting Unit Installed
- 1.1.22. Ballasting for Safe Ground Contact
- 1.1.23. Remove Paint Before Welding or Heating
- 1.1.24. Avoid Heating Near Pressurized Fluid Lines
- 1.1.25. Avoid HighPressure Jet on Safety Decals
- 1.1.26. Dispose of Waste Properly
- 1.2. Safety Decals
- 1.2.1. Safety Decals
- 1.3. Preparing the Pickup
- 1.3.1. Unpacking and First Setup
- 1.3.2. Set Gauge Wheel Height
- 1.3.3. Check Adjustment of Automatic Auger Lifting (Option)
- 1.4. Preparing the 6000 and 7000 Harvesters
- 1.4.1. Before Attaching the Pickup on 7000 Series Harvesters
- 1.4.2. Before Attaching the Pickup on 6000 Series Harvesters
- 1.5. Attaching
- 1.5.1. Adjusting Channel Width
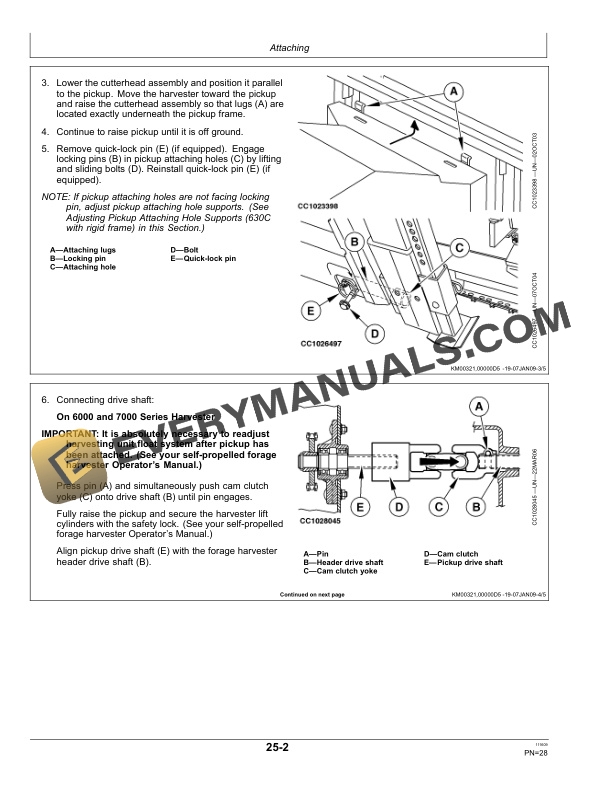
- 1.5.2. Attaching the 630C Pickup with Rigid Frame
- 1.5.3. Adjusting Pickup Attaching Hole Supports (630C with Rigid Frame)
- 1.5.4. Attaching the 630C Pickup with Oscillating Frame
- 1.5.5. Adjusting Pickup Attaching Hole Supports (630C with Oscillating
- 1.5.6. Attaching the 640C and 645C Pickups
- 1.5.7. Adjusting Pickup Attaching Hole Supports (640C and 645C)
- 1.5.8. Connecting Hydraulic Hoses
- 1.6. Detaching
- 1.6.1. Detaching the 630C Pickup
- 1.6.2. Detaching the 640C and 645C Pickups
- 1.7. Transporting the Pickup
- 1.7.1. Observe Public Road Legislation
- 1.7.2. Locking Oscillating Frame (if equipped)
- 1.7.3. Setting Crop Deflector in Transport Position
- 1.7.4. Setting Gauge Wheels in Transport Position
- 1.7.5. Setting Roller Compression Unit in Transport Position (Option)
- 1.8. Operating the Pickup
- 1.8.1. Follow Safe Operating Procedures
- 1.8.2. Working Under A Raised Roller Compression Unit (Option)
- 1.8.3. Unlocking Oscillating Frame (if equipped)
- 1.8.4. Setting Gauge Wheels in Operating Position
- 1.8.5. Setting Crop Deflector in Operating Position
- 1.8.6. Adjusting Crop Deflector
- 1.8.7. Adjusting Crop Deflector Working Height
- 1.8.8. Adjusting Crop Deflector Sheet Angle
- 1.8.9. Setting Roller Compression Unit in Operating Position (Option)
- 1.8.10. Operating the Roller Compression Unit (Option)
- 1.8.11. Adjusting Deflector Plate of Roller Compression Unit (Option)
- 1.8.12. Adjusting Rake of Roller Compression Unit (Option)
- 1.8.13. Adjusting Gauge Wheel Height
- 1.8.14. Adjusting the Pickup Float
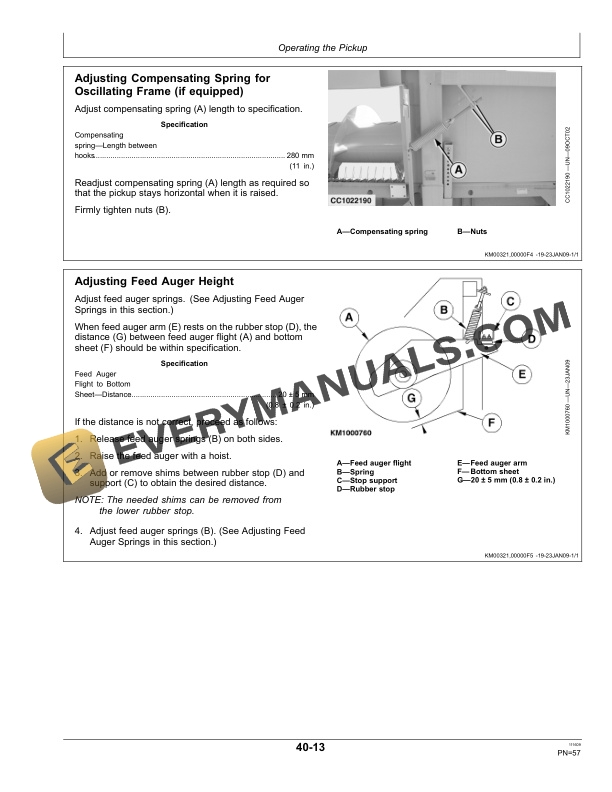
- 1.8.15. Adjusting Compensating Spring for Oscillating Frame (if equipped
- 1.8.16. Adjusting Feed Auger Height
- 1.8.17. Adjusting Feed Auger Springs
- 1.8.18. Adjusting the Scrapers
- 1.8.19. Adjusting Automatic Auger Lifting (Option)
- 1.8.20. Adjusting Feed Auger Speed
- 1.8.21. Opening the Side Guard
- 1.8.22. Adjusting Feed Auger Retractable Fingers (if equipped)
- 1.8.23. Adjusting Feed Auger Paddles (if equipped)
- 1.8.24. Adjusting the Stone Trap
- 1.9. Attachments
- 1.9.1. Top Flight Reinforcement Kit
- 1.9.2. Special Kit for Feed Auger Drive High Speed
- 1.9.3. Roller Compression Unit
- 1.9.4. Automatic Auger Lifting
- 1.10. Lubrication and Maintenance
- 1.10.1. Lubrication Intervals
- 1.10.2. Gear Oil
- 1.10.3. Alternative and Synthetic Lubricants
- 1.10.4. Lubricant Storage
- 1.10.5. Mixing of Lubricants
- 1.10.6. Every 10 Hours 630C Pickup Drive Shaft
- 1.10.7. Every 10 Hours 640C and 645C Pickup Drive Shaft
- 1.10.8. Every 10 Hours Drive Chains
- 1.10.9. Every 50 Hours Pivoting Gauge Wheels
- 1.10.10. Every 50 Hours Lift Arms of Roller Compression Unit (Option)
- 1.10.11. Every 50 Hours Feeding Auger Pivot Points
- 1.10.12. Every 50 Hours Oscillating Frame Pivot (if equipped)
- 1.10.13. Every 500 Hours Gear Case
- 1.11. Troubleshooting
- 1.11.1. Pickup Operation
- 1.12. Service
- 1.12.1. Metric Bolt and Screw Torque Values
- 1.12.2. Adjusting the Drive Chains
- 1.12.3. Feeding Auger Rubber Stops
- 1.12.4. Adjusting Deflector Compensating Springs
- 1.12.5. Windrow Pickup Hanging Points
- 1.13. Storage
- 1.13.1. Storing the Pickup
- 1.13.2. Taking the Pickup out of Storage
- 1.14. Specifications
- 1.14.1. Pickup
- 1.14.2. Pickup
- 1.14.3. Pickup
- 1.15. Serial Number
- 1.15.1. Serial Number
- 1.15.2. Pickup Serial Number Plate (Up to Construction Year 2009)
- 1.15.3. Pickup Serial Number Plate (From Construction Year 2010)
- 1.15.4. Record Pickup Serial Number
- 1.15.5. Keep Proof of Ownership
- 1.15.6. Keep Machines Secure
- 1.16. John Deere Service Literature Available
- 1.16.1. Technical Information
- 1.17. John Deere Service Keeps You On The Job
- 1.17.1. John Deere Is At Your Service
- 2. Page Number
- 2.1. Section 00
- 2.2. Section 05
- 2.3. Section 10
- 2.4. Section 15
- 2.5. Section 20
- 2.6. Section 25
- 2.7. Section 30
- 2.8. Section 35
- 2.9. Section 40
- 2.10. Section 45
- 2.11. Section 50
- 2.12. Section 55
- 2.13. Section 60
- 2.14. Section 65
- 2.15. Section 70
- 2.16. Section 75
- 2.17. Section JDSLA