Description
-
Model List:
- 490Plus Rotary Harvesting Unit
- 1. Contents
- 1.1. Predelivery Inspection
- 1.1.1. Predelivery Checklist
- 1.1.2. Delivery Checklist
- 1.1.3. AfterSale Checklist
- 1.2. Identification View
- 1.2.1. Identification View
- 1.3. Safety Measures
- 1.3.1. Recognize Safety Information
- 1.3.2. Follow Safety Instructions
- 1.3.3. Understand Signal Words
- 1.3.4. Observe Road Traffic Regulations
- 1.3.5. Operator Ability
- 1.3.6. Use Safety Lights and Devices
- 1.3.7. Prepare for Emergencies
- 1.3.8. Wear Protective Clothing
- 1.3.9. Check Machine Safety
- 1.3.10. Guards and Shields
- 1.3.11. Stay Clear of the Intake Area
- 1.3.12. Stay Clear of Harvesting Unit
- 1.3.13. Keep Hands Away From Knives
- 1.3.14. Store Attachments Safely
- 1.3.15. Practice Safe Maintenance
- 1.3.16. Stay Clear of Rotating Drivelines
- 1.3.17. Service Machines Safely
- 1.3.18. Support Machine Properly
- 1.3.19. Avoid HighPressure Fluids
- 1.3.20. Driving on Roads with Rotary Harvesting Unit Attached
- 1.3.21. Ballasting for Safe Ground Contact
- 1.3.22. Remove Paint Before Welding or Heating
- 1.3.23. Avoid HighPressure Jet on Safety Decals
- 1.3.24. Decommissioning Proper Recycling and Disposal of Fluids and Components
- 1.3.25. Protect Against Noise
- 1.3.26. Park Machine Safely
- 1.4. Safety Decals
- 1.4.1. Pictorial Safety Signs
- 1.4.2. Replace Safety Signs
- 1.4.3. Operators Manual
- 1.4.4. Repair and Maintenance
- 1.4.5. Rotating Blades
- 1.4.6. Folding Area of the Rotary Harvesting Unit
- 1.4.7. Stay Clear of Rotary Harvesting Unit
- 1.4.8. Rotating Drums
- 1.4.9. Crushing Danger Area
- 1.4.10. Foldable Feed Bars
- 1.4.11. Hydraulic Lines
- 1.4.12. Driveshaft
- 1.4.13. Input Transmission
- 1.5. Haulage
- 1.5.1. Haulage With a Forklift General
- 1.5.2. Loading with a crane (rotary harvesting units up to serial no 135629)
- 1.5.3. Loading with a Crane (rotary harvesting unit starting with Serial No. 135630)
- 1.5.4. Secure the Rotary Harvesting Unit for Transport (Lashing Points)
- 1.6. Preparing the rotary harvesting unit
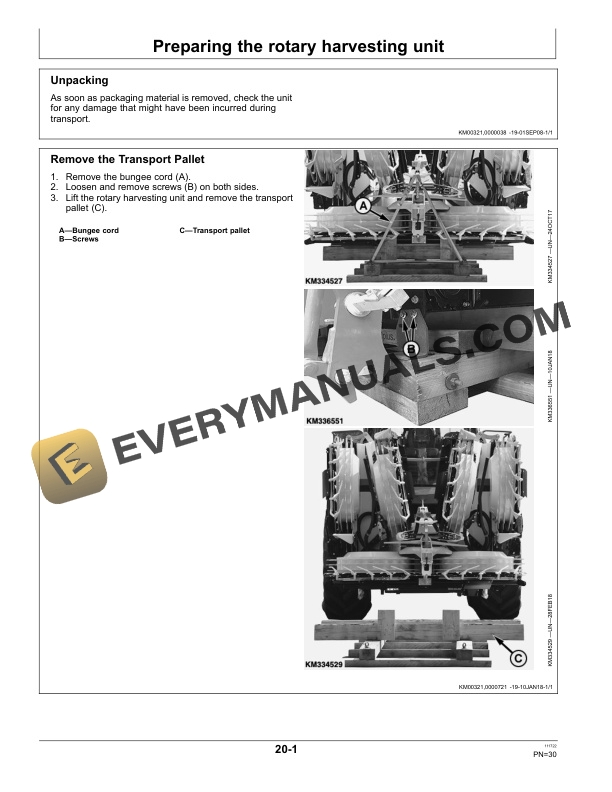
- 1.6.1. Unpacking
- 1.6.2. Remove the Transport Pallet
- 1.6.3. Moving the shipping stands into the parking position (rotary harvesting unit up to serial no. 135629)
- 1.7. Attaching to a CLAAS Forage Harvester
- 1.7.1. Compatibility Chart
- 1.7.2. Ballasting Harvester
- 1.7.3. Adjust additional headlights on forage harvester
- 1.7.4. Attaching to type 498, 499 and 502 forage harvesters with variable header drive
- 1.7.5. Installing the additional wiring harness (only forage harvesters of types 498, 499 and 502)
- 1.7.6. Attaching to CLAAS Forage Harvesters
- 1.7.7. Rotary Harvesting Units with MultiSpeed Gearbox and Quick Coupler
- 1.7.8. Connect the wiring harness
- 1.7.9. Connect Hydraulic Hoses
- 1.7.10. Replace CLAAS Tray with KEMPER Tray
- 1.8. Attachment to a FENDT Forage Harvester
- 1.8.1. Requirements for the Rotary Harvesting Unit Attachment 490plus
- 1.8.2. Align the Tilt Frame
- 1.8.3. Attaching the Rotary Harvesting Unit to the FENDT Forage Harvesters
- 1.8.4. Connect Hydraulic Hoses and Wiring Harness
- 1.8.5. Shaft
- 1.8.6. Connect U.J. Shaft
- 1.8.7. Select hydraulic setting for the attachment
- 1.8.8. Lateral tilt lock on tilt frame
- 1.9. Detaching the Rotary Harvesting Unit
- 1.9.1. Detach the Rotary Harvesting Unit
- 1.10. Transporting
- 1.10.1. Driving on Public Roads
- 1.10.2. Fold the Rotary Harvesting Unit
- 1.10.3. Apply Decal (Rotary Harvesting Units with Support Wheel)
- 1.10.4. Driving on Public Roads (Rotary Harvesting Units with Comfort Support Wheel)
- 1.10.5. Driving on Public Roads (Rotary Harvesting Units without Comfort Support Wheel)
- 1.11. Operating the Rotary Harvesting Unit
- 1.11.1. Rotary Harvesting Unit Method of Operation
- 1.11.2. Operating the Rotary Harvesting Unit General Use
- 1.11.3. Removing blockages
- 1.11.4. Feeder House Drum Operating Speeds
- 1.11.5. Adjusting Gear Selection with MultiSpeed Gearbox for CLAAS Forage Harvesters
- 1.11.6. Lengths of Cut and Gear Selection with MultiSpeed Gearbox for CLAAS Forage Harvesters
- 1.11.7. Harvesting
- 1.11.8. Hydraulic System
- 1.12. Troubleshooting
- 1.12.1. lus Rotary Harvesting Unit
- 1.13. Lubrication and Periodic Service
- 1.13.1. Service Intervals
- 1.13.2. Fluid Grease for Drives
- 1.13.3. Transmission Oil
- 1.13.4. Coolant for Main Drive Friction Clutch
- 1.13.5. Alternative and Synthetic Lubricants
- 1.13.6. Mixing Lubricants
- 1.13.7. Lubricant Storage
- 1.13.8. At the Start of Every Harvesting Season
- 1.13.9. Use Genuine KEMPER Parts
- 1.13.10. At the Start of Every Harvesting SeasonSpherical Collar Bolts
- 1.13.11. At the Start of Every Harvesting SeasonTransmission Mounting Flange Attaching Screws
- 1.13.12. At the beginning of each harvesting season adjust latch of the chassis
- 1.13.13. General View of Drives and Oil Levels on the Rotary Harvesting Unit
- 1.13.14. Overview of Oil Levels in Input Transmission
- 1.13.15. Every 10 Hours of OperationCleaners and Blade Rotor Segments
- 1.13.16. Every 10 HoursBalancing Weights
- 1.13.17. Every 50 HoursClaw Clutch
- 1.13.18. Every 50 HoursLower Pin of Hydraulic Cylinder and Pivots of the Outer Units
- 1.13.19. Every 50 hours of operationUpper rollers of the tilt frame (rotary harvesting units for CLAAS forage harvesters)
- 1.13.20. Every 50 hours of operationLower rollers of the tilt frame (rotary harvesting units for CLAAS forage harvesters)
- 1.13.21. Every 50 hours of operationSpringloaded pins
- 1.13.22. Every 50 hours of operationAxle pins of the outer units
- 1.13.23. Every 50 operating hoursFold cylinders
- 1.13.24. Every 50 operating hoursLatch jaws
- 1.13.25. Every 3 YearsChange Coolant of Main Drive Friction Clutch
- 1.13.26. After each harvesting season
- 1.14. Service
- 1.14.1. Metric Bolt and Screw Torque Values
- 1.14.2. Relieving Pressure at the Slip Clutches on the Main Drive
- 1.14.3. Disassemble Slip Clutch
- 1.14.4. Installing New Rotating Blades
- 1.14.5. Adjusting the Dividers
- 1.14.6. Checking Adjustment of Scrapers (Inner Drums)
- 1.14.7. Checking Adjustment of Scrapers (Outer Drums)
- 1.14.8. Check Condition of Cleaners
- 1.14.9. Cleaning Rotary Harvesting Unit
- 1.15. Storage
- 1.15.1. Storage at End of Harvesting Season
- 1.15.2. Start of New Season
- 1.16. Specifications
- 1.16.1. Machine Design Life
- 1.16.2. Rotary Harvesting Unit 490plus
- 1.16.3. Sound level
- 1.16.4. EU Declaration of Conformity
- 1.16.5. UK Declaration of Conformity
- 1.17. Serial Number
- 1.17.1. Rotary Harvesting Unit Serial Number Plate
- 1.17.2. Serial Number
- 2. Page Number
- 2.1. Section CLIST
- 2.2. Section 00
- 2.3. Section 05
- 2.4. Section 10
- 2.5. Section 15
- 2.6. Section 20
- 2.7. Section 25
- 2.8. Section 28
- 2.9. Section 30
- 2.10. Section 35
- 2.11. Section 40
- 2.12. Section 45
- 2.13. Section 50
- 2.14. Section 55
- 2.15. Section 60
- 2.16. Section 65
- 2.17. Section 70