
Description
-
Model List:
- 600R Series Cutting Platform
- 1. Contents
- 1.1. Predelivery Inspection
- 1.1.1. Predelivery Inspection
- 1.2. Identification View
- 1.2.1. Identification View
- 1.2.2. Recognize Safety Information
- 1.2.3. Follow Safety Instructions
- 1.2.4. Observe Road Traffic Regulations
- 1.2.5. Use Safety Lights and Devices
- 1.2.6. Prepare for Emergencies
- 1.2.7. Wear Protective Clothing
- 1.2.8. Store Attachments Safely
- 1.2.9. Guards and Shields
- 1.2.10. Stay Clear of Harvesting Units
- 1.2.11. Keep Hands Away From Knives
- 1.2.12. Stay Clear of Rotating Drivelines
- 1.2.13. Stay Clear of Cutterbar When Rotating Auger
- 1.2.14. Ballasting for Safe Ground Contact
- 1.2.15. Practice Safe Maintenance
- 1.2.16. Service Machines Safely
- 1.2.17. Support Machine Properly
- 1.2.18. Protect Against Noise
- 1.2.19. Avoid Heating Near Pressurized Fluid Lines
- 1.2.20. Avoid HighPressure Fluids
- 1.2.21. Decommissioning Proper Recycling and Disposal of Fluids and Components
- 1.3. Safety Decals
- 1.3.1. Pictorial Safety Signs
- 1.3.2. Cutting Platform
- 1.3.3. Cutting Platform Drive Shaft
- 1.3.4. Shields on Cutting Platform Drives
- 1.3.5. Reel Lifting Cylinder
- 1.4. Adjust Cutting Platform
- 1.4.1. Adjust Cutting Platform to Combine
- 1.4.2. Adjust Cutting Platform for W650, W660, T660, T670
- 1.4.3. Adjust Cutting Platform for W650, W660, T660, T670 HillMaster
- 1.4.4. Adjust Cutting Platform for W440, W540, W550, T550, T560
- 1.4.5. Adjust Cutting Platform for W540, W550, T550, T560 HillMaster
- 1.4.6. Adjust Cutting Platform for S660, S670, S680, S690
- 1.4.7. Adjust Cutting Platform for S560
- 1.5. Attaching and Detaching
- 1.5.1. Adjust Lock
- 1.5.2. Attach Cutting Platform to Combine
- 1.5.3. Detach Cutting Platform
- 1.6. Transport
- 1.6.1. Transporting the Cutting Platform
- 1.7. Operating the Cutting Platform
- 1.7.1. Cutting Platform Operation
- 1.7.2. Cutting Platform Controls
- 1.7.3. Combining Oats, Sorghum and Wheat in Dry Ground Conditions
- 1.7.4. Combining Oats, Sorghum and Wheat in Damp Ground Conditions
- 1.7.5. Combining Oats, Sorghum, Barley and Wheat in Short, Thin Crops
- 1.7.6. Combining Rice
- 1.7.7. Heavy Duty Wear Plates (Optional)
- 1.7.8. Safety Stop for Platform Lift Cylinder
- 1.7.9. Setting the Safety Stops on the Reel Raising Cylinder
- 1.7.10. Skid Plates for Automatic Header Control
- 1.7.11. FineCut Knife (Option)
- 1.7.12. Basic Setting of Reel
- 1.7.13. Adjusting Reel Tine Position
- 1.7.14. Basic Setting for Reel Fore/Aft and Lift Cylinders
- 1.7.15. Crop Dividers
- 1.7.16. Installing Crop Dividers
- 1.7.17. Adjusting Short Crop Divider Inner Deflector
- 1.7.18. Adjusting Long Crop Divider Inner Deflector
- 1.7.19. Installing Long Outer Deflector
- 1.7.20. Installing Lifting Guards
- 1.7.21. Knife Protection Guard
- 1.7.22. Adjust the Angle of Tilt of the Cutting Platform
- 1.7.23. Cutterbar Position
- 1.7.24. Adjust Cutterbar Fore/Aft
- 1.7.25. Adjust Auger Height
- 1.7.26. Adjusting Auger Finger Timing
- 1.7.27. Adjusting Auger Fore/Aft
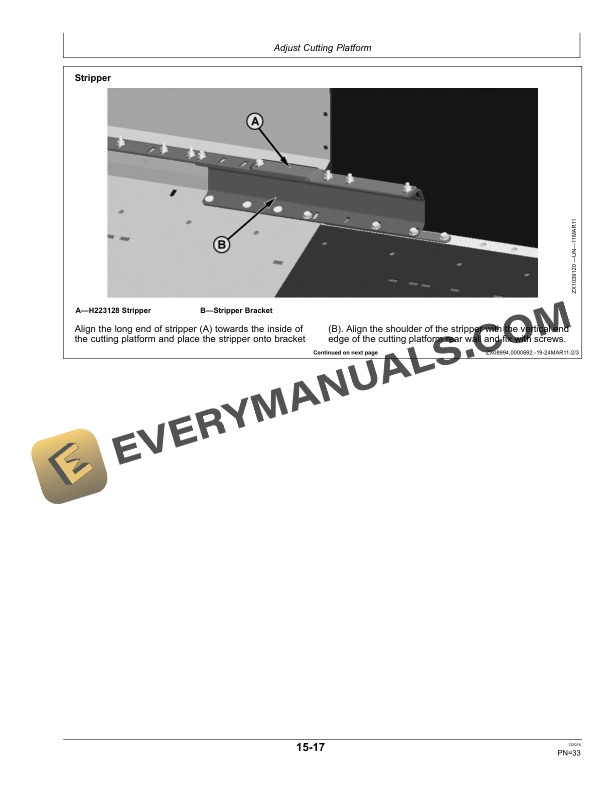
- 1.7.28. Adjust Rear Stripper
- 1.7.29. Adjust Auger Chain
- 1.7.30. Auger AntiWrap Shields
- 1.8. Lubricants and Capacities
- 1.8.1. Gear Oil
- 1.8.2. Alternative and Synthetic Lubricants
- 1.8.3. Mixing of Lubricants
- 1.8.4. Lubricant Storage
- 1.9. Lubrication Charts, Periodic Service
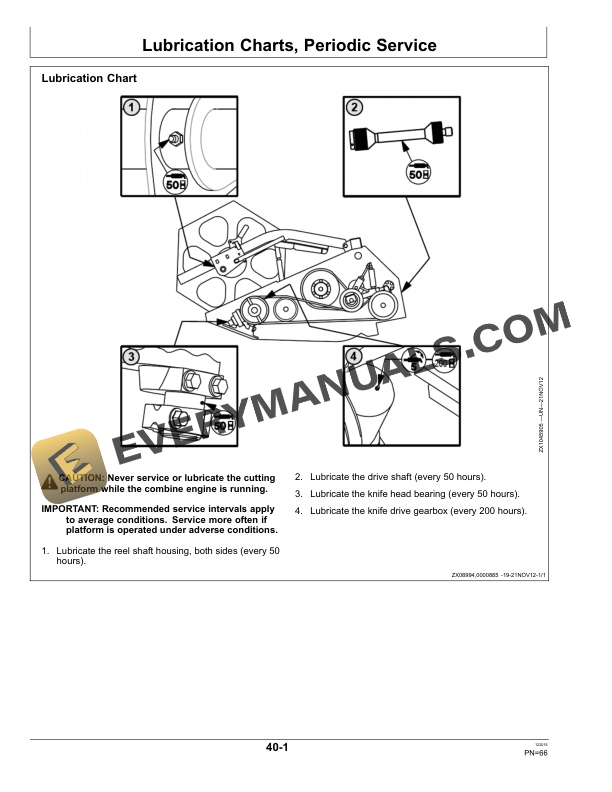
- 1.9.1. Lubrication Chart
- 1.10. Troubleshooting
- 1.10.1. Cutterbar Difficulties
- 1.10.2. Down and Tangled Crops Difficulties
- 1.10.3. Feeder House Difficulties
- 1.10.4. Auger Difficulties
- 1.10.5. Cutting Difficulties
- 1.10.6. Reel Difficulties
- 1.11. Service
- 1.11.1. Safety Stop for Platform Lift Cylinder
- 1.11.2. Setting the Safety Stops on the Reel Raising Cylinder
- 1.11.3. Adjusting Reel Speed Ratio Sensor
- 1.11.4. Replace Knife
- 1.11.5. Align Knife Head and Knife Drive
- 1.11.6. Adjusting Hold Down Clips (Forged Guards Only)
- 1.11.7. Adjusting Wear Plates
- 1.11.8. Replacing Knife Sections
- 1.11.9. Replace Auger Fingers and Retainers
- 1.11.10. Remove and Install Knife Drive Belt
- 1.11.11. Adjust the Sensor Straps
- 1.11.12. Rephasing Reel Lift Cylinders
- 1.11.13. Bleed the Reel Lift Cylinders
- 1.12. Storage
- 1.12.1. End of Season Service
- 1.12.2. Beginning of Season Service
- 1.13. Specifications
- 1.13.1. Cutting Platform Specifications
- 1.13.2. EC Declaration of Conformity
- 1.13.3. Metric Bolt and Screw Torque Values
- 1.13.4. Unified Inch Bolt and Screw Torque Values
- 1.14. Serial Number
- 1.14.1. Product Identification Number
- 1.14.2. Serial Number Plate
- 1.15. John Deere Service Keeps You on the Job
- 1.15.1. John Deere Parts
- 1.15.2. The Right Tools
- 1.15.3. WellTrained Technicians
- 1.15.4. Prompt Service
- 2. Page Number
- 2.1. Section CLIS
- 2.2. Section 00
- 2.3. Section 05
- 2.4. Section 10
- 2.5. Section 15
- 2.6. Section 20
- 2.7. Section 25
- 2.8. Section 30
- 2.9. Section 35
- 2.10. Section 40
- 2.11. Section 45
- 2.12. Section 50
- 2.13. Section 55
- 2.14. Section 60
- 2.15. Section 65




