Description
-
Model List:
- RT1038 Rotary Tiller
- 1. Contents
- 1.0.1. Recognize Safety Information
- 1.0.2. Understand Signal Words
- 1.0.3. Follow Safety Instructions
- 1.0.4. Prevent Machine Runaway
- 1.0.5. Operate Machine Safely
- 1.0.6. Keep Riders Off Machine
- 1.0.7. Avoid Rollover Accidents
- 1.0.8. Prepare for Emergencies
- 1.0.9. Wear Protective Clothing
- 1.0.10. Use Safety Lights and Devices
- 1.0.11. Transport Safety
- 1.0.12. Service Machine Safely
- 1.0.13. Practice Safe Maintenance
- 1.0.14. Remove Paint Before Welding or Heating
- 1.0.15. Store Attachments Safely
- 1.0.16. Decommissioning Proper Recycling and Disposal of Fluids and Components
- 1.1. Safety Signs
- 1.1.1. Safety Sign Locations Light Duty Rotary Tiller
- 1.1.2. Decal A Read Operator Manual
- 1.1.3. Decal B Shutoff Engine, Remove Keys
- 1.1.4. Decal C Wear Safety Gloves
- 1.1.5. Decal D Throwing Objects
- 1.1.6. Decal E Hot Surfaces (Burns to fingers or hands)
- 1.1.7. Decal F Stay Away from Raised Implement (Feet/Toe Crush or Smash)
- 1.1.8. Decal G Rotating and Moving Parts
- 1.1.9. Decal H Operate the Tractor at Safe Speed
- 1.1.10. Decal J PTO and Rotating Components of Implements
- 1.1.11. Decal K Rotating Driveshaft (PTO Entanglement)
- 1.1.12. Decal I Slow Moving Vehicle (SMV)
- 1.2. Preparing the Tractor
- 1.2.1. Use Your Tractor Operators Manual
- 1.2.2. Front Counterweight
- 1.2.3. Rear Wheel Counterweight
- 1.2.4. Determining FrontEnd Ballast Without Implement Codes
- 1.2.5. Check Tire Inflation Pressure
- 1.2.6. Lift Rods
- 1.2.7. Top Link
- 1.2.8. Sway Chains
- 1.2.9. Preparing the Hitch
- 1.2.10. Tighten Fasteners
- 1.2.11. Top Link Adjustment
- 1.2.12. Lift Links
- 1.2.13. Float Adjustment
- 1.2.14. Rockshaft Control Levers
- 1.2.15. Set Position Control Lever Stop
- 1.2.16. Use Rockshaft Position Control
- 1.2.17. Use Draft Control
- 1.2.18. Position Center Link
- 1.3. Preparing the Rotary Tiller
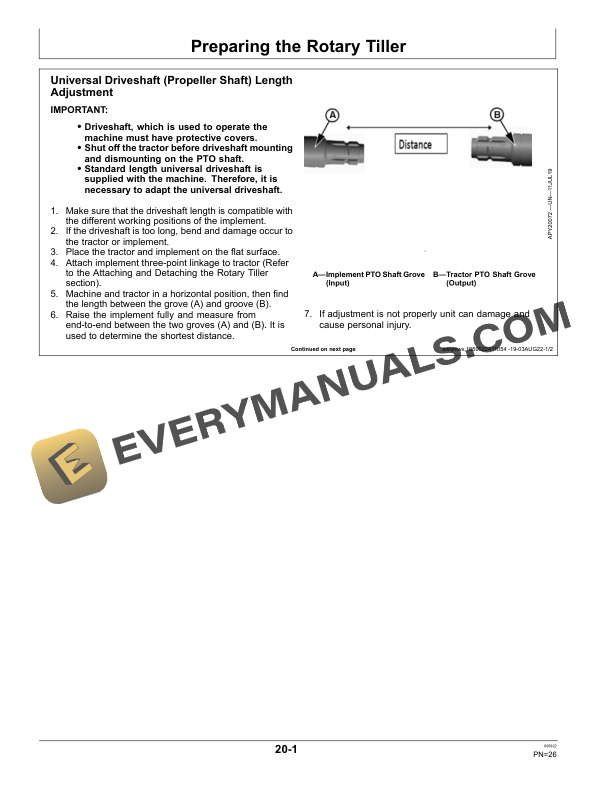
- 1.3.1. Universal Driveshaft (Propeller Shaft) Length Adjustment
- 1.3.2. Trailing Board Assembly
- 1.3.3. Tightening Hardware
- 1.4. Attaching and Detaching the Rotary Tiller
- 1.4.1. Attaching Rotary Tiller to Tractor
- 1.4.2. Detaching Rotary Tiller from Tractor
- 1.5. Adjustments
- 1.5.1. Skid Shoe Adjustment
- 1.5.2. MultiSpeed Gear Drive Adjustment (If Equipped with MultiSpeed Gearbox)
- 1.5.3. Trailing Board Adjustment
- 1.6. Operating the Rotary Tiller
- 1.6.1. Starting Operation
- 1.6.2. Field Operation of the Rotary Tiller
- 1.6.3. Parking of the Rotary Tiller
- 1.6.4. Propeller Shaft Connection
- 1.6.5. Driveline with Safety Limiter and Shear Bolt
- 1.7. Transporting
- 1.7.1. Transport Safely
- 1.7.2. Transporting
- 1.8. Lubrication and Maintenance
- 1.8.1. Lubricate and Maintain the Machine Safely
- 1.8.2. Lubrication and Maintenance Procedures
- 1.8.3. Lubrication Symbols
- 1.8.4. Alternative Lubricants
- 1.8.5. Lubrication of Rotary Tiller
- 1.8.6. Maintenance Schedule of Rotary Tiller
- 1.8.7. Oil Capacity of LightDuty Rotary Tiller
- 1.8.8. Daily or Every 8 hours Work
- 1.8.9. Weekly or Every 50 hours Work
- 1.8.10. Every 200 hours Work
- 1.8.11. Every 400 hours Work
- 1.8.12. Driveshaft (Propeller Shaft)
- 1.8.13. Bearing Housing Lubrication (Greasing Points)
- 1.8.14. Lubrication NonDrive Side
- 1.8.15. Gearbox Lubrication Multispeed Gearbox
- 1.8.16. Side Drive Lubrication
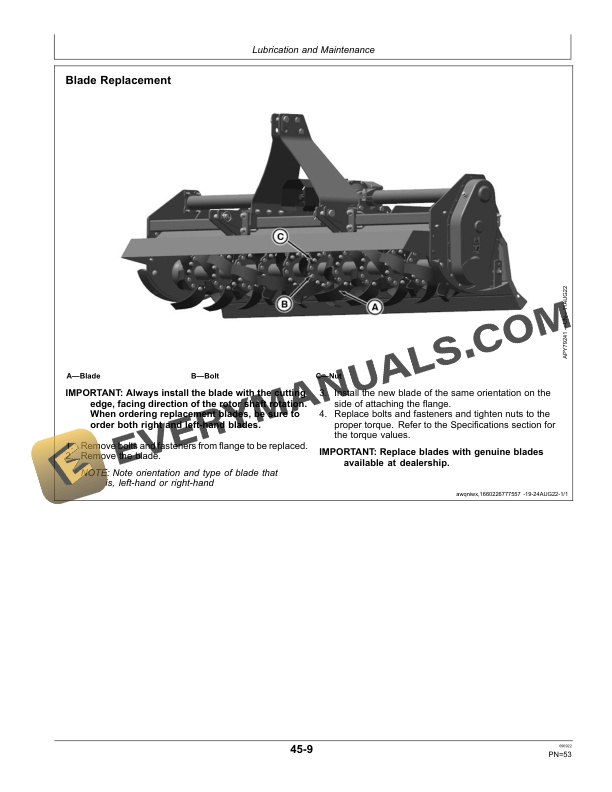
- 1.8.17. Blade Replacement
- 1.9. Storage
- 1.9.1. End of Season Storage
- 1.9.2. Start of Season Preparation
- 1.9.3. Scrapping
- 1.10. Troubleshooting
- 1.10.1. Rotary Tiller
- 1.11. Specifications
- 1.11.1. LightDuty Rotary Tiller
- 1.11.2. Serial Number
- 1.11.3. Metric Bolt and Screw Torque Values
- 1.11.4. Unified Inch Bolt and Screw Torque Values
- 1.11.5. Keep Machines Secure
- 1.12. Tool Kit
- 1.12.1. Tool Kit Bag
- 1.12.2. LightDuty Rotary Tiller
- 1.13. Inspection Checklists
- 1.13.1. PreDelivery Inspection
- 1.13.2. Owners Record
- 1.13.3. Delivery Inspection
- 1.13.4. Inspection Before Each Day of Operation
- 1.13.5. Inspection Before Each Season
- 1.13.6. Top Mast Assembly
- 1.14. Limited Warranty Statement
- 1.14.1. General Provision
- 1.14.2. Authorised Dealers
- 1.14.3. Preconditions to Avail Warranty and Documentation Requirement
- 1.14.4. User Responsibility
- 1.14.5. Warranty Term and Equipment Covered Under This Warranty
- 1.14.6. Warranty shall not Cover the Following
- 1.14.7. JDAs liability under this Warranty
- 1.14.8. No implied Warranty, representation or condition
- 1.14.9. Dealer Warranty
- 1.14.10. Contact Information
- 1.14.11. Jurisdiction
- 1.14.12. Privacy Notice
- 1.14.13. CUSTOMER COPY
- 1.14.14. DEALER COPY
- 1.15. Implement Identification and Installation Certificate
- 1.15.1. INSTALLATION CERTIFICATE
- 1.15.2. CUSTOMER COPY
- 1.15.3. INSTALLATION CERTIFICATE
- 1.15.4. DEALER COPY
- 2. Page Number
- 2.1. Section 05
- 2.2. Section 10
- 2.3. Section 15
- 2.4. Section 20
- 2.5. Section 25
- 2.6. Section 30
- 2.7. Section 35
- 2.8. Section 40
- 2.9. Section 45
- 2.10. Section 46
- 2.11. Section 50
- 2.12. Section 55
- 2.13. Section 57
- 2.14. Section 60
- 2.15. Section 65
- 2.16. Section 70