Description
-
Model List:
- TE Gator Utility Vehicles
- 1. Introduction
- 1.1. Thank You for Purchasing a John Deere Product
- 1.2. Using Your Operators Manual
- 1.3. Special Messages
- 1.4. Attachments for Your Machine
- 2. Contents
- 3. Product Identification
- 3.1. Record Identification Numbers
- 4. Safety Labels with Text
- 4.1. Safety Label Location
- 4.2. Understanding the Machine Safety Labels
- 4.2.1. French or Spanish Safety Labels and Operators Manual
- 4.3. Caution
- 4.3.1. HELP PREVENT INJURY WHEN DUMPING LOADS
- 4.4. Warning
- 4.4.1. WARNING YOUNG DRIVERS INCREASE CHANCE OF DEATH
- 4.4.2. CAUTION BEFORE LEAVING VEHICLE
- 4.5. Warning
- 4.5.1. ROLLOVER OR FALLING OFF MAY CAUSE DEATH
- 4.6. Danger/Caution
- 4.6.1. CAUTION
- 4.7. Warning
- 4.7.1. AVOID INJURY FROM EXPLOSION
- 4.7.2. RIDERS CAN FALL OFF AND BE KILLED
- 4.8. SAE J2258 and ASME B56.8 Compliance
- 5. Safety Labels without Text
- 5.1. Safety Label Location
- 5.2. Understanding the Machine Safety Labels without Text
- 5.3. Help Prevent Injury When Dumping Loads
- 5.4. Avoid Injury From Explosion or Riders Falling Off
- 5.5. Avoid Injury From Batteries and Motor Exploding
- 5.6. Young Drivers Increase Chance of Death
- 5.7. Rollover or Falling Off May Cause Death
- 5.8. Avoid Injury From Electrical Burns or Battery Explosion
- 5.9. Drawbar Load
- 5.10. Operating Safely
- 5.11. Parking Safely
- 5.12. Protect Children and Prevent Accidents
- 5.13. Avoid Excessive Speeds
- 5.14. Avoid Tipping
- 5.15. Keep Riders Off Vehicle
- 5.16. Transport Loads Safely
- 5.17. Towing Loads Safely With Utility Vehicle
- 5.18. Operator Ability
- 5.19. Before Driving
- 5.20. Driving On Rough Terrain
- 5.21. Climbing Or Descending A Hill or Slope
- 5.22. Driving Across Slopes
- 5.23. Riding Through Water
- 5.24. Checking Wheel Hardware
- 5.25. Wear Appropriate Clothing
- 5.26. Practice Safe Maintenance
- 5.27. Prevent Fires
- 5.28. Do Not Modify Machine
- 5.29. Tire Safety
- 5.30. Handling Fuel Safely
- 5.31. Handling Waste Product and Chemicals
- 6. Operating Controls
- 6.1. Operator Station Controls
- 7. Operating
- 7.1. Daily Operating Checklist
- 7.2. Avoid Damage to Plastic and Painted Surfaces
- 7.3. Using Hand Holds
- 7.4. Adjusting Standard Seat
- 7.5. Adjusting Driver Seat with Optional Lever System
- 7.6. Testing Safety Systems
- 7.6.1. Test 1 (REVERSE WARNING ALARM)
- 7.6.2. Test 2 (ROLLAWAY ALARM)
- 7.6.3. Test 3 (OPERATOR PRESENCE)
- 7.6.4. Test 4 (CHARGER INTERLOCK)
- 7.7. Using the Directional Control Switch
- 7.8. Using the LCD Charge Meter and the Hour Meter
- 7.8.1. Charge Meter
- 7.8.2. Hour Meter
- 7.9. Using the Service and Drive Switch
- 7.9.1. Service Position
- 7.9.2. Drive Position
- 7.10. Using Park Brake
- 7.10.1. Locking the Park Brake
- 7.10.2. Unlocking the Park Brake
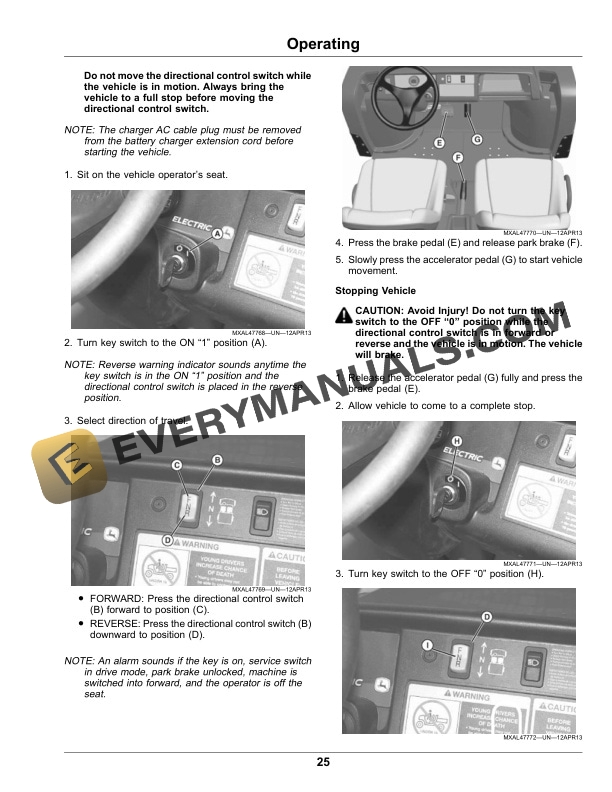
- 7.11. Starting and Stopping the Vehicle
- 7.11.1. Starting Vehicle
- 7.11.2. Stopping Vehicle
- 7.12. Using the Cargo Box
- 7.12.1. Raising with Manual Lift
- 7.12.2. Raising and Lowering with Power Lift
- 7.12.3. Locking Box in Raised Position
- 7.12.4. Operating the Tailgate
- 7.12.5. Removing the Tailgate
- 7.12.6. Using Cargo Box Tie Downs
- 7.13. Loading the Cargo Box
- 7.13.1. Box Volume Capacity
- 7.14. Emptying Cargo Box
- 7.15. Converting the Cargo Box to a Flat Bed
- 7.16. Converting the Flat Bed to a Cargo Box
- 7.17. Towing Loads
- 7.17.1. Capacity Label
- 7.18. Using Correct Tires and Inflation
- 7.18.1. Inflation
- 7.19. Towing the Utility Vehicle
- 7.20. Transporting the Utility Vehicle
- 7.21. Use Care In Handling and Servicing Batteries
- 7.21.1. Prevent Battery Explosions
- 7.21.2. Charging Safety
- 7.22. Charging the Batteries
- 7.23. Using the Battery Charger
- 7.23.1. Diagnostics Using the Battery Charger 10LED Indicator Display
- 7.23.2. Fault Indications on Charge Plate Gauge or Battery Charger Gauge
- 7.23.3. Other Indications
- 8. Replacement Parts
- 8.1. Service Literature
- 8.1.1. Order Service Parts Online
- 8.2. Part Numbers
- 9. Optional Attachments Kits
- 9.1. Cab Classification According to EN156951 (for Application of Crop Protection Chemicals and Liquid Fertilizer)
- 9.2. Using a Trailer
- 10. Service Intervals
- 10.1. Servicing Your Machine
- 10.2. Break In
- 10.2.1. After First 8 Hours
- 10.3. Every 25 Hours
- 10.4. Every 50 Hours
- 10.5. Every 50 Hours or Annually (whichever comes first)
- 10.6. Every 200 Hours or Annually (whichever comes first)
- 10.7. Every 1000 Hours or 24 Months (whichever comes first)
- 10.8. As Needed
- 11. Service Battery
- 11.1. Battery Safety
- 11.2. Using Deep Cycle Batteries
- 11.2.1. Electrolyte and Specific Gravity
- 11.3. Battery Position and Connection Diagram
- 11.4. Checking Batteries
- 11.5. Tighten Battery Terminal Connections
- 11.6. Tighten Battery Hold Downs
- 11.7. Cleaning or Replacing Batteries
- 11.7.1. Cleaning Batteries
- 11.7.2. Replace Batteries
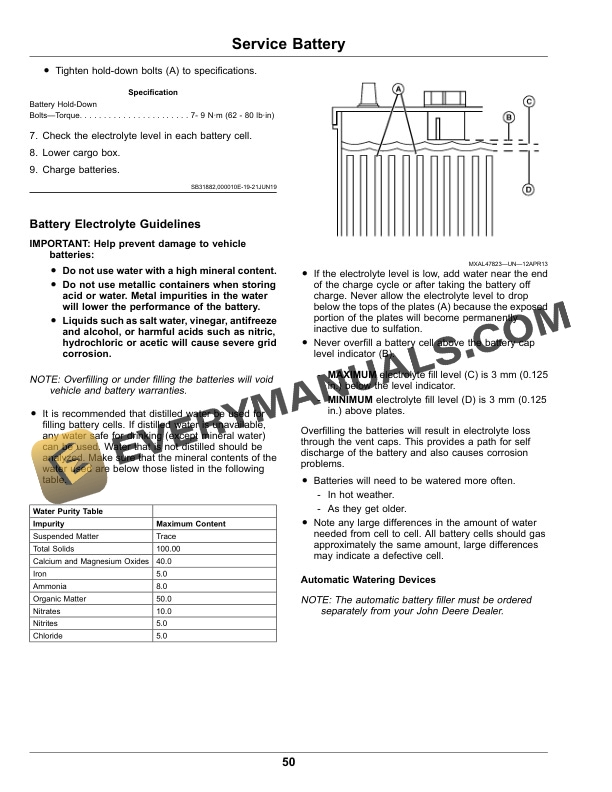
- 11.8. Battery Electrolyte Guidelines
- 11.8.1. Automatic Watering Devices
- 11.8.2. Checking Electrolyte LevelBefore Charging
- 11.8.3. Check Electrolyte LevelAfter Charging
- 11.9. Checking Battery Condition
- 11.9.1. Hydrometer
- 11.10. Using a Hydrometer
- 11.11. Battery Test Log
- 12. Service Steering Brakes
- 12.1. Brake Fluid
- 12.2. Check Brake Fluid Level
- 12.3. Checking Brake Drums (Rear Brakes Only)
- 12.4. Checking Brake Lines (Rear Brakes Only)
- 12.5. Adjusting Park Brake
- 13. Service Electrical
- 13.1. Service Electrical
- 13.2. Replacing Headlight Bulb and Housing
- 13.2.1. Replace 48 Volt Headlight Bulb
- 13.2.2. Replace 12 Volt Headlight Bulb
- 13.2.3. Replace Headlight Housing
- 13.3. Checking and Replacing Fuses
- 14. Service Miscellaneous
- 14.1. Lifting Machine
- 14.1.1. Lifting Rear
- 14.1.2. Lifting Front
- 14.2. Tightening Wheel Hardware
- 14.2.1. Front Wheel Bolts
- 14.2.2. Rear wheel Nuts
- 14.3. Lubricating Front King Pins
- 14.4. Removing and Installing Hood
- 14.4.1. Removing Hood
- 14.4.2. Installing Hood
- 14.5. Replacing Cargo Box Tailgate Bushings
- 14.6. Cleaning and Repairing Cargo Box
- 14.6.1. Repairing Accessory Tubes
- 14.6.2. Cargo Box Floor
- 14.7. Cleaning Vehicle Surfaces
- 14.8. Cleaning Plastic Hood and Body Panel Surfaces
- 14.9. Cleaning and Repairing Metal Surfaces
- 14.9.1. Cleaning
- 14.9.2. Repairing Minor Scratches (surface scratch)
- 14.9.3. Repairing Deep Scratches (bare metal or primer showing)
- 15. Troubleshooting
- 15.1. Using Troubleshooting Chart
- 15.2. Batteries
- 15.3. Battery Charger
- 15.4. Cargo Box
- 16. Storage
- 16.1. Storing Safety
- 16.2. Battery Storage
- 16.3. Preparing Batteries for Storage
- 16.4. Storing the Vehicle
- 16.5. Removing Vehicle from Storage
- 17. Specifications
- 17.1. Batteries
- 17.2. Torque Specifications
- 17.3. Contoller
- 17.4. Electrical
- 17.5. Travel Speeds
- 17.6. Steering and Brakes
- 17.7. Vehicle Dimensions
- 17.8. Ground Clearance
- 17.9. Weights and Capacities
- 17.10. Charger
- 17.11. Recommended Lubricants
- 18. Warranty
- 18.1. Product Warranty
- 18.1.1. United States
- 18.2. Tire Warranty
- 18.3. Limited Battery Warranty For Factory Installed Batteries
- 18.3.1. FREE REPLACEMENT PERIOD
- 18.3.2. PRO RATA ADJUSTMENT (batteries with letter code identification only)
- 18.3.3. THIS WARRANTY DOES NOT COVER
- 18.3.4. LIMITATION OF IMPLIED WARRANTIES AND PURCHASERS REMEDIES
- 18.3.5. NO DEALER WARRANTY
- 18.3.6. WARRANTY TERMS TABLE
- 19. John Deere Quality Statement
- 19.1. John Deere Quality
- 20. Service Record
- 20.1. Record Service Dates